MBL PRO (Motion Blur Lab PRO) is an Adobe Photoshop (or compatible host) plugin capable of producing high-quality, multi-directional and variable-strength motion blur effects quickly and efficiently using motion vectors.
MBL PRO was developed in an effort to achieve complex motion blur effects difficult to produce with today’s existing digital retouching software. It is of particular interest to professional photographers, retouchers and digital artists everywhere.
Real-world examples of motion blur (Wikipedia)
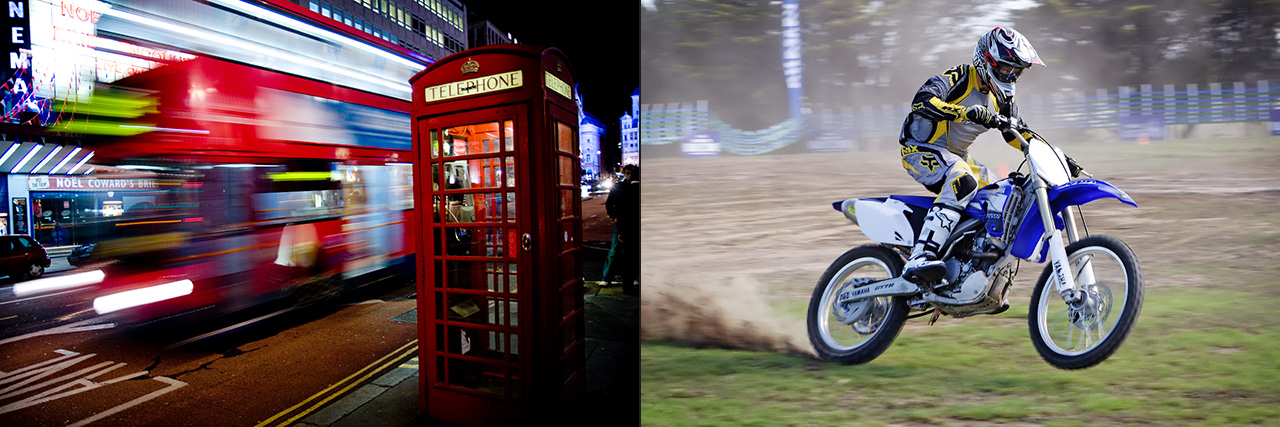
Motion blur is an apparent streaking of moving objects inherent in photography, film and computer graphics when the image being recorded changes during the capture of a single frame, either due to rapid movement or long exposure. The camera’s captured image does not always represent an instant of time but rather the scene over a period of time. Any moving objects in the scene are presented in the image as an integration of all positions, as well as the camera’s viewpoint throughout the exposure time. In such an image, any moving object with respect to the camera will look blurred or smeared along the direction of relative motion. This smearing may occur on an object that is moving or on a static background if the camera is moving. In a film or television image, this looks natural because the human eye perceives it in much the same way. Because the effect is caused by the relative motion between the camera, the objects and the scene, motion blur may be minimized or avoided by panning the camera to track those moving objects. In this case, even with long exposure times, the objects will appear sharper, and the background more blurred.
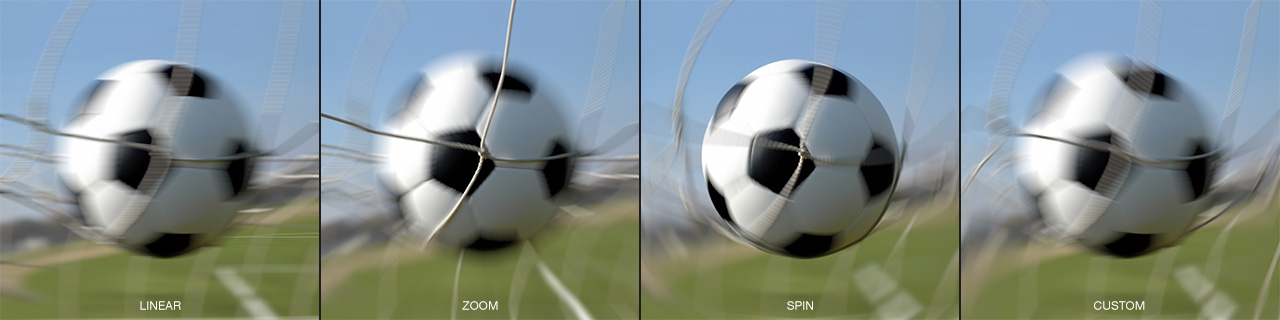
Select the type of blur based on your subject’s performance
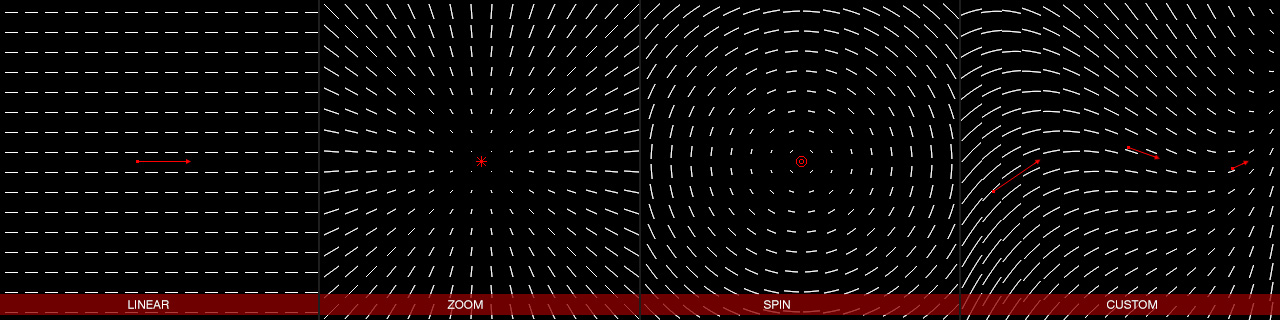
MBL PRO features numerous modes of operation for simulating virtually any type of real-world motion blur. Single vector blurs are useful for linear motion blurs. Zoom blurs are useful for depth-driven motion blurs while spin blurs are useful for rotationally-driven motion blurs. Both offer sophisticated ellipticity and orientation options for dealing with varying perspectives. Finally, multiple vector blurs are useful for complex, multi-directional and variable-strength motion blurs. All motion blur types feature various distribution methods such as constant, increasing, decreasing and soft. Motion blur can be introduced to subjects, backgrounds or both.
Produce multi-directional, variable-strength motion blur effects
Why MBL PRO? Naturally occurring motion blur has extremely complex optical characteristics that are quite difficult to accurately simulate with today’s array of underdeveloped tools. Traditional digital retouching software such as Photoshop provide very basic motion blur capabilities. The linear motion blur filter suffers from severe highlight decay while the zoom and spin filters suffer from excessive noise. The emitters are constrained within the image bounding box and are limited to circular output only, making them unsuitable for perspective-driven images. Multi-directional motion blur with variable-strength output is impossible to achieve as is. Poorly designed GUI’s are hardly intuitive and far too cumbersome for most visual artists. MBL PRO carefully takes into consideration all of these aspects in order to produce a powerful and easy-to-use filter delivering the highest quality motion blur output possible.
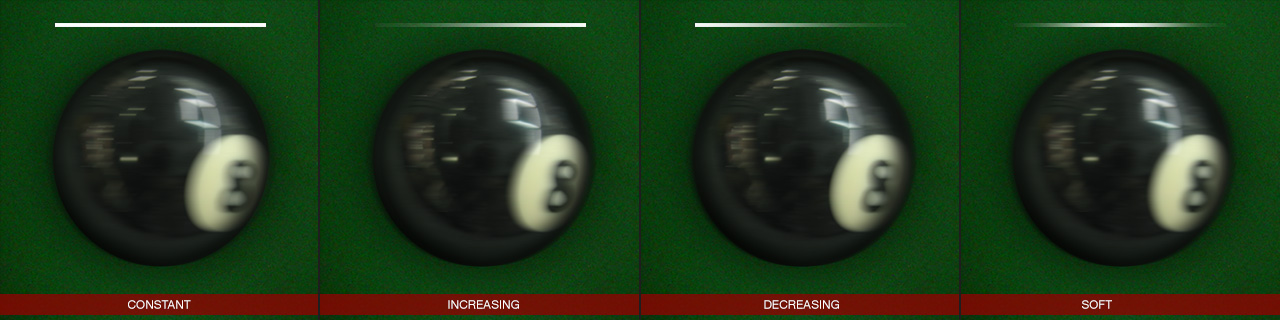
Different distribution models provide creative results
MBL PRO features various motion blur distribution models for more creative results. Distribution affects the way in which the blur is performed throughout the exposure and can vary from the default constant to increasing, decreasing and soft. The effects of the distribution can be especially seen in the highlights.
Powerful, robust and easy-to-use graphical user interface
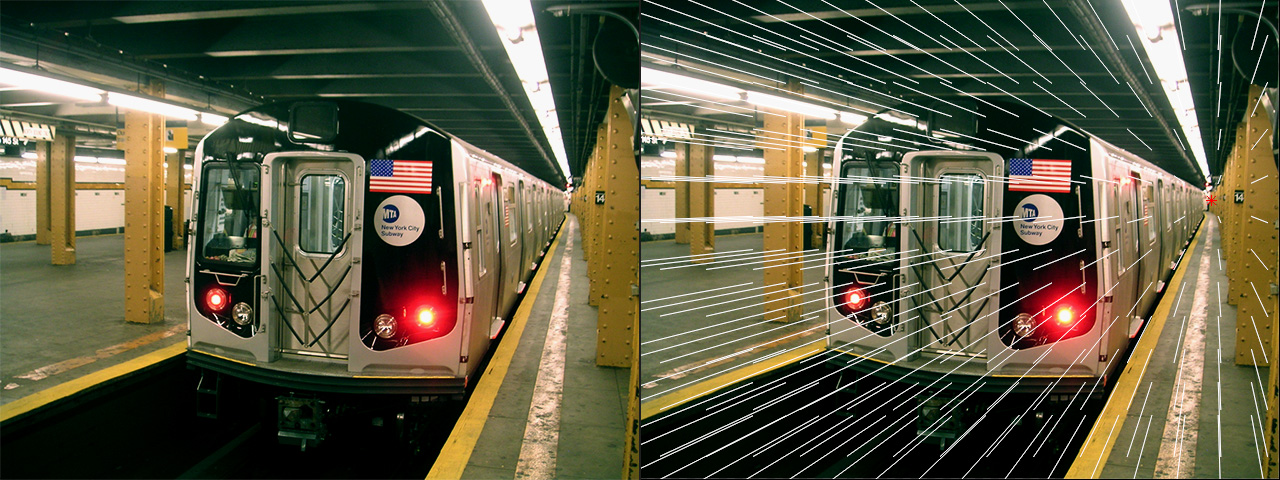
MBL PRO features a powerful, robust and easy-to-use graphical user interface specifically designed for working with motion blur. Motion vectors (in red) are adjusted and the flow field (in white) provides an interpolated preview of the motion blur strength and direction. Motion vectors can be scaled independently to produce varying motion blur strengths for simulating real-world phenomena.
Motion blur foreground elements, backgrounds or both
MBL PRO boasts an impressive featureset to meet today’s creative industry requirements. A fast render preview window with statistical data provides immediate feedback. Multiple types of blur capabilities allow complex simulation of virtually any type of real-world motion blur. Elliptical adjustment along with 360 degree orientation provides options for dealing with subject perspective. Off-image emission centers allow for advanced motion blur effects. Global velocity strength combined with interactive vector lengths offer precise motion blur strength controls. Alternative motion blur distribution models provide creative alternatives to traditional blur results. Powerful highlight preservation and enhancement tuning delivers uncompromised highlights. Motion vector and flow-field customization offers artists the ability to fully customize the GUI. The dialog can be interactively resized allowing larger preview displays limited only by the monitor size. An advanced rendering console provides the artist with detailed instructional messages and responsive progress bars, complete with processing statistics. 24 and 48 bit image processing capabilities ensure compatibility with today’s demanding technical standards. Multicore rendering technology and gigabyte memory management offer unparalleled performance when using production-ready workstations.
Work with layers, transparency, selections or feathered selections
MBL PRO can work on a single composited image or multiple elements broken up into separate layers. Layers can use transparency for motion blur masking. Additionally, any of these workflows can be combined with selections for area masking and even feathered selections for area masking with falloff.
MBL PRO is 100% multi-threaded capable of using an unlimited number of cores for ultimate speed.
MBL PRO supports both 8 bits / channel and 16 bits / channel color modes for professional workflows.
Workflow
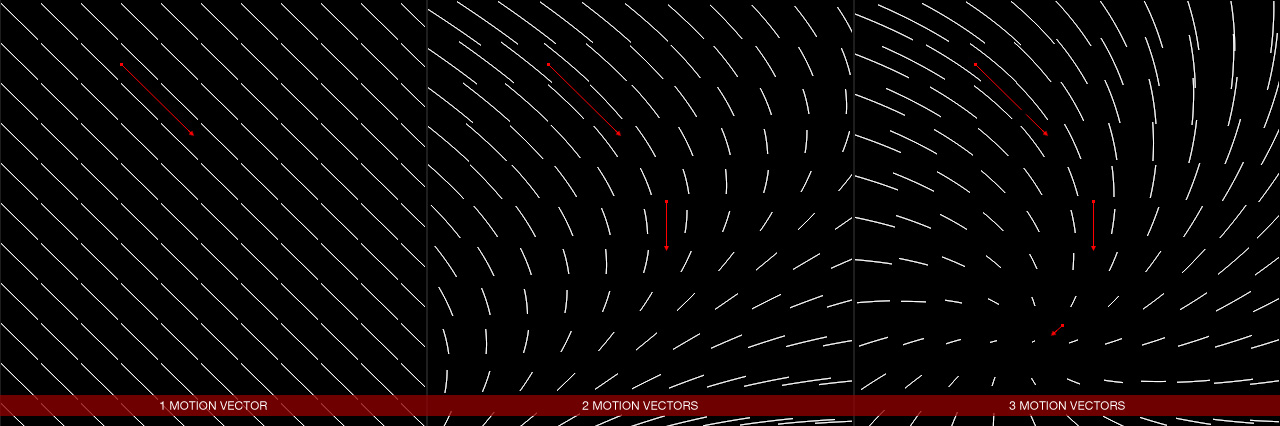
MBL PRO operates by placing and adjusting one, two or three motion vectors to describe the direction and strength of the directional or custom motion blur. Alternately, single points can be placed and adjusted for zoom and spin blurs. This is always performed over a layer that requires motion blur. It’s easy to match motion vectors and points to images as most have clear perspective lines that can be visually aligned.
Perspective matching is easy by visually aligning perspective lines.
When placing motion vectors, a flow field will become visible to describe the motion blur path using interpolation between the one, two or three placed vectors. You can vary the direction of the motion blur throughout the image by adjusting different vector orientations through which the flow field will interpolate across. Similarly, you can vary the strength of the motion blur throughout the image by adjusting different vector lengths through which the flow field will also interpolate across.
Every time a new motion vector is added, the flowfield direction is re-interpolated.
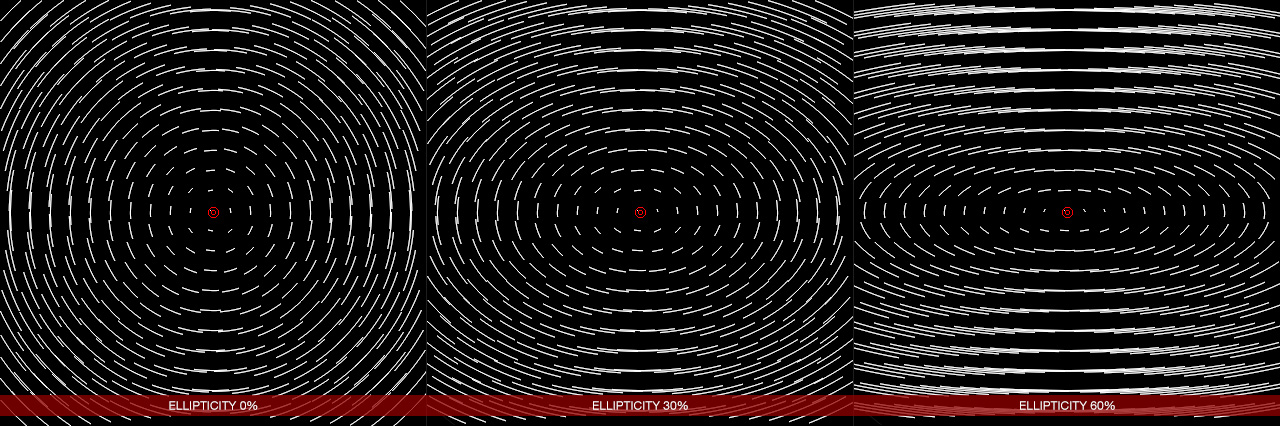
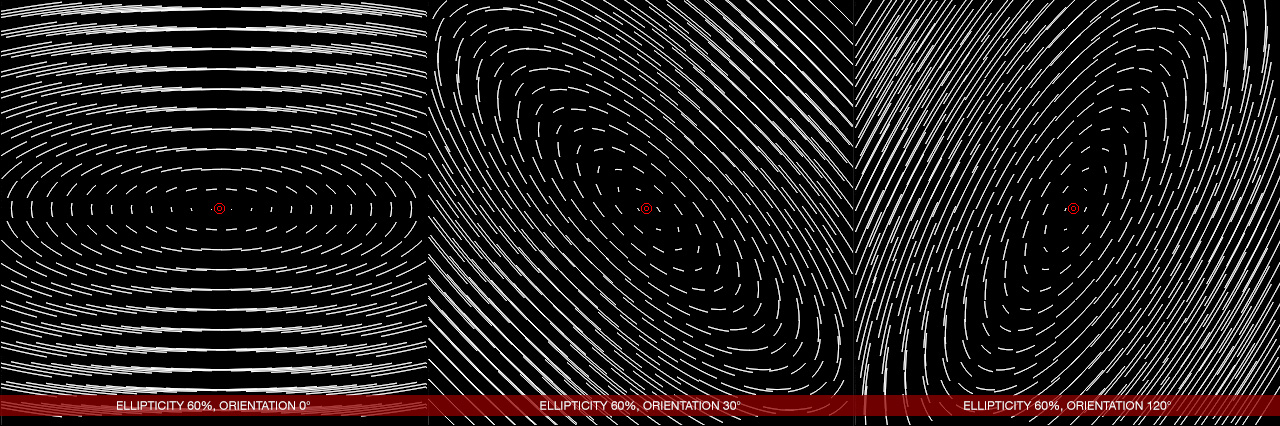
The flow field will also be visible when placing and adjusting points for zoom and spin blur, and it will interpolate across the ellipticity and orientation of the vectors. Generally, ellipticity and orientation are used for perspective-driven subjects such as a ¾ perspective wheel.
Motion vectors consist of a line with a point at one end and an arrow at the other thereby describing the flow of the motion blur. Placing vectors facing each other will produce an entirely different result than vectors following one another.
Best results in separate passes and in layers.
For best results, MBL PRO should be used in separate passes and in layers. Foreground and background objects should be separated on their own layers for ease of use and high quality results. While it is possible to motion blur a foreground object on the same layer as the background, you will have to use feathered selections to compensate for the blur along the edges which produces incorrect results. Backgrounds can be easily motion blurred on the same layer as the foreground object provided you have made accurate selections.
Distribution models should be generally left to the default constant as this is true to a realistic motion blur. Increasing, decreasing and soft produce more creative albeit somewhat unrealistic results.
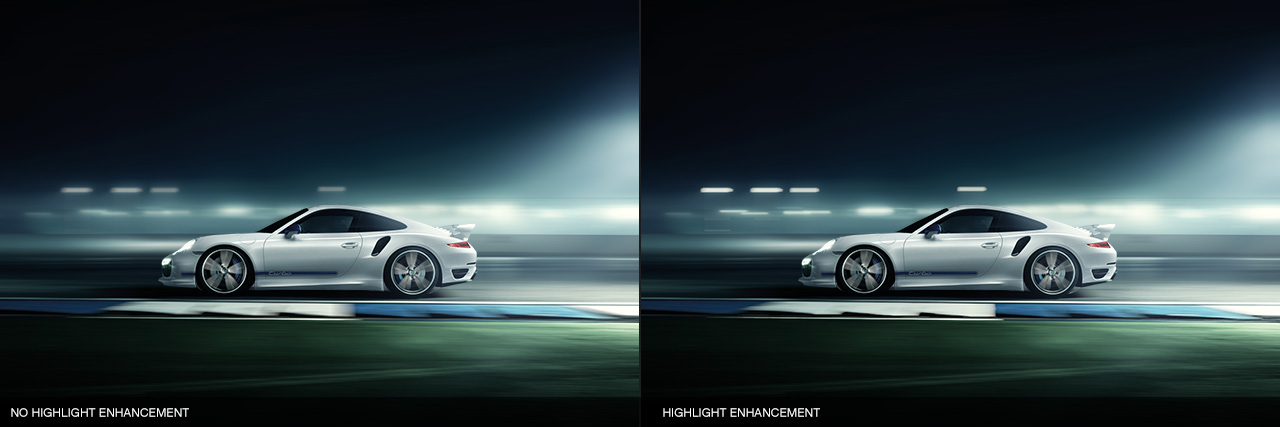
When applying blurs of any kind, highlights tend to suffer and become washed out. Although MBL PRO preserves them better than most applications, the threshold and enhancement tools will allow the user to enhance highlights ensuring they remain crisp and bright.
Each and every time the plugin is invoked, the motion blur settings will be reset. Please keep this in mind when clicking OK / Cancel and make sure to save your settings should you wish to apply them multiple times.
Control Groups
The Graphical User Interface (GUI) is structured into three groups of controls which belong to a logical unit. Individual controls or entire control groups may be enabled or disabled, depending on the settings of other controls.
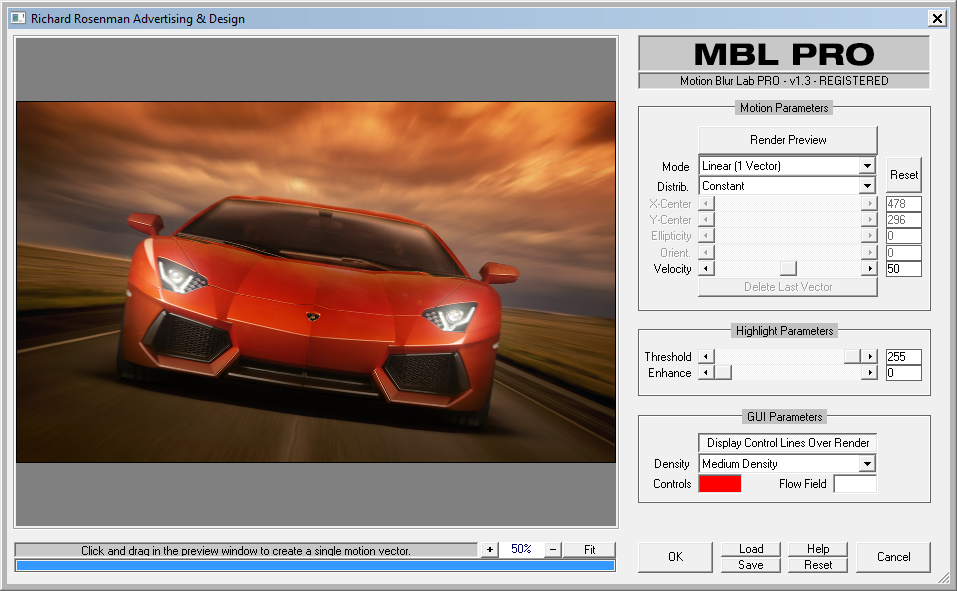
Motion Parameters
This section contains all the controls related to the type of motion blur, its distribution model, placement, ellipticity, orientation and velocity.
Render Preview: This toggles the preview rendering on and off. When enabled, a motion blurred update will follow any adjustment of a control or motion vector.
Mode: This specifies the type of motion blur to use. The following modes are available:
Linear – applies a uniform linear motion blur using one motion vector. Use this for linear motion blurs.
Zoom – applies a zoom blur using a specified center point. Use this for depth-driven motion blurs.
Zoom – applies a spin blur using a specified center point. Use this for rotationally-driven motion blurs.
Custom – applies a multi-directional, variable-strength motion blur using one, two or three motion vectors. This is the most powerful motion blur mode in MBL PRO.
Distribution: This specifies the distribution model of the motion blur. Different distribution models can produce creative results. The following options are available:
Constant – applies a constant distribution of the motion blur. This is a realistic motion blur distribution model. The motion blur leading and trailing the object will remain crisp and bright.
Increasing – applies an increasing distribution of the motion blur. The motion blur trailing the object will appear to fade.
Decreasing – applies a decreasing distribution of the motion blur. The motion blur leading the object will appear to fade.
Soft – applies an increasing and decreasing distribution of the motion blur. The motion blur leading and trailing the object will appear to fade.
X & Y Center: When zoom or spin blur are enabled, these controllers specify the center point of the blurs. Center points may lie outside the image boundaries for complex motion blur effects.
Ellipticity: When zoom or spin blur are enabled, this controller specifies the ellipticity of the motion blurs. Ellipticity is especially useful for perspective-driven subjects such as a ¾ perspective wheel.
Orientation: When zoom or spin blur are enabled, this controller specifies the orientation of the ellipticity.
Velocity: Specifies the global strength of the motion blur. Unlike adjusting the strength of individual motion vectors, this adjusts the strength of all vectors and points.
Reset: Resets the motion parameters to default settings.
Highlight Parameters
This control group deals with highlight management. Due to the limited dynamic range of the image, highlights are usually clipped as a trade-off to a reasonable overall exposure. When highlights are motion blurred, this truncated light intensity may be restored using these tools as the light is distributed over a larger area.
Threshold: Determines the onset of highlights. Image areas with brightness values above threshold will be enhanced in order to restore their original (unclipped) brightness.
Enhancement: Controls the amount of enhancement. Careful adjustment is recommended, as too high values will result in white and aliased highlights.
GUI Parameters
This control group deals with the graphical user interface. MBL PRO has been designed with a unique, robust and user-friendly interface that can be finely tuned by the artist.
Display Control Lines Over Render: When render preview is enabled, this will draw the motion vectors and zoom / spin center points so that they can be adjusted further. If you want to see your preview render without any obstructions, simply disable this feature.
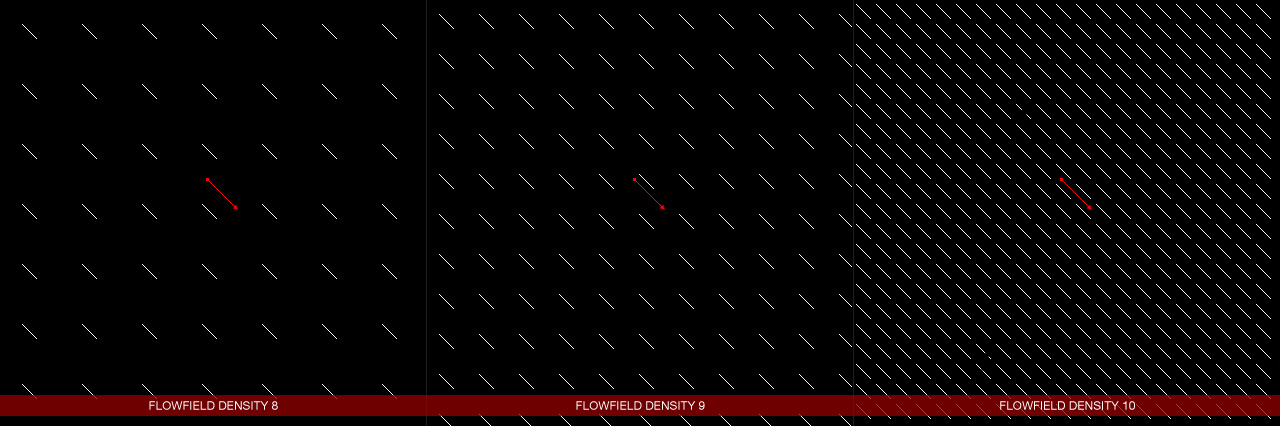
Density: This controls the density of the flow field. The default value of 7 is a good value for most cases. Lower values display fewer flow field lines.
Control and Flow Field Color Swatches: These color swatches may be adjusted to change the motion vector, zoom / spin center point and flow field colors. This is useful when your image contains similar colors to the motion vectors, zoom / spin center points and flow field colors.
Preview Window Parameters
This control group deals with rendering the preview, providing instructional messages and printing statistics.
Progress Bar: Indicates the currently processed percentage of the preview.
Status Line: Provides instructional messages while not in ‘Preview Render’ mode. Otherwise provides numerical statistics on the currently processed percentage of the preview, the number of system cores used for rendering and the total processing time once complete.
Zoom: Displays the image in different zoom levels for potentially faster previewing.
Fit: Sizes the preview image to the largest possible size that will fit in the preview.
Other Control Parameters
These controls deal with the general functioning and operation of the filter.
Dialog Resize: By clicking and dragging the bottom right hand corner of MBL PRO, you can interactively resize the dialogue.
Load/Save: Allows you to load or save your current settings.
Reset: Resets all controllers to default settings.
OK/Cancel: Apply or cancel the filter respectively. You must be a registered user in order to apply the filter.
Help: Displays general information.
Changelog
v1.0 – First release.
v1.1 – 64 bit release.
v1.2 – Fixed file access crashing bug in Windows 10.
v1.3 – Fixed plugin freezing with high resolution images.
v1.4 – Fixed incorrect logo display when using larger fonts or DPI.
v1.4 – Centered interface to screen on first launch.
Special Thanks
Martin Vicanek
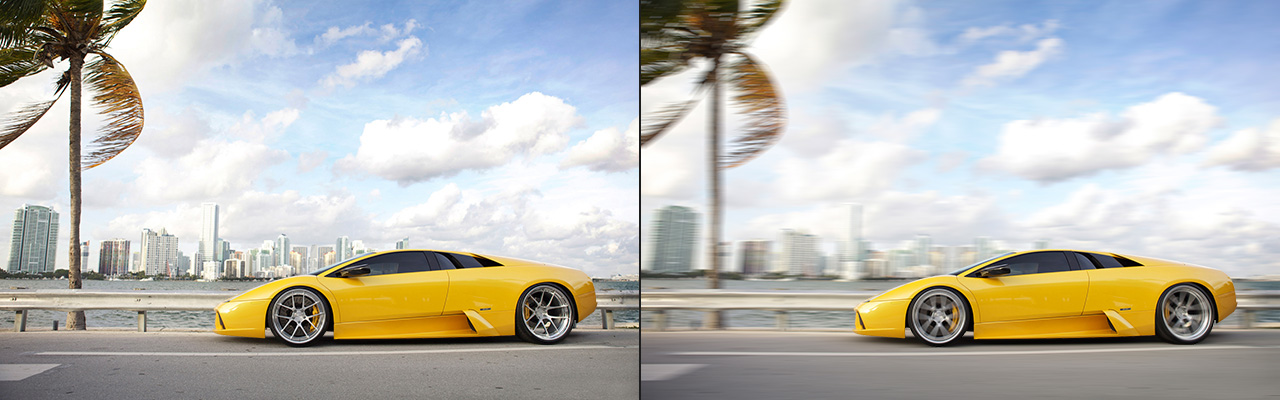
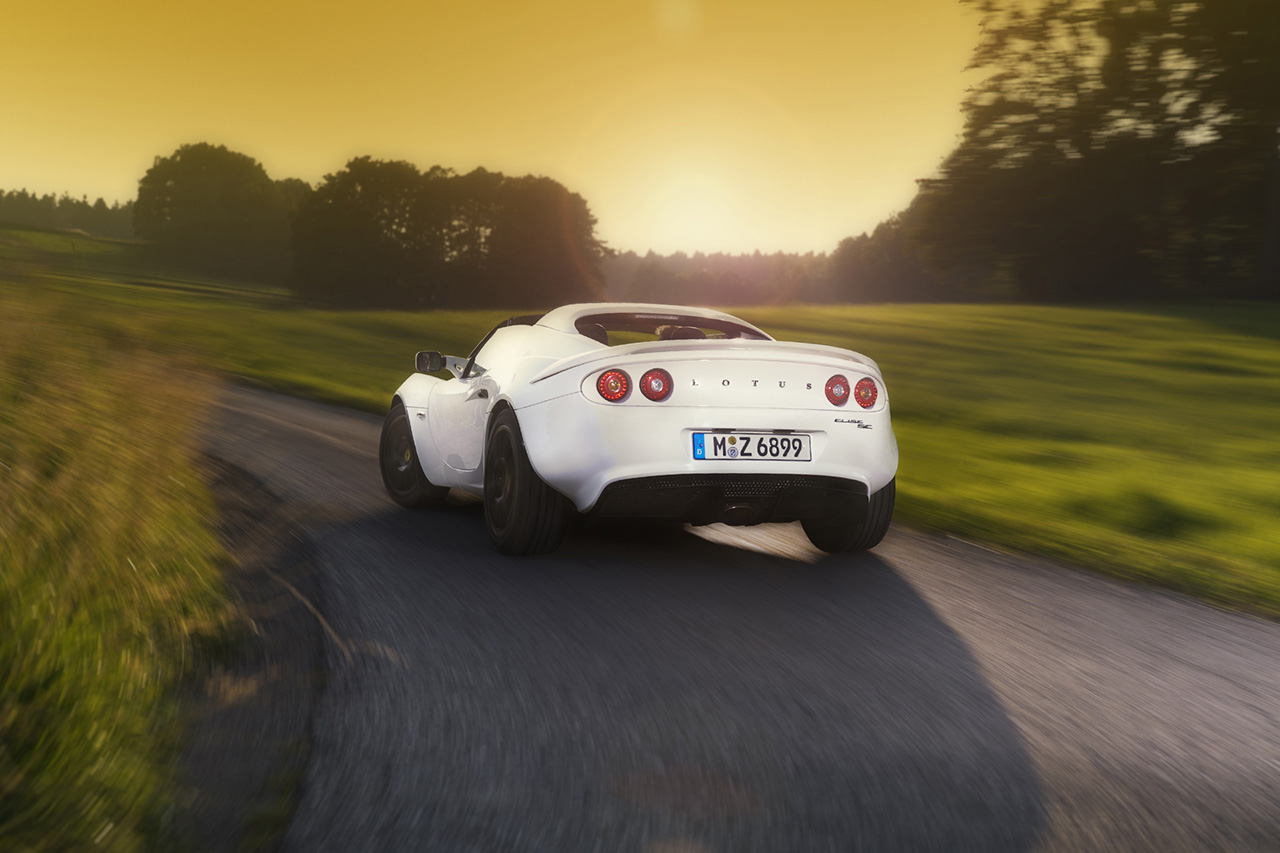
Image Credit: Lamborghini
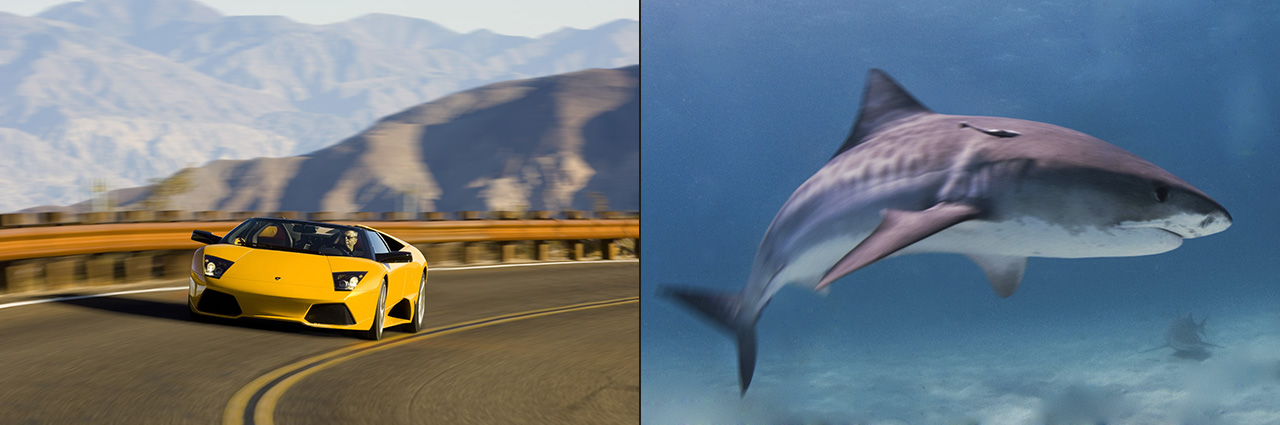
This image is a great example of MBL PRO’s multi-directional and variable-strength motion blur capabilities. Because the road contains a convex curve (as seen in the lower left edge bending further left and the top right edge bending further right), standard zoom blurs are inadequate for this purpose. Using MBL PRO’s custom motion blur, we were able to place three motion vectors tracing the perspective and curvature of the road to produce a correct motion blur effect. The distant road motion vector was shorter than the foreground road ones so as to produce less motion blur in the distance and more in the foreground. Additionally, the vehicle wheels were motion blurred using spin blur with a high ellipticity value, combined with correct orientation for matching the perspective. This image was produced with feathered selections so as to leave the distance unaffected.
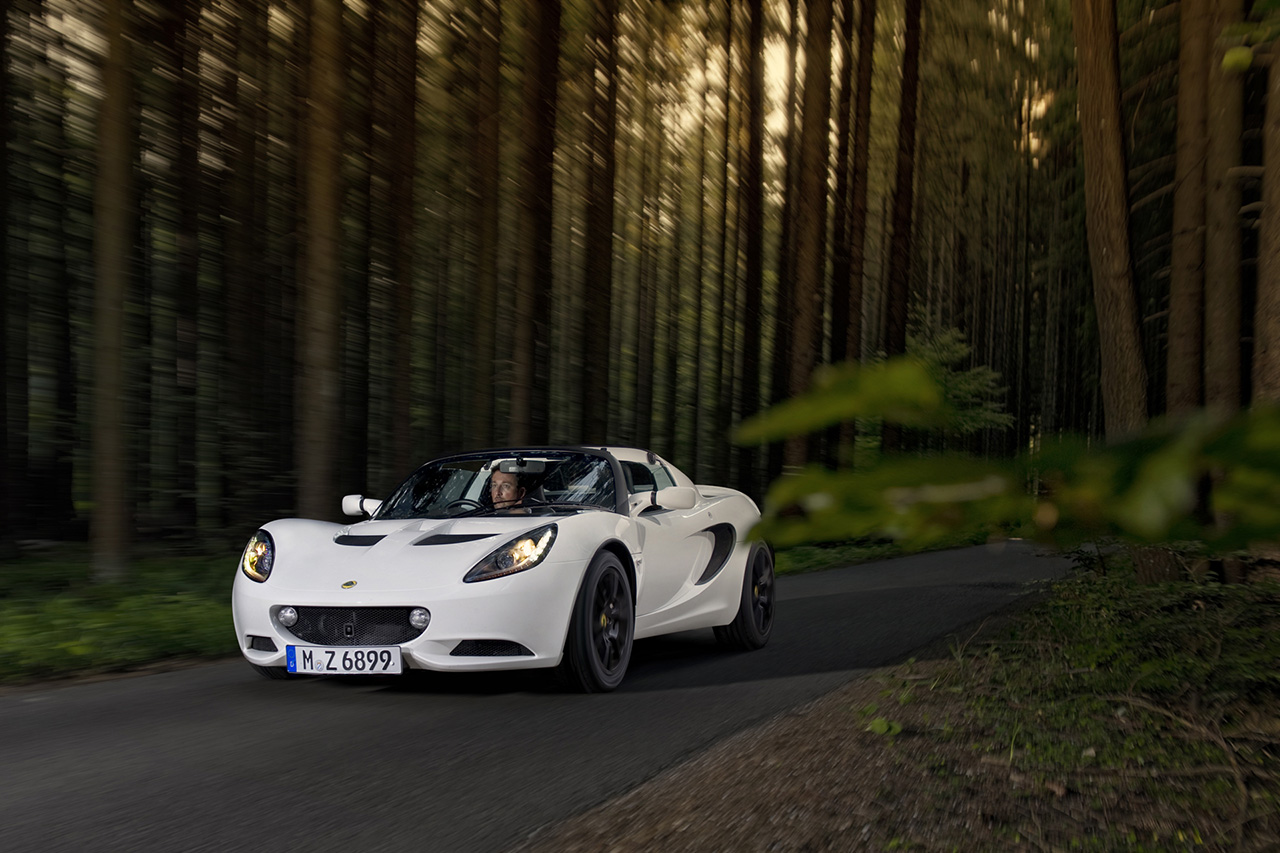
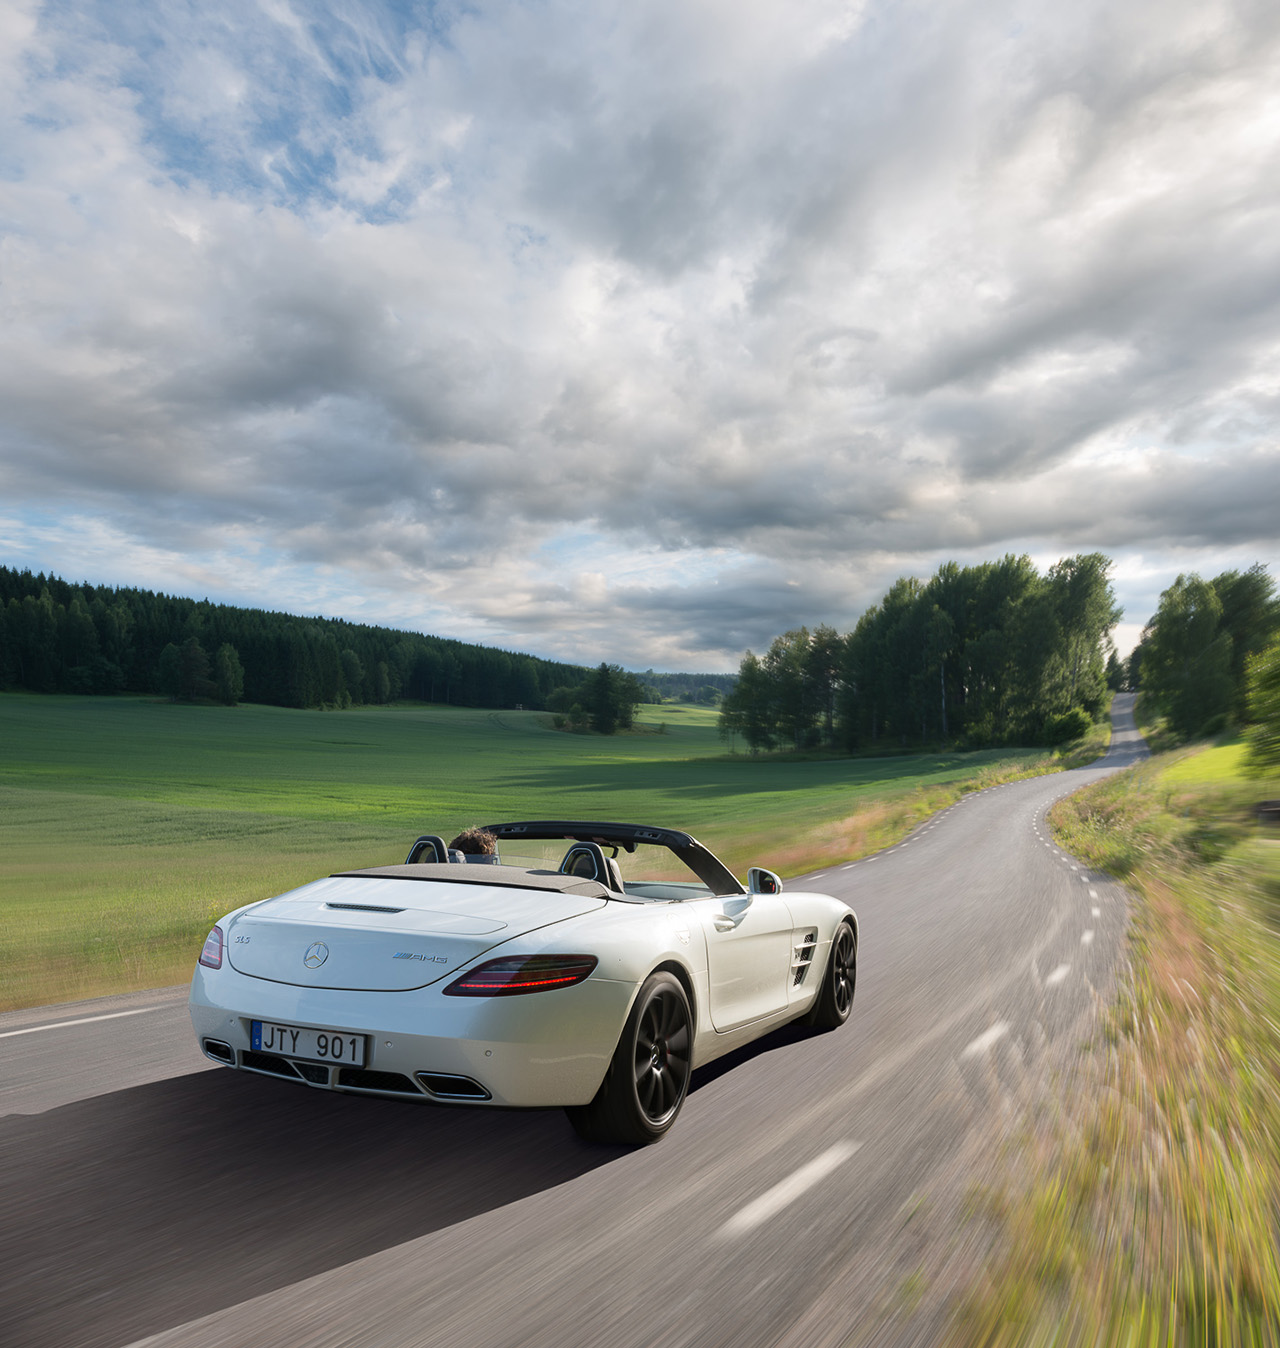
Image Credit: v12-gt.com
This image is a good example of how to work with MBL PRO using passes and layers. The background was been separated from the foreground road, which was also been separated from the vehicle. First, a small amount of linear motion blur was applied to the background and the project settings were saved. Then the same project settings were reloaded and applied to the foreground road but with a higher velocity value to compensate for distance perspective. Finally, each wheel was individually motion blurred using spin blur combined with selections. Elliptical spin blur was used on the rear wheel due to the ovular camera lens distortion. As a final touch, the project was once again reloaded and the linear motion blur applied to the selected inside transparent window of the vehicle through which we can see the background environment.
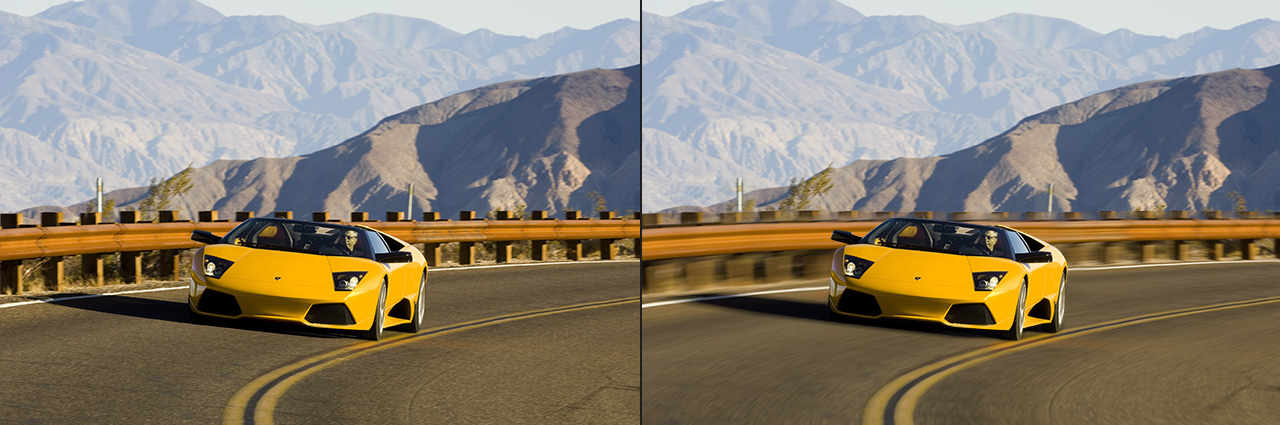
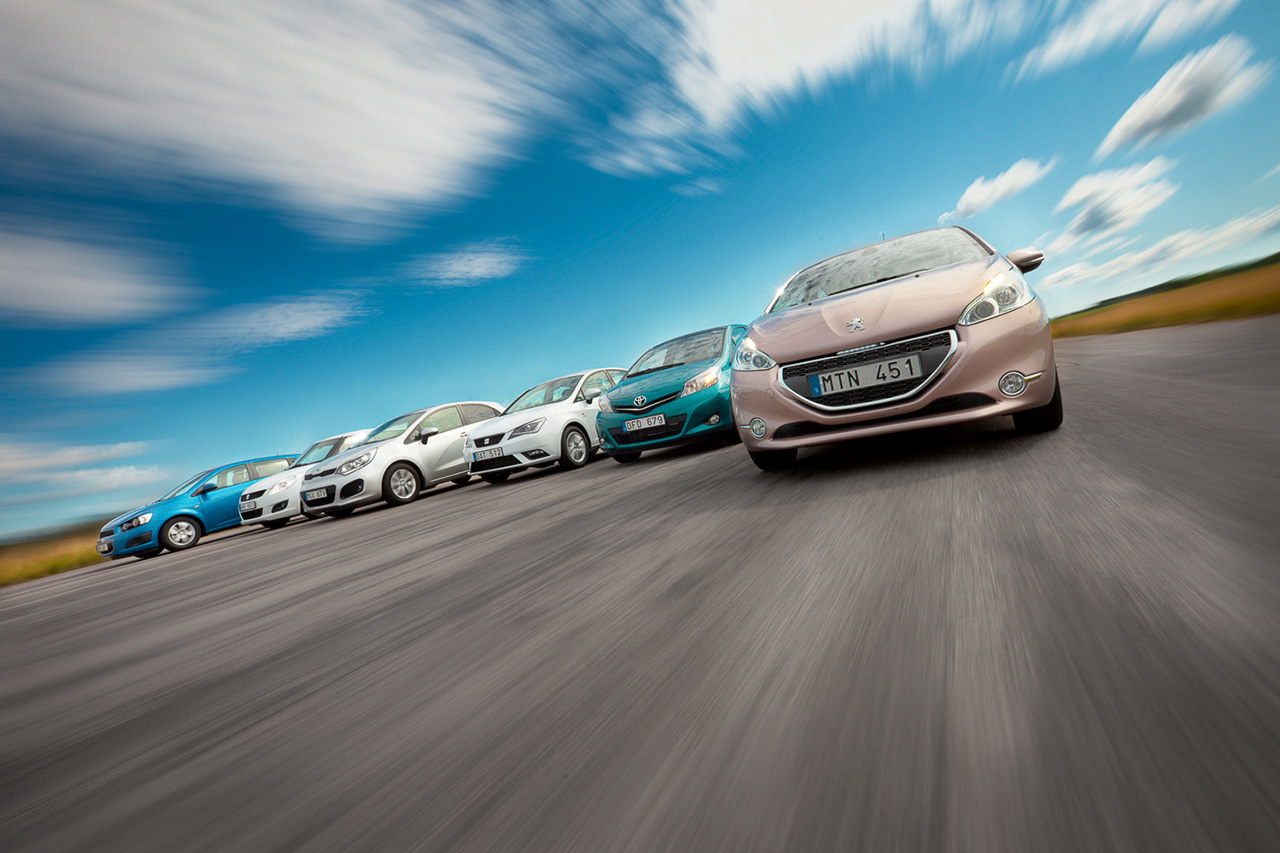
Image Credit: avto.goodfon.com
This third and final vehicle shot involves extreme multi-directional motion blur, specifically on the road. Once again, the image was separated into layers involving the distant hills, midground hills, foreground road and the vehicle. This many layers weren’t necessarily required but it provided the most control and the best results. First the custom motion vectors were placed so as to match the road curvature and perspective while ensuring they remained shorter as the road fell into the distance. The project settings were saved and the effect applied to the distant hills. The settings were then reloaded and applied to the midground hills with a higher velocity value and finally one last time to the road with the highest velocity value yet. By applying different motion blur amounts to the background based on distance, we create a much more realistic motion blur effect.
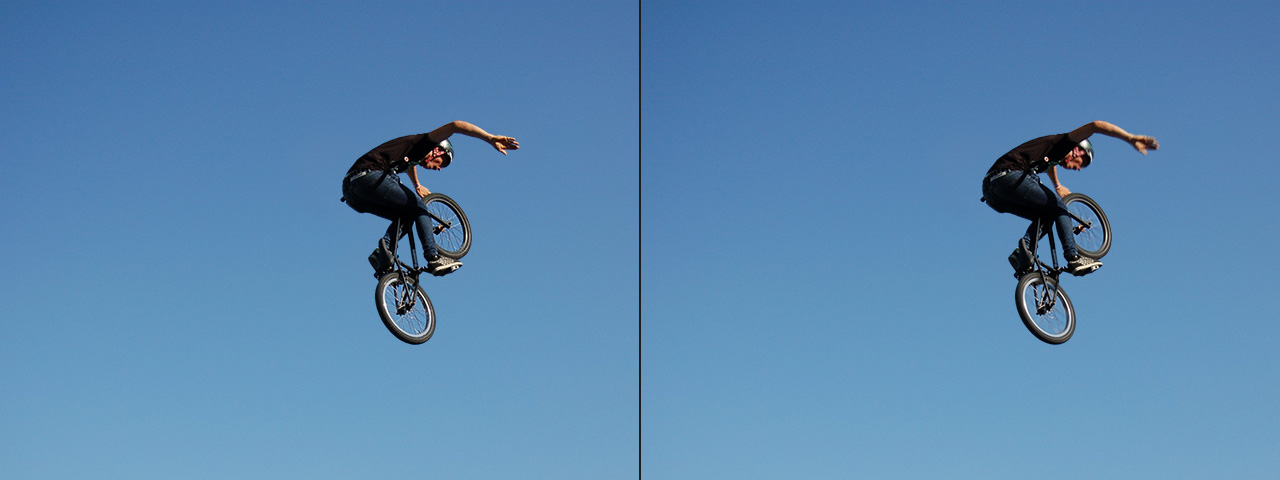
Image Credit: pwet.fr
This image was created in multiple passes using only spin motion blur. The bike has been separated from the background. First the wheels were masked with selections and elliptical spin blur applied to each. Then the arms were masked with selections and spin blur applied with center points located at the elbows. Finally, the head was masked with selections and spin blur applied with the center point located at the neck. The amount of motion blur was kept subtle in order to achieve a convincingly realistic motion blur effect.
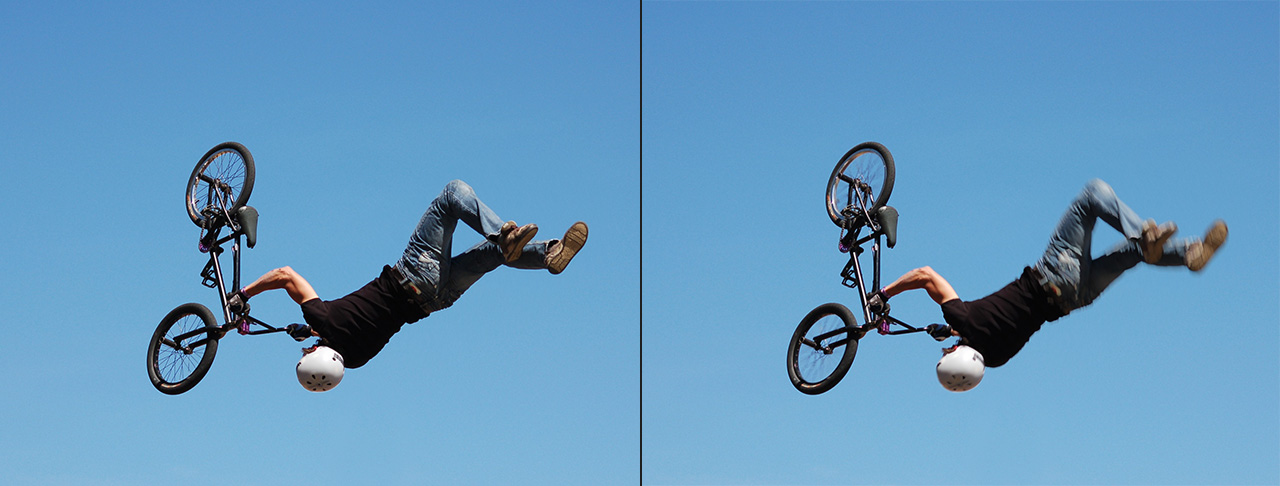
Image Credit: pwet.fr
This image was once again created in multiple passes using only spin motion blur. The bike has been separated from the background. First the wheels were masked with selections and elliptical spin blur applied to each. Then the body was masked with selections and spin blur applied with the center point located at the handlebars. The amount of motion blur was kept subtle in order to achieve a convincingly realistic motion blur effect.
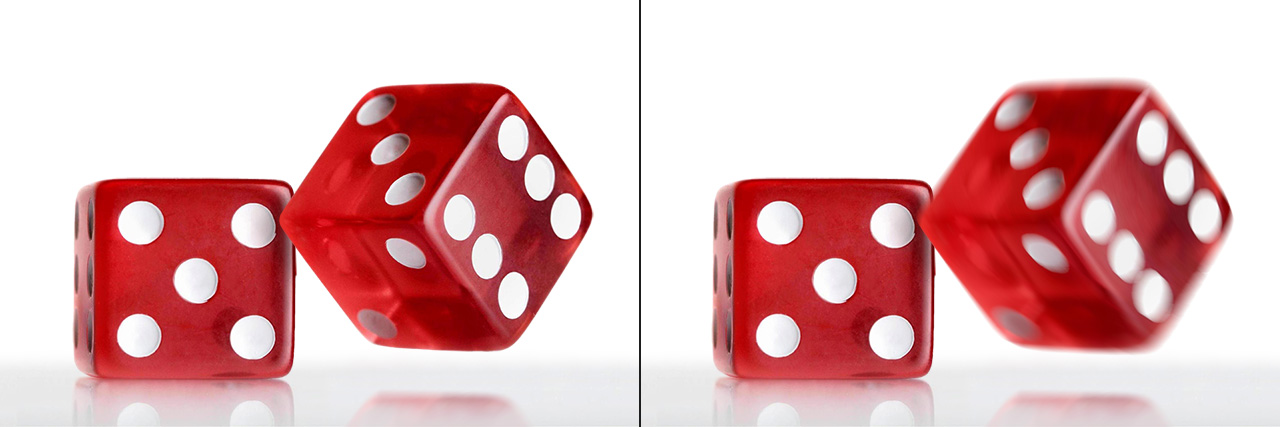
Image Credit: floridalifetimeimpact.com
This image was created in multiple layers. Each die has been separated into its own layer. Custom motion blur was applied to the foreground die in order to achieve a curved motion blur however, off-image elliptical spin blur could have created a similar result.
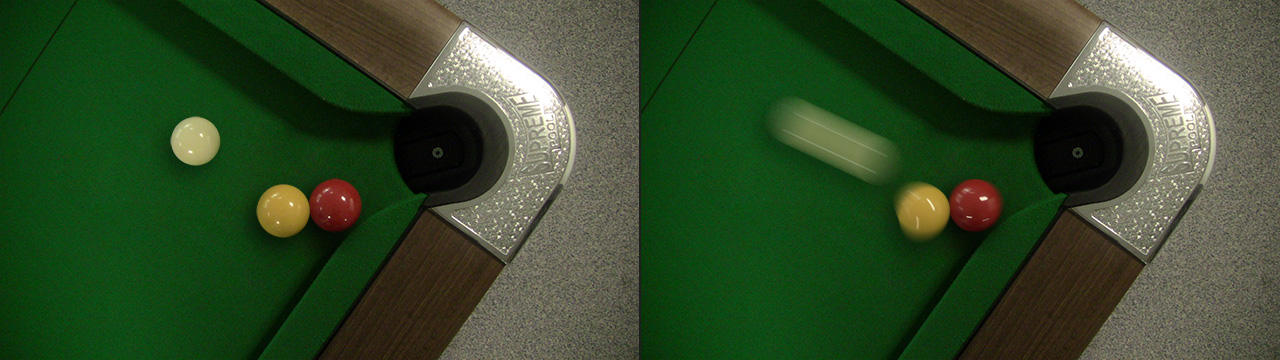
Image Credit: en.wikipedia.org
This image is a good example of MBL PRO’s highlight preservation features. Each billiard ball was separated into its own layer and processed with linear and/or custom motion blur to achieve an illusion of intercollision. With most motion blur processors, highlights become clipped and muted under such extreme cases. However, with MBL PRO the highlights on the billiard balls were preserved and remain crisp and bright.
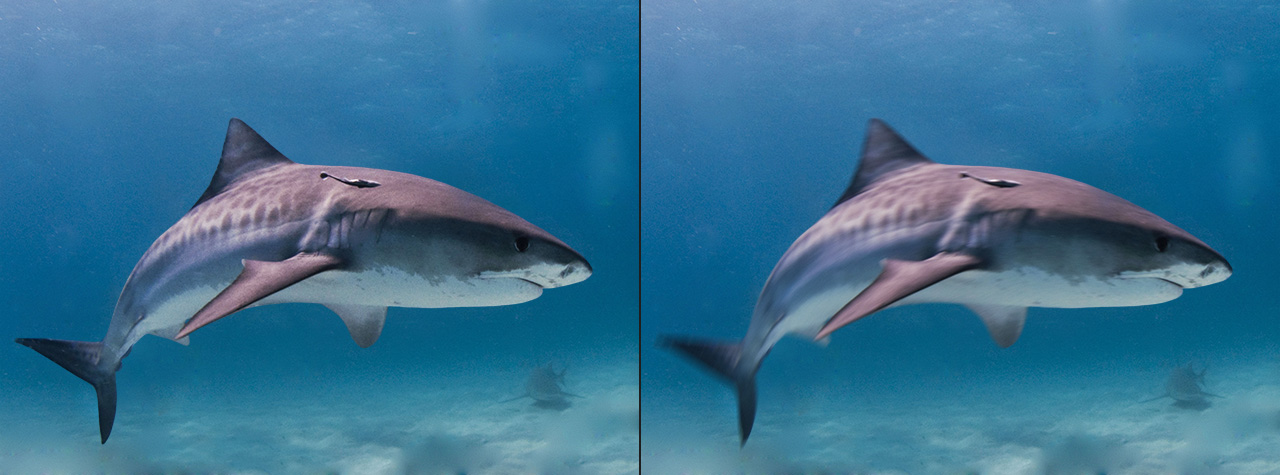
Image Credit: en.wikipedia.org
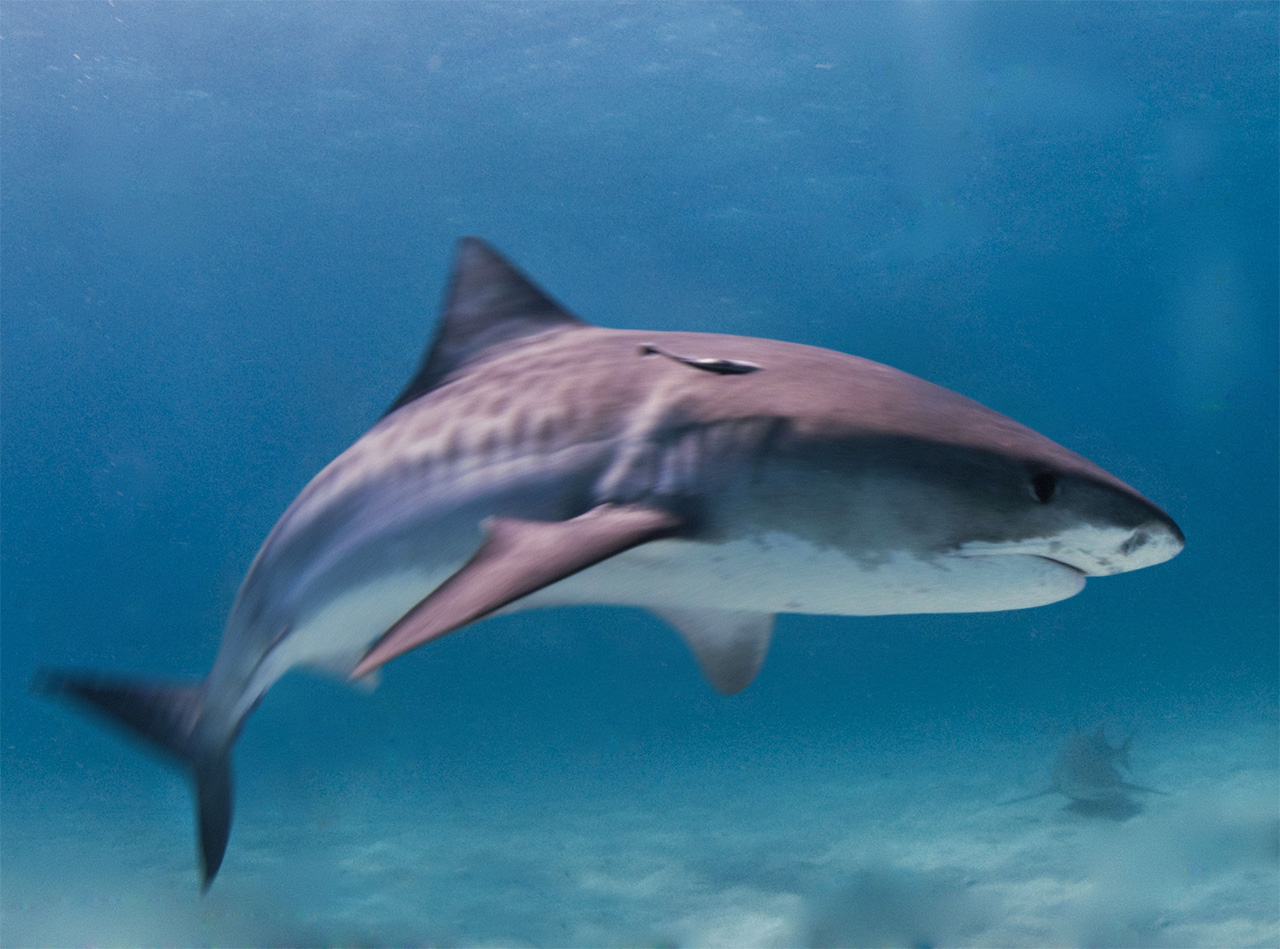
This image was once again created using multi-directional, variable-strength custom motion blur. The shark was separated from the background. The motion blur steadily increases in curvature and strength as it progresses further down the shark’s body.
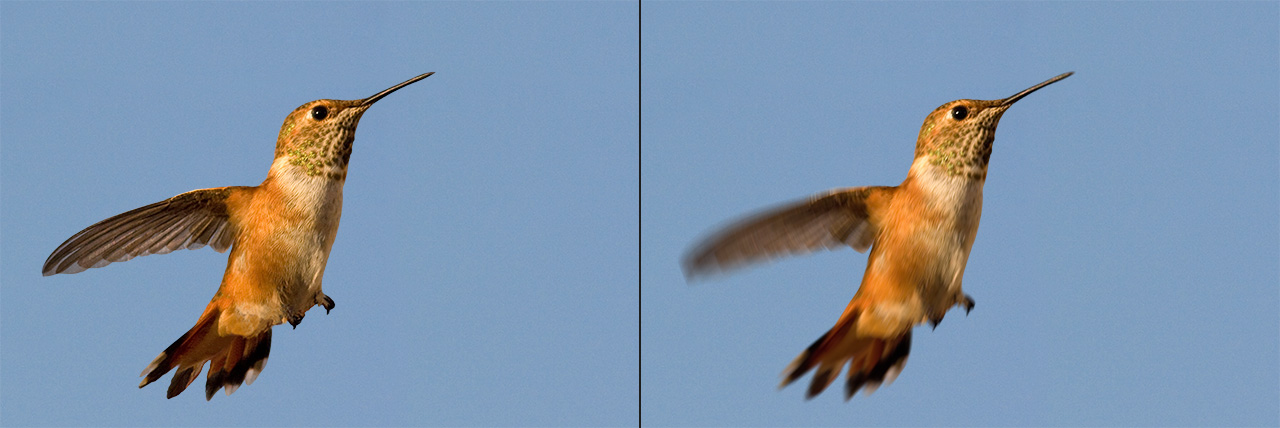
Image Credit: pkwallpapers.com
This image was created in multiple passes and in layers. The hummingbird was separated from the background and elliptical spin blur applied to the wing while multi-directional, variable strength custom motion blur was applied to the body. The motion blur steadily increases in curvature and strength as it progresses further down the hummingbird’s body.
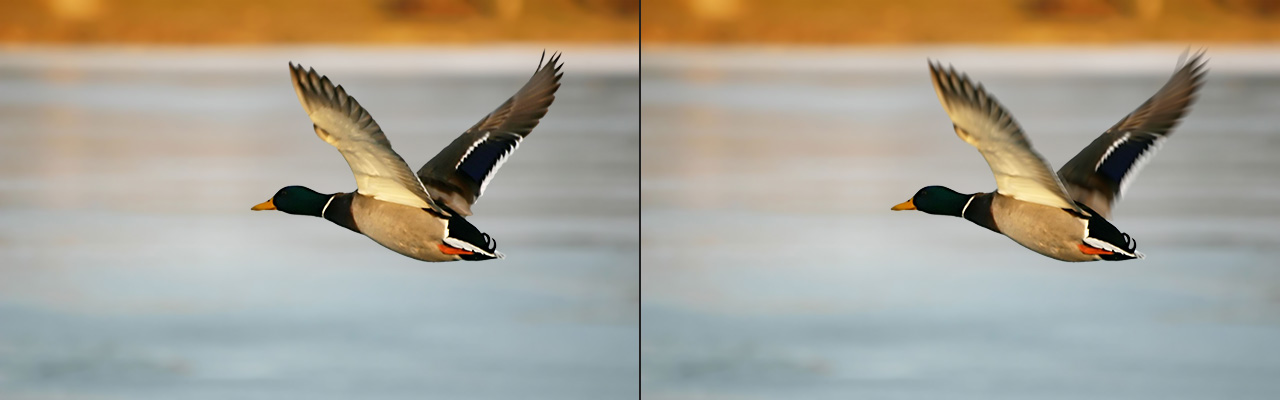
Image Credit: pkwallpapers.com
This image was used as an example of adding additional motion blur to an already motion blurred subject. In this case, the goose’s wings have subtle motion blur but not enough to be clearly seen. Using a combination of elliptical zoom and spin blur masked with selections, we were able to exaggerate the motion blur effect of the wings.
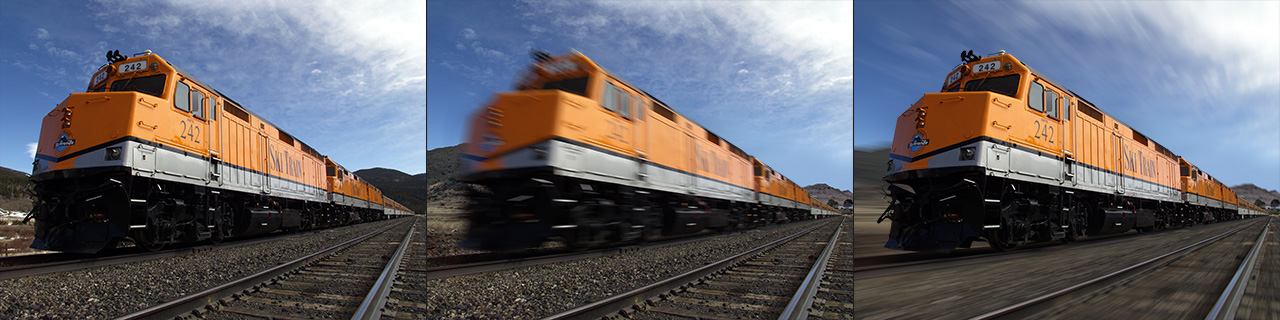
Image Credit: heyokamagazine.com
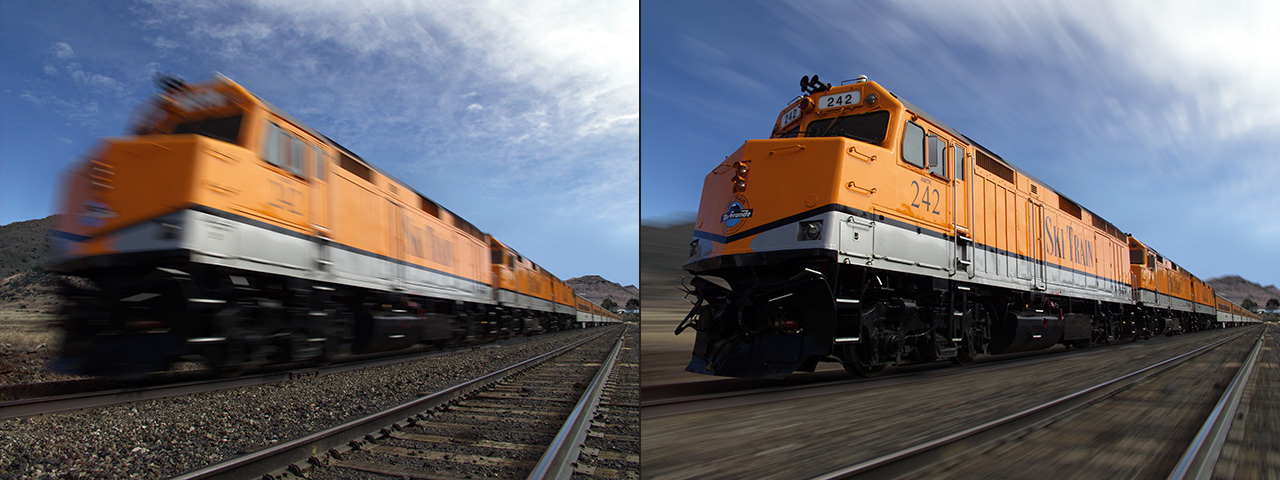
This image exemplifies that any background as well as foreground object can be processed in order to achieve different motion blur results. This is true for any of the examples shown above. The train has been separated from the background and this allows us to motion the background alone thus creating an illusion that the camera is tracking with the train. Alternately, we can motion blur the train only, thus creating an illusion that the camera is locked to the ground. Zoom blur with highlight preservation was used in this example.
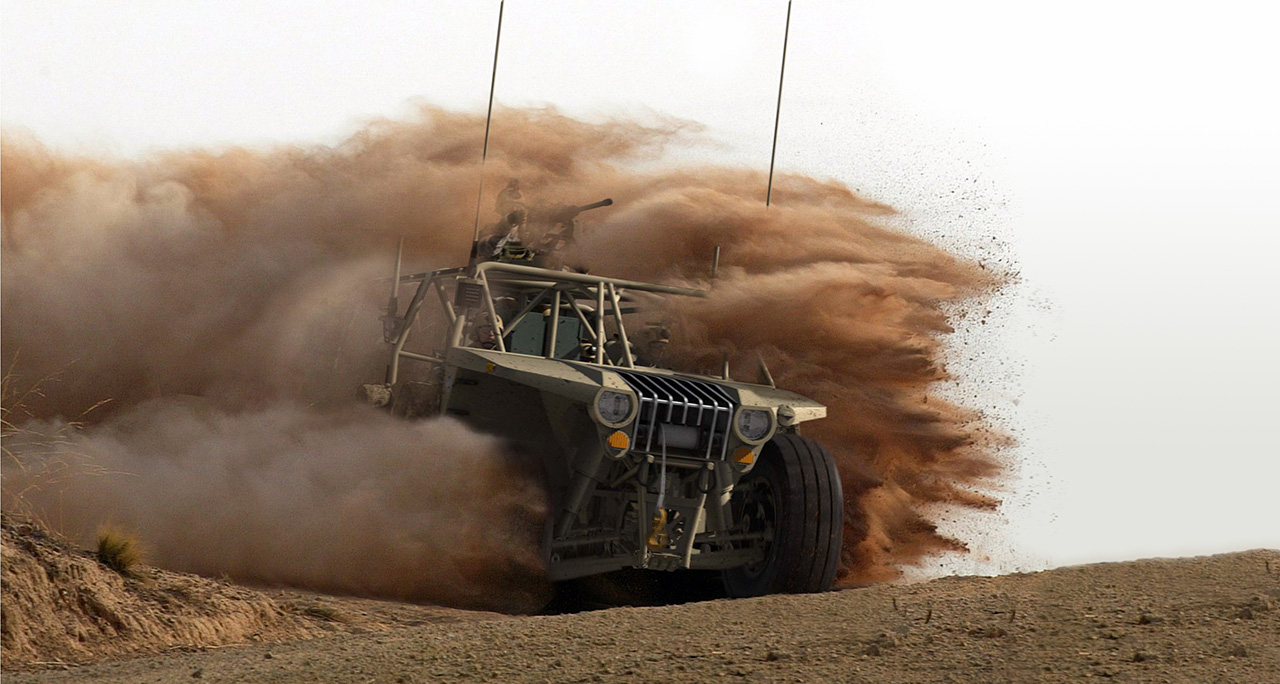
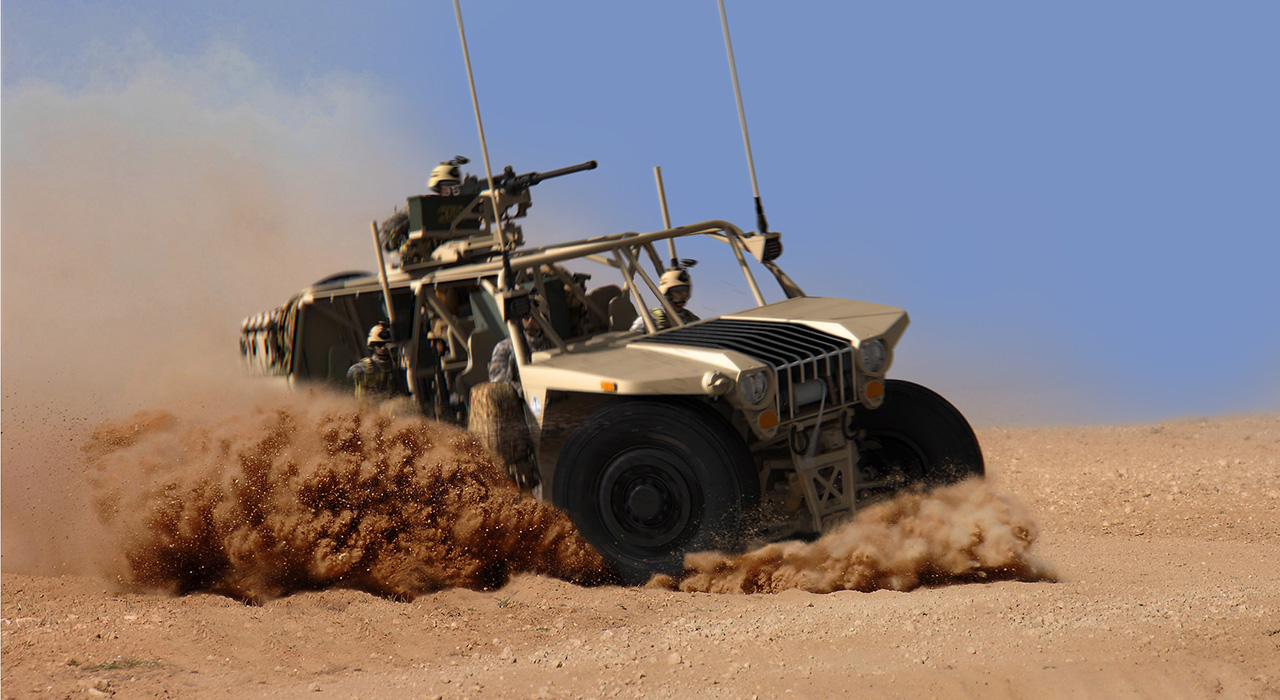
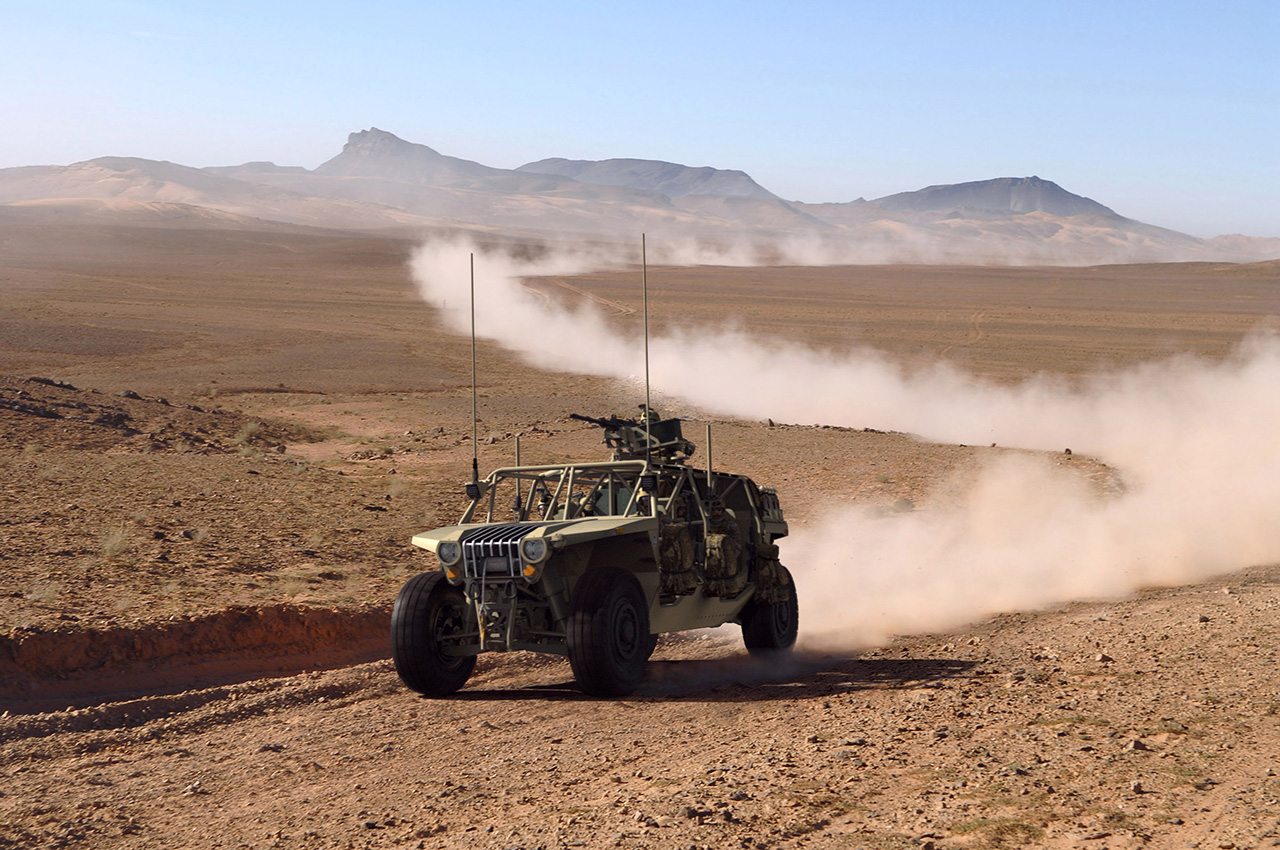
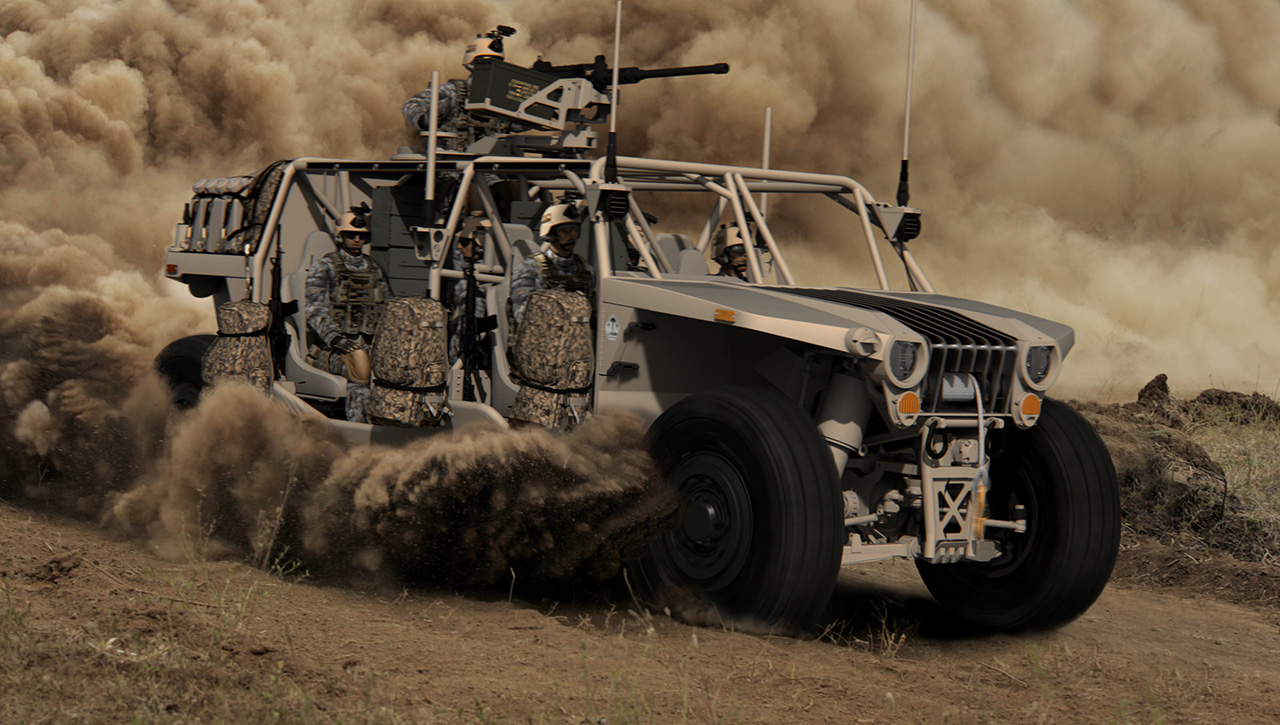
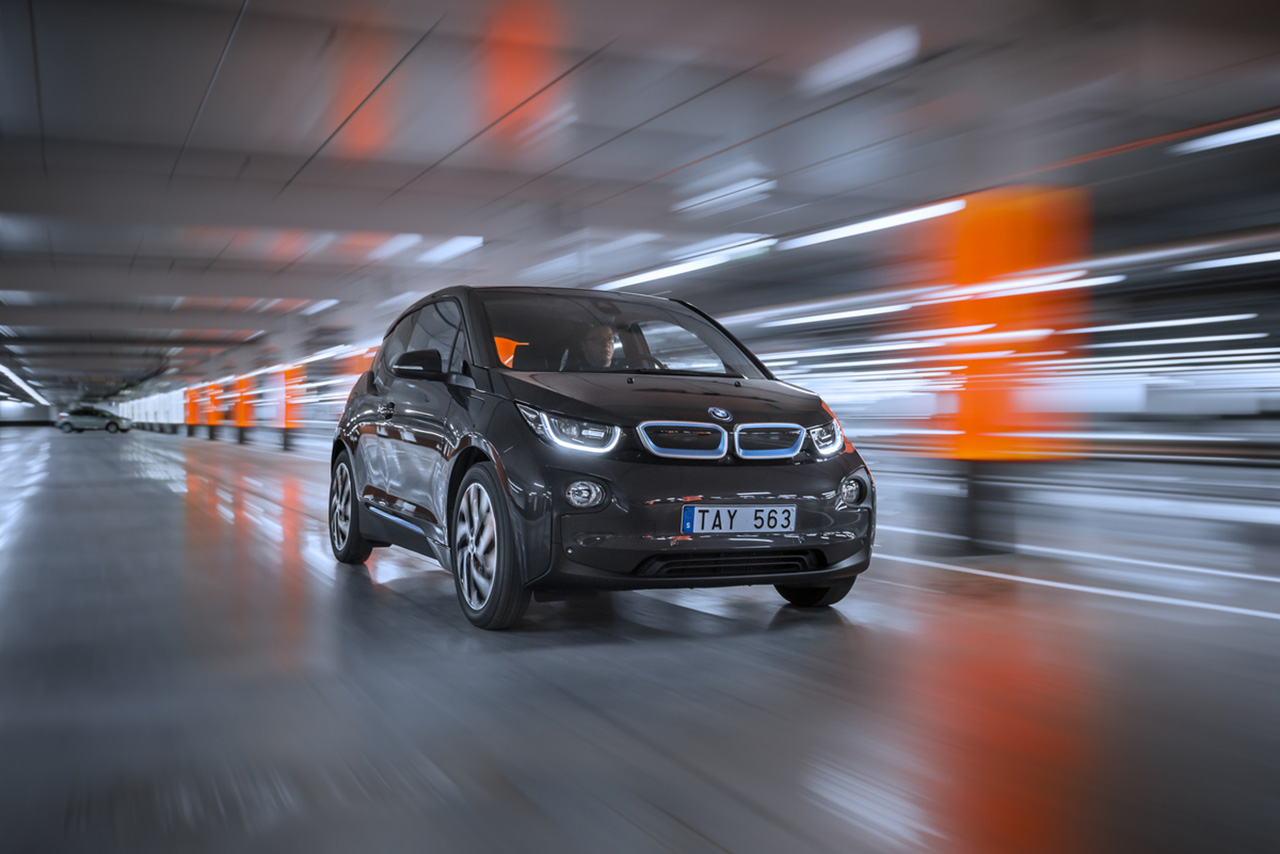
Image Credit: Hydradesignlabs.com
Image Credit: Hydradesignlabs.com
Image Credit: Hydradesignlabs.com
Image Credit: Hydradesignlabs.com
Image Credit: Hydradesignlabs.com
Image Credit: Hydradesignlabs.com
Some stunning conceptual automotive work created by Jon Hull at Hydra Designs Lab, extensively using MBL PRO.
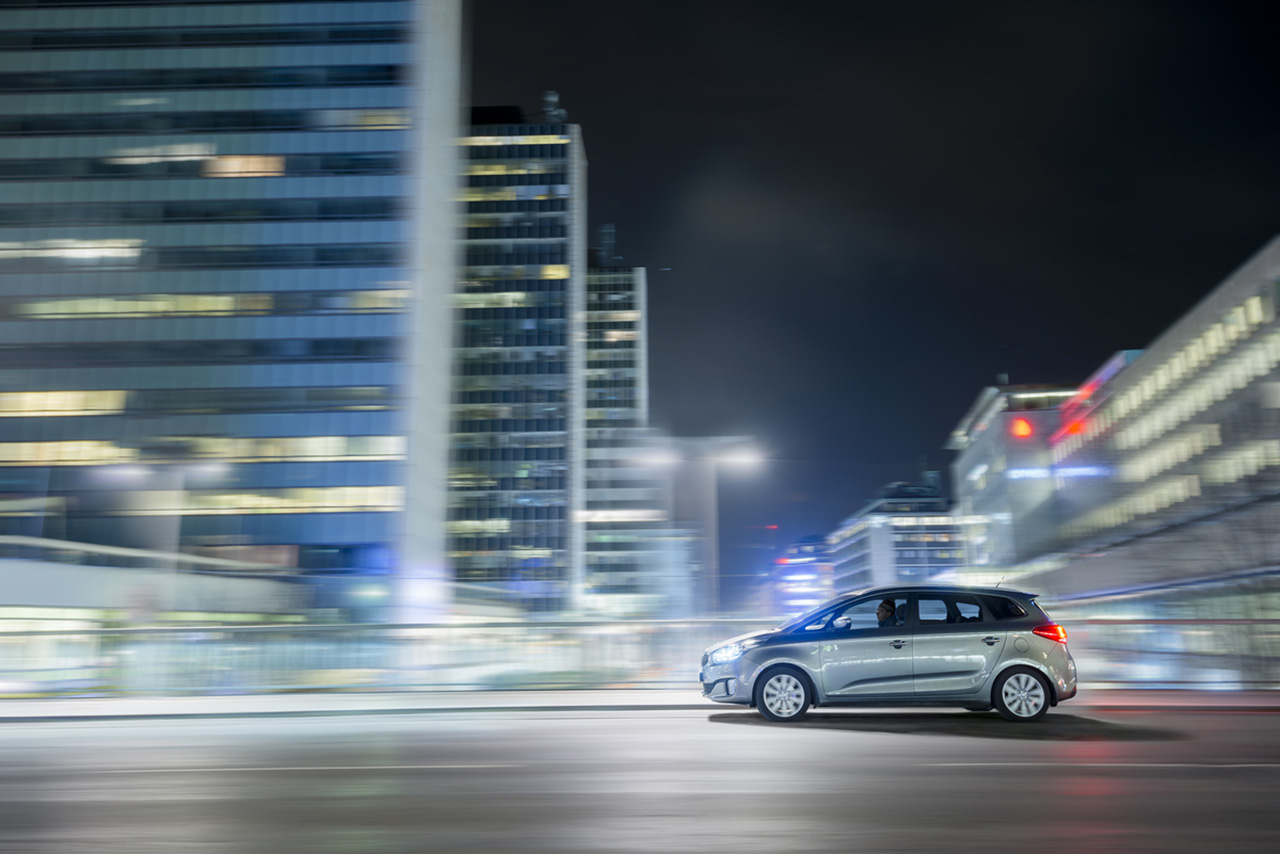
Image Credit: Wimmer Fotografie
Image Credit: Wimmer Fotografie
Gorgeous automotive work created by Christian Wimmer at Wimmer Fotografie using MBL PRO.
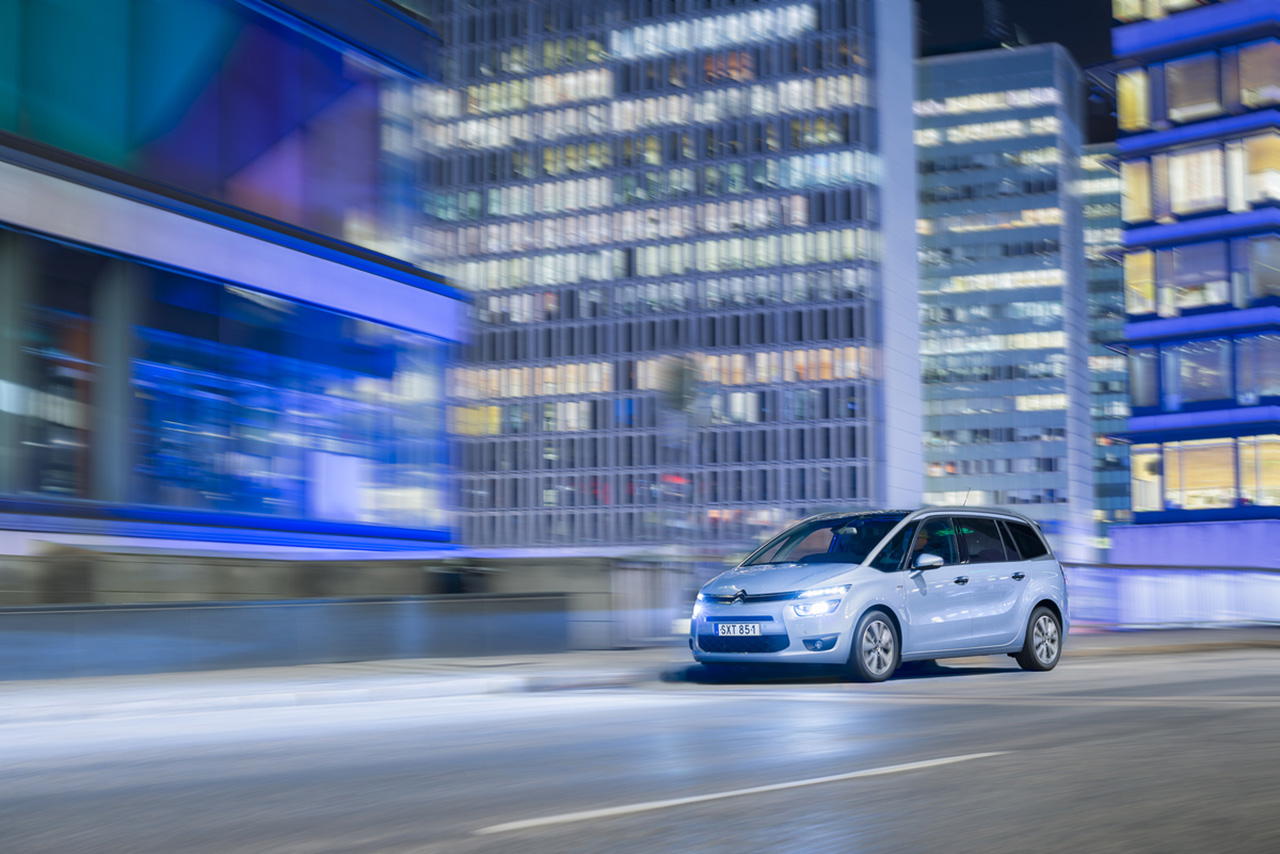
Image Credit: www.erikhagman.com
Image Credit: www.erikhagman.com
Image Credit: www.erikhagman.com
Image Credit: www.erikhagman.com
Image Credit: www.erikhagman.com
Image Credit: www.erikhagman.com
Image Credit: www.erikhagman.com
Awesome automotive work created by Erik Hagman at www.erikhagman.com using MBL PRO.
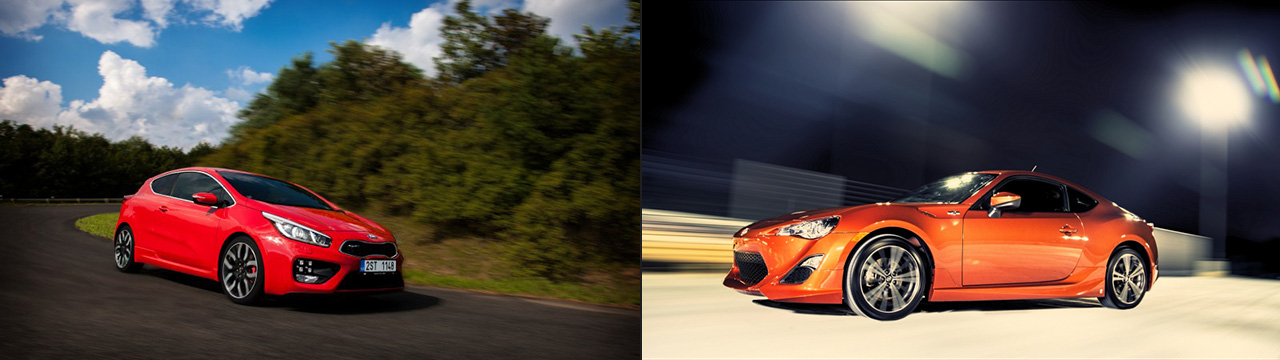
Image Credit: Left: Andrew Hayek, Right: Jesse James Allen
Some great automotive work created by Andrew Hayek & Jesse James Allen using MBL PRO.
MBL PRO Tutorial 1 – Working with Motion Vectors
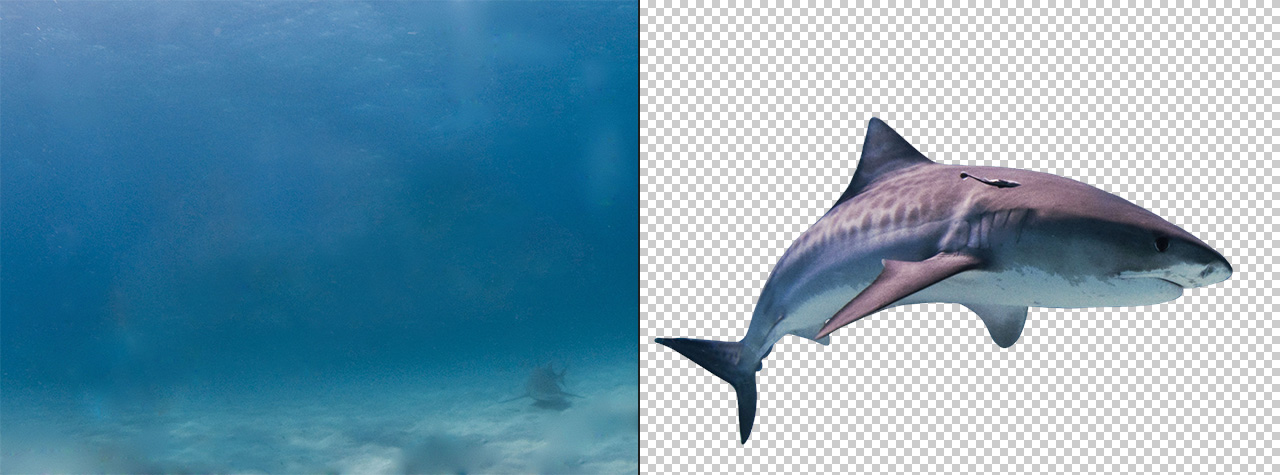
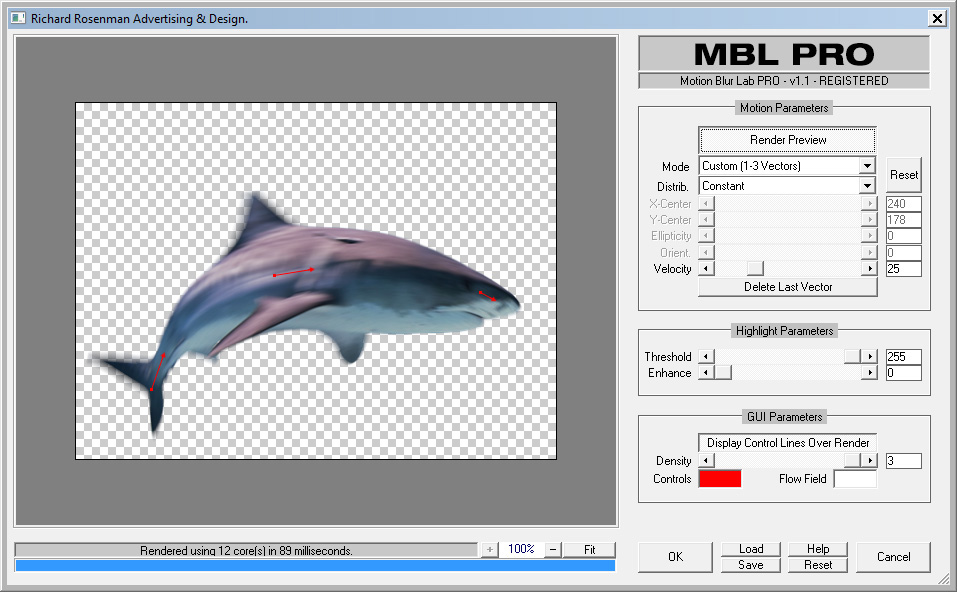
For optimum results, MBL PRO should ideally be used in separate passes and layers. Foreground and background objects should be separated on their own layers for easier use and higher quality results. While it is possible to motion blur a foreground object on the same layer as the background, you will have to use feathered selections which result in incorrect output. Backgrounds can be easily motion blurred on the same layer as the foreground object provided you have made accurate selections. For our tutorial, we will be adding motion blur to the above image in the foreground layer only.
To get started, let’s take a look at our two layers. We have the background layer, and the foreground subject which we’ll refer to as the shark. Since the foreground layer contains transparency, MBL PRO will display the checkered canvas in transparent areas. Once separated into these layers, it is very easy to add motion blur to the foreground subject, the background layer or both. We have separated the image into these two layers because we will apply multi-directional, variable strength motion blur to the shark while leaving the background intact.
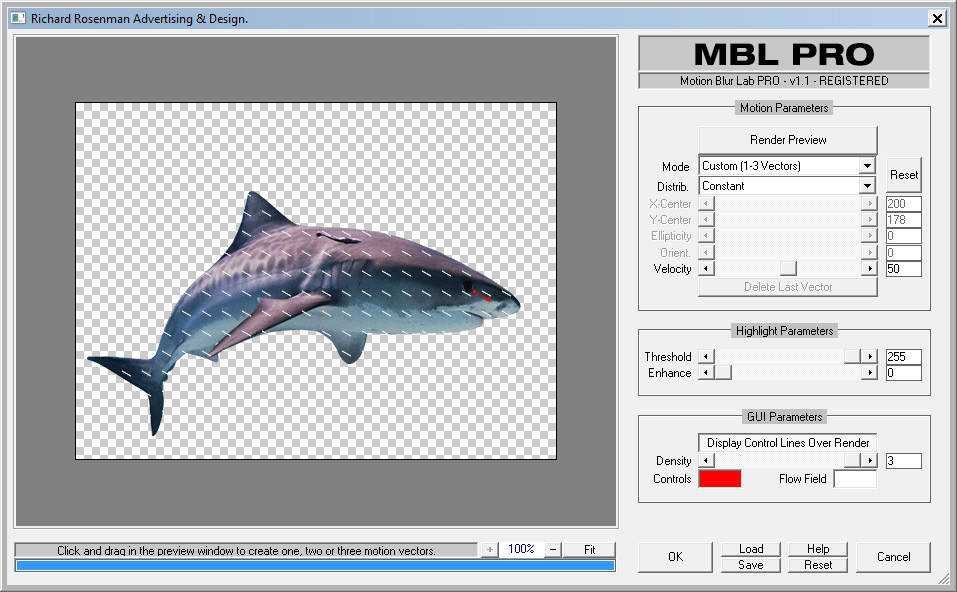
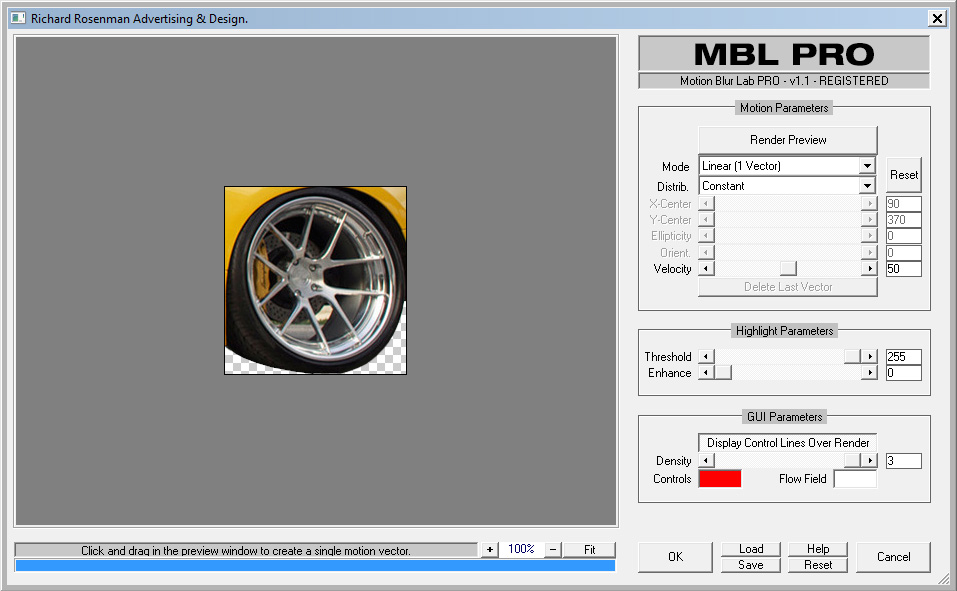
Let’s get started. Select the shark layer and launch MBL PRO. You should see this screen which is MBL PRO in it’s default state. Notice we are on the default linear motion blur mode. Linear mode allows us to motion blur in one direction only. Since we wish to apply a blur of varying direction and strength along the shark’s body, we will have to use more than one motion vector.
Click on the mode dropdown menu and select custom. This will allow us to use anywhere from 1 to 3 motion vectors which is what we need since we are going to be drawing three motion vectors of varying direction and increasing speed.
Let’s begin by drawing the first motion vector. In the preview window, click on the shark’s snout and slightly drag your mouse towards the eye to create a motion vector. The vector should be short because we want the snout to have the least amount of motion blur. As you draw the vector, you should see the flow field in white describing the motion blur direction and strength. Notice that the flow field isn’t displayed on transparent areas indicating these will not be processed. Should there have been feathered or varying layer transparency, the flow field would have been displayed in a respective opacity. Also take note that the motion vector has an arrow pointing in the direction you dragged it. Finally, notice the length of the motion vector dictates the length of the flow field, which defines the strength of the blur.
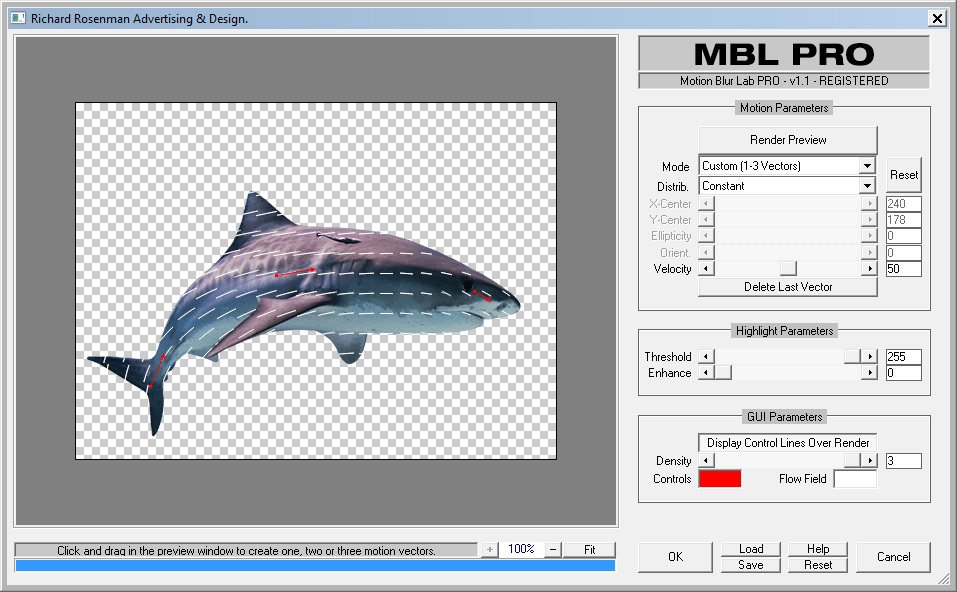
Now let’s draw the second motion vector. In the preview window, click behind the shark’s gills and drag your mouse along the curvature of the body to create a second motion vector. The vector should be slightly longer than the first because we want to increase the motion blur strength in this area. As you draw the vector, you should see the flow field in white readjusting and interpolating its motion blur direction and strength between the two motion vectors.
Upon drawing the second vector, you will notice the “Delete Last Vector” button becomes available. By clicking this button you can delete the last created vector when in custom mode and when more than one motion vectors exist.
Finally, let’s draw the third and final motion vector. In the preview window, click on the shark’s tail and drag your mouse along the tail fin to create a third motion vector. The vector should once again be slightly longer than the second because we want this area to have the strongest motion blur. As you draw the vector, you should see the flow field in white readjusting and interpolating its motion blur direction and strength between the three motion vectors.
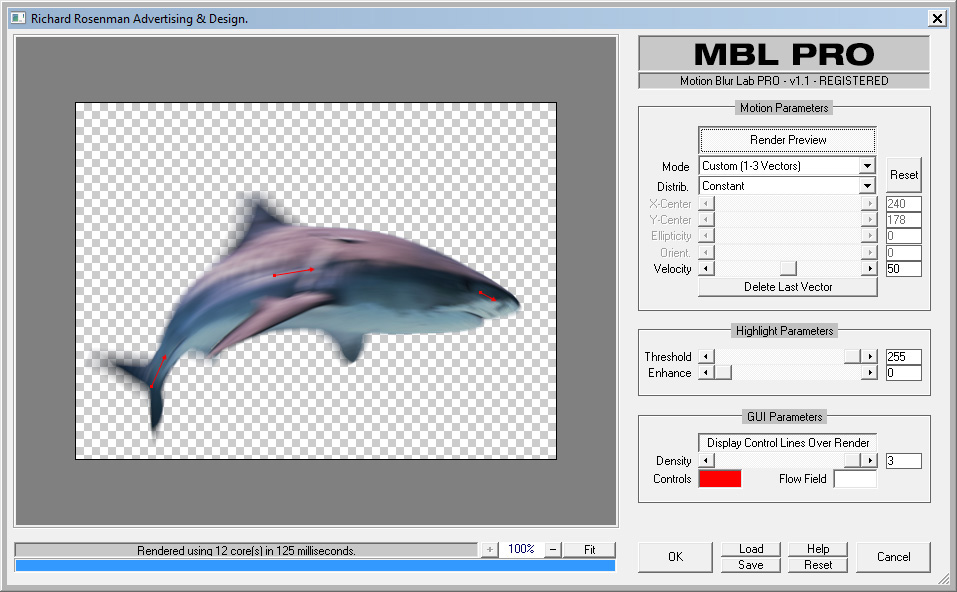
At this point, our flow field indicates a good result and the flow field accurately traces the curvature of the shark. Let’s click on render preview to see our effect.
Our preview looks good but the motion blur is too strong because the tail fin is losing definition. To reduce the amount, we can decrease the length of each vector independently or we can decrease the global velocity which will affect all vectors.
Lets go ahead and modify the global velocity slider to 25 so that we don’t have to re-adjust our motion vectors.
Click render preview again. Our motion blur is now less pronounced and more realistic.
Before clicking on OK and applying the effect to the image, let’s go ahead and save our project. Saving is important because each time MBL PRO is invoked, the settings are reset. Although we don’t need to use these settings again, let’s go ahead and save them anyway should we need to tweak this layer in the future.
This concludes the tutorial on working with motion vectors.
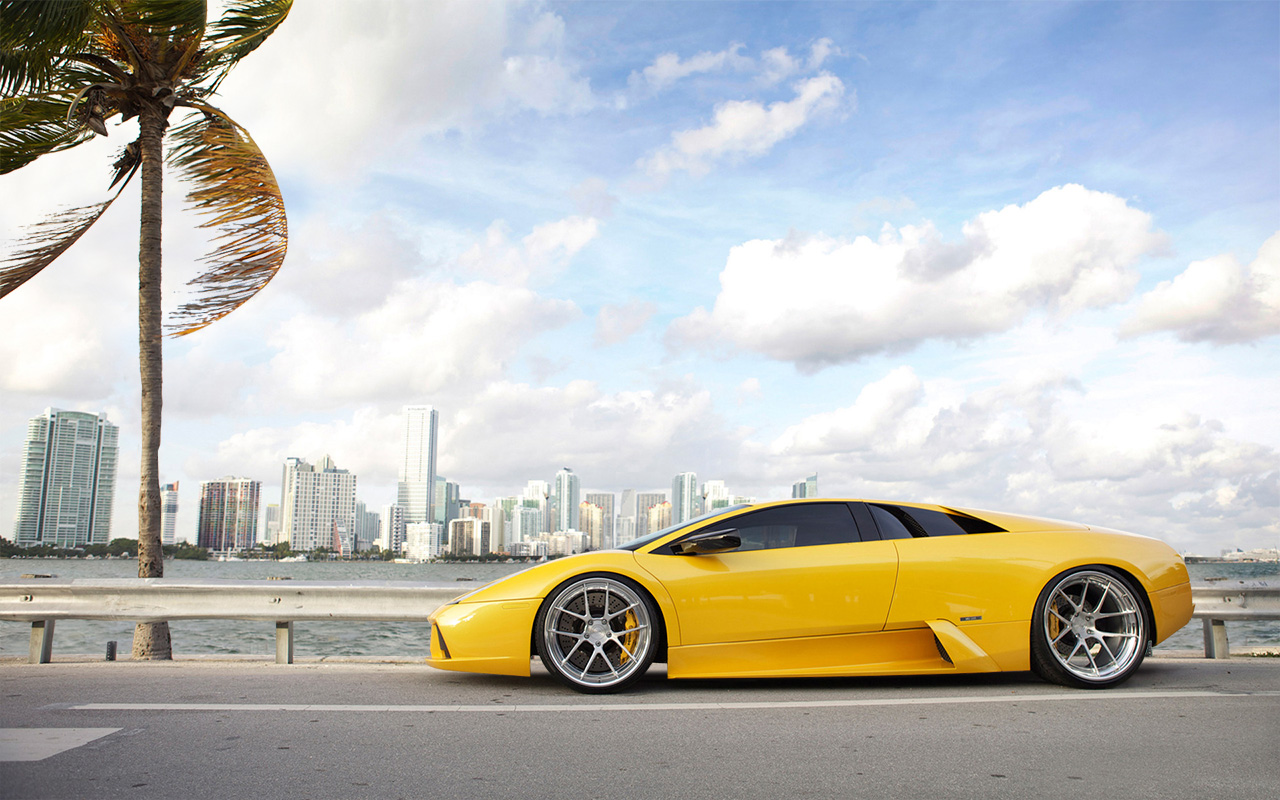
MBL PRO Tutorial 2 – Working with Passes and Layers
For optimum results, MBL PRO should ideally be used in separate passes and layers. Foreground and background objects should be separated on their own layers for easier use and higher quality results. While it is possible to motion blur a foreground object on the same layer as the background, you will have to use feathered selections which result in incorrect output. Backgrounds can be easily motion blurred on the same layer as the foreground object provided you have made accurate selections. For our tutorial, we will be adding motion blur to the above image in the background, foreground, front and back wheels.
To get started, let’s take a look at our three layers. We have the background layer, the foreground layer which we’ll refer to as the road, and the subject which we’ll refer to as the car. Once separated into these layers, it is very easy to add motion blur to the foreground subject, the background layer or both. We have separated the image into these three layers because we will apply weaker motion blur to the background, stronger motion blur to the road and moderate spin blur to the wheels. If we wanted to take this a step further, we would separate the shadow into it’s own layer as well because it’s tracking with the car and therefore shouldn’t have any motion blur.
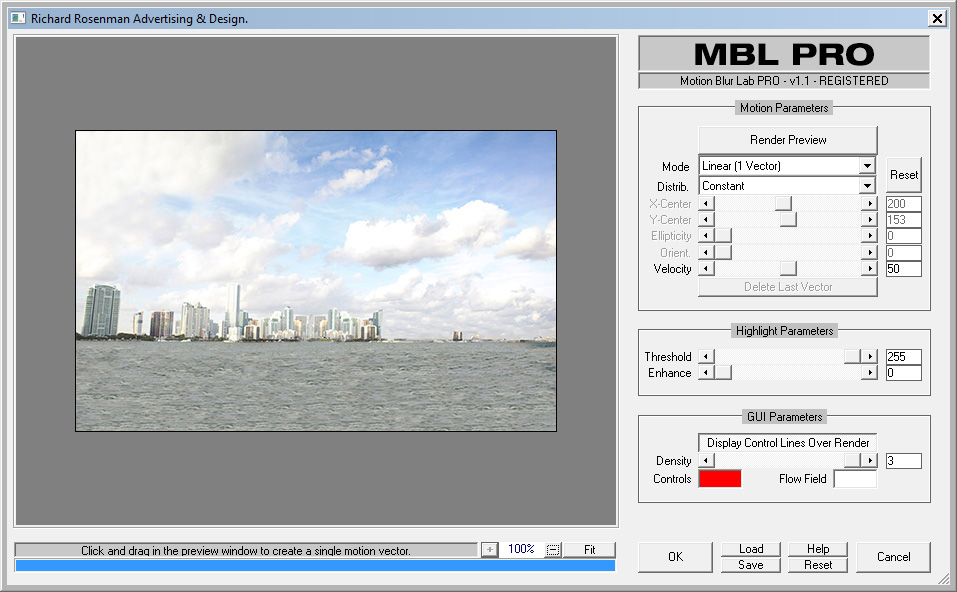
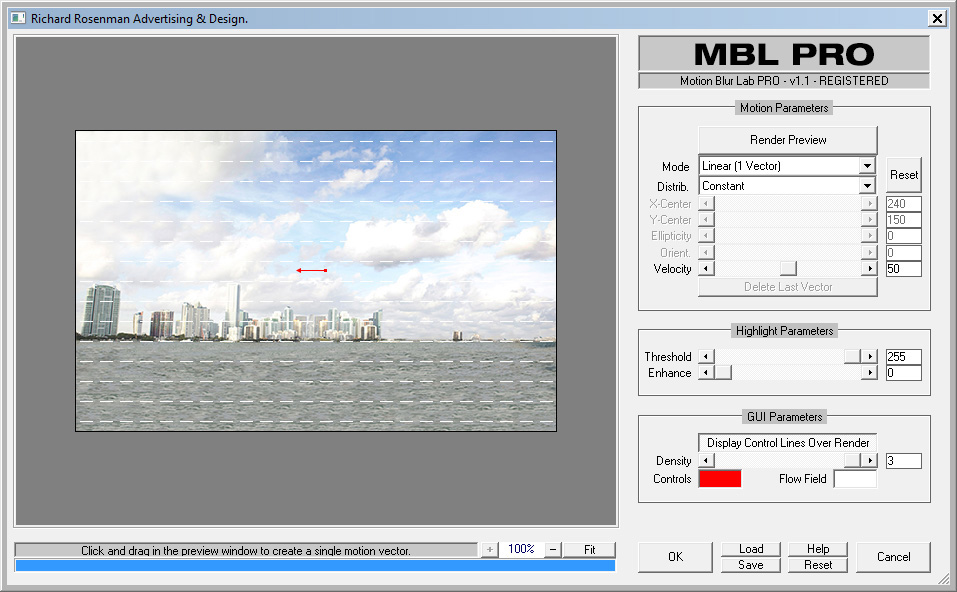
Let’s get started. Select the background layer and launch MBL PRO. You should see this screen which is MBL PRO in it’s default state.
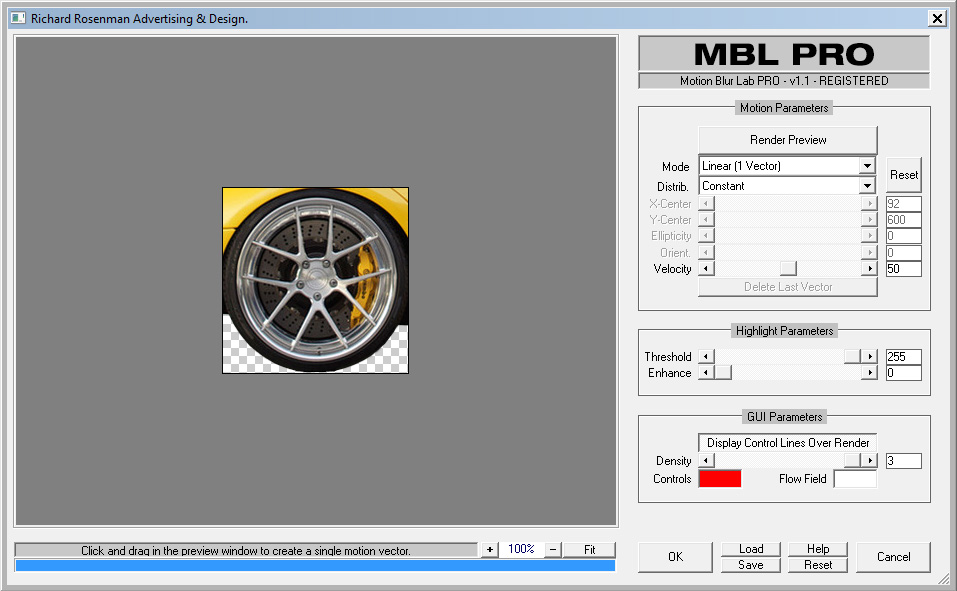
Notice we are on linear motion blur mode. This is what we want for our first pass because we will be applying a single directional blur to the background. In the preview window, click in the middle and drag your mouse to the left to create a motion vector. You should see the flow field in white describing the motion blur direction and strength. Notice that the motion vector has an arrow pointing in the direction you dragged it. Also notice the length of the motion vector dictates the length of the flow field, which defines the strength of the blur.
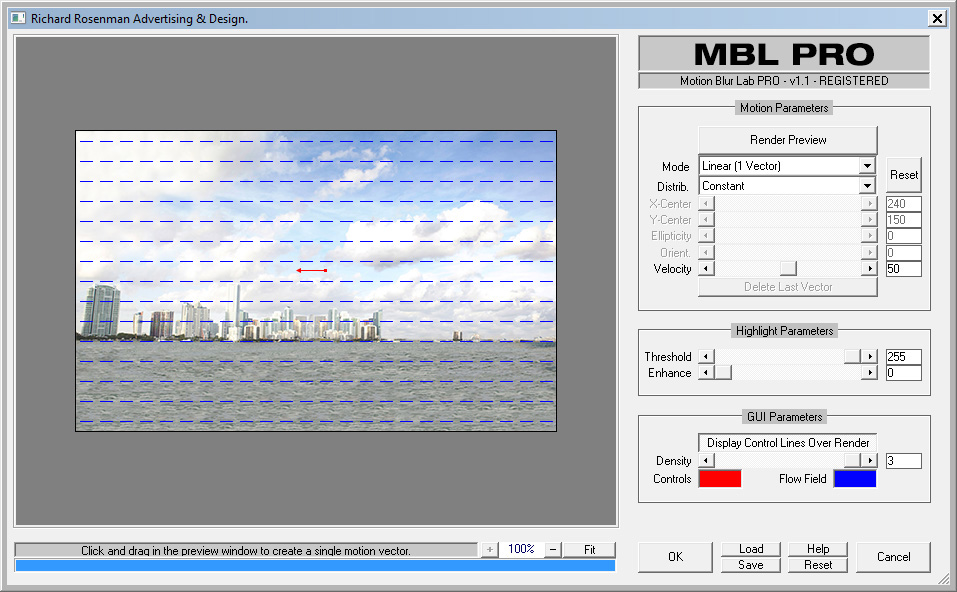
Since our image is quite light, it is difficult to see the flow field. We can change the color to a darker blue for instance by selecting a different flow field color in the GUI parameters group.
Now we can see the flow field much clearer. At this point, our flow field indicates a good result so let’s click on render preview to see our effect.
Click the render preview button and MBL PRO will render a preview of the currently-defined motion blur. Because the background layer is the furthest in distance, it should receive the least amount of motion blur. Objects closer to camera will have more pronounced motion blur.
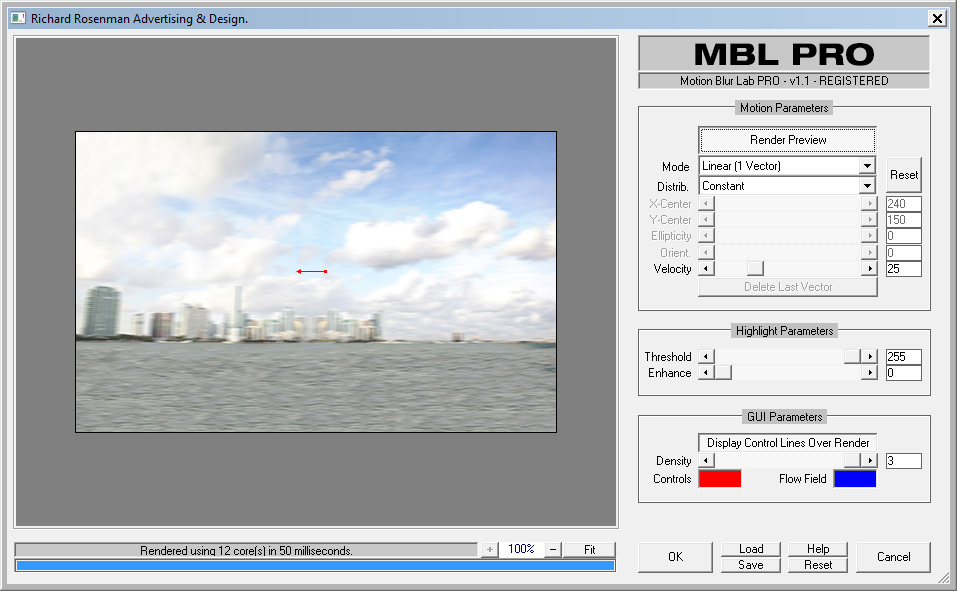
To reduce the amount of motion blur, you can decrease the length of the vector or your can decrease the global velocity which will affect all vectors. Lets go ahead and modify the global velocity slider so that we don’t have to re-adjust our motion vector. We’ll reduce it to a value of 25.
Click render preview again. Our motion blur is now less pronounced and more realistic.
Before clicking on OK and applying the effect to the image, let’s go ahead and save our project. Saving is important for two reasons. Each time MBL PRO is invoked, the settings are reset. In addition, we will be using this same setup for our foreground layer but with a minor adjustment.
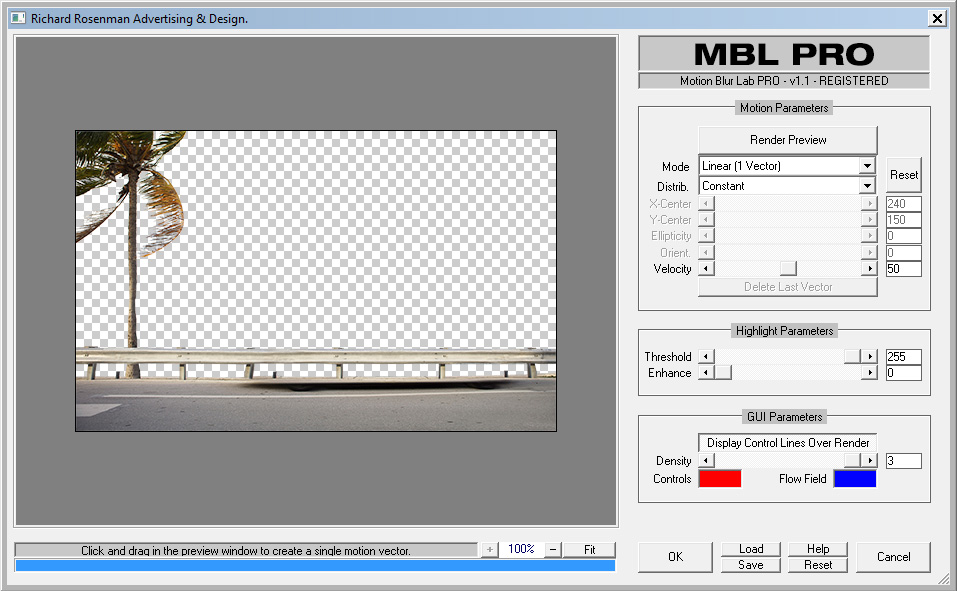
Now that we’ve taken care of the background, let’s work on the foreground road. Start by selecting the foreground road layer and launching MBL PRO. This will once again display this screen which is MBL PRO in it’s default state. Since the foreground layer contains transparency, MBL PRO will display the checkered canvas in transparent areas.
Ideally, we want to use the same directional motion vector from the background and simply adjust the velocity. Click on LOAD and select your previously saved settings.
Once loaded, the previous settings will be set. Notice that the flow field isn’t displayed on transparent areas indicating these will not be processed. Should there have been feathered or varying layer transparency, the flow field would have been displayed in a respective opacity.
Since we want to use the same motion as before but stronger, let’s simply increase the velocity to 45. The flow field will update accordingly and display an increased motion blur effect.
This seems like a good amount so let’s click on render preview and take a look at our effect.
Although we don’t need to use these settings for the next part, let’s go ahead and save them anyway should we need to tweak this layer in the future. Finally, let’s click on OK and apply our effect to the layer.
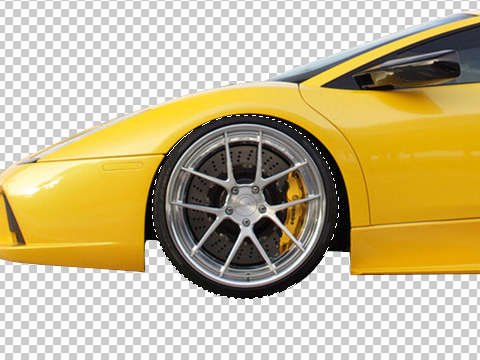
Now it’s time to move on to the front wheel. Since we only wish to affect the wheel and not the rest of the vehicle, we will use selections. Alternately, the wheel could be separated into it’s own layer but this is unnecessary extra work. Using selections, we can specify which areas of the image we want to affect. Select a circular selection and outline the car wheel as shown above. Occasionally, a minimal amount of selection feathering can help soften drastic transitions from fully motion blurred areas to areas without blur. In this case, we will use a 1 pixel feather with our selection.
With our car layer selected, and our selection drawn out, let’s once again launch MBL PRO. You should see this screen which is MBL PRO in it’s default state, displaying only the image data within the selection.
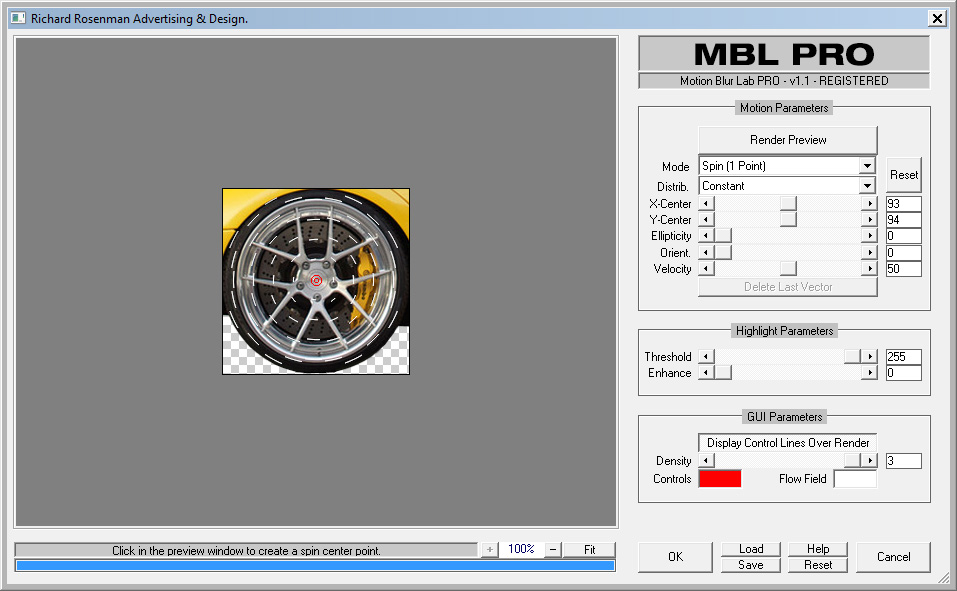
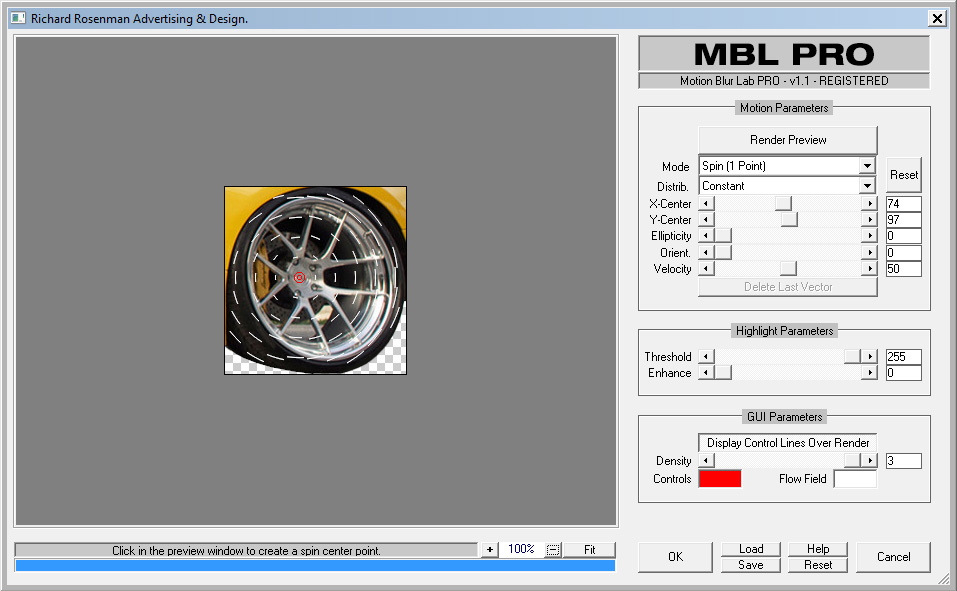
In this case, we will be adding spin blur to the tire so let’s go ahead and select spin from the mode drop-down menu.
In the preview window, click in the middle of the wheel to create a spin center point. You should see the flow field in white describing the motion blur direction and strength. You can adjust the center point with your mouse until you’re happy with the position. Once again, notice that the flow field isn’t displayed on transparent areas or areas outside of the selection to indicate these will not be processed.
When adjusting the center point, you will see the numerical values updated in the GUI. You can optionally adjust these sliders when you need the center point to be drastically outside the image bounds.
At this point, our flow field indicates a good result so let’s click on render preview to see our effect.
Although we don’t need to use these settings for the next part, let’s go ahead and save them anyway should we need to tweak this layer in the future. Finally, let’s click on OK and apply our effect to the layer.
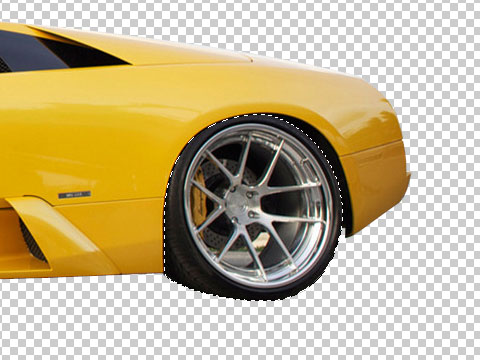
It’s now time to move on to our fourth and final pass, the back wheel. Once again, since we only wish to affect the wheel and not the rest of the vehicle, we will use selections. Let’s outline the wheel once again and apply a 1 pixel feathering. Be mindful to outline all parts of the wheel that require motion blur.
With our car layer selected, and our selection drawn out, let’s once again launch MBL PRO. You should see this screen which is MBL PRO in it’s default state, displaying only the image data within the selection.
In the preview window once again, click in the middle of the wheel to create a spin center point. The flow field will once again appear in white describing the motion blur direction and strength. Due to camera lens distortion, there is perspective on the back wheel and it is no longer circular. We need to match the back wheel perspective and this can be accomplished using the ellipticity and orientation features.
Adjust the ellipticity and orientation sliders until the flow field matches the wheel perspective. The center point may need to be adjusted as well to compensate for the perspective shift.
We now have a much closer match to the wheel’s perspective. The flow field lines perfectly trace the outline of the wheel, with perspective.
At this point, our flow field indicates a good result so let’s click on render preview to see our effect.
Although we don’t need to use these settings anymore, let’s go ahead and save them anyway should we need to tweak this layer in the future. Finally, let’s click on OK and apply our effect to the layer.
This concludes the tutorial on working with passes and layers.
Installing this software is easy and only requires three simple steps:
1 – Download the software by clicking on the Download Demo button located above on the software page. This will prompt you to save a .zip file on your computer.
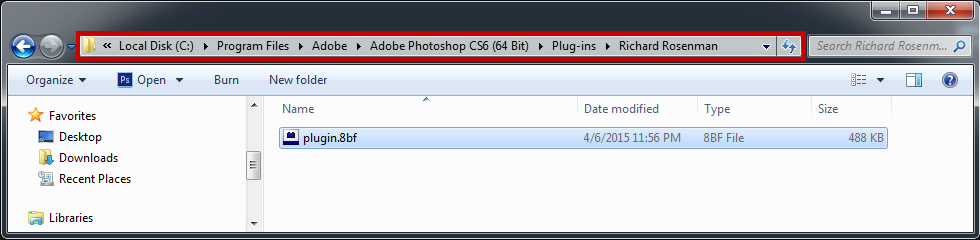
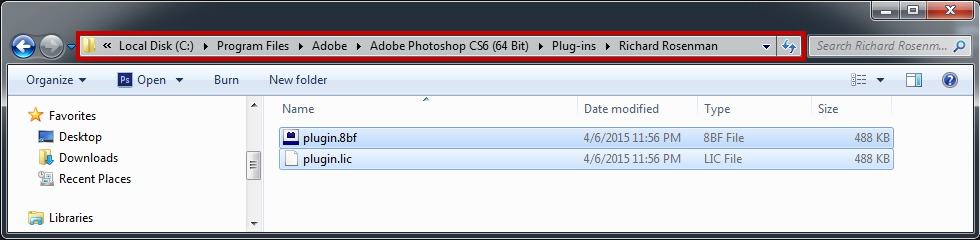
2 – Extract the contents from the .zip file and place the .8bf file into your host’s plugin folder. For instance, to install for Adobe Photoshop CS6, place the .8bf file into the location shown below. You can make a sub-folder to keep your plugins organized, such as the one below. Please make sure 64 bit plugins such as these are placed in the corresponding 64 bit Adobe Photoshop plugin folder.
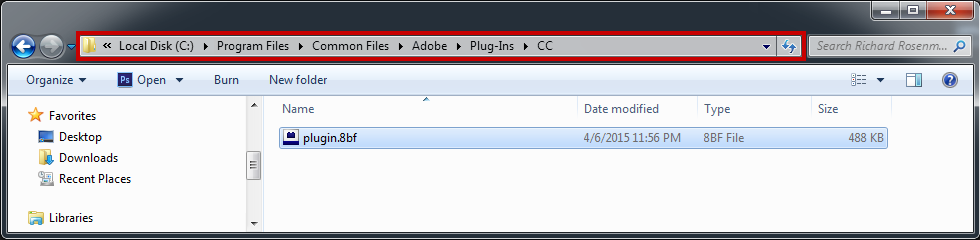
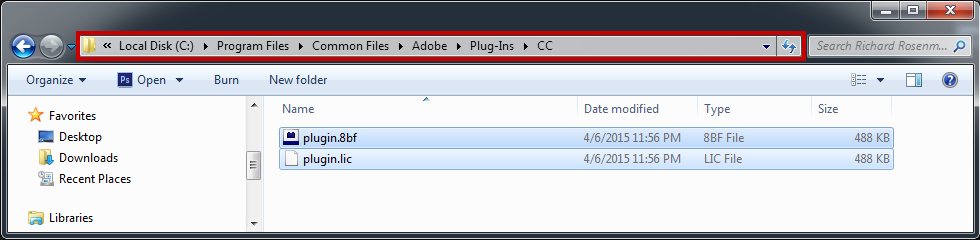
If you’re using Photoshop CC (eg. version 2013 – 2019 or later), your Photoshop plug-ins are stored in a folder shared between all Photoshop CC versions shown below.
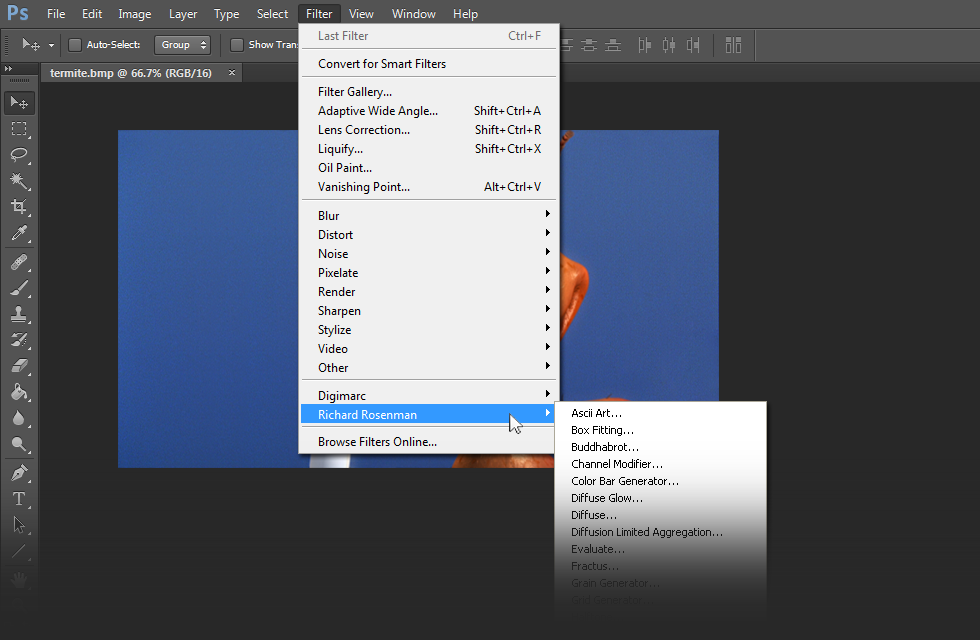
3 – Launch Adobe Photoshop, open an image and click on Filter > Richard Rosenman > Filter Name. If the filter is grayed out, it may not support your current image color depth.
If you have purchased a commercial license, please review the activation section.
If you have purchased a commercial license, you must activate your software. You can manually activate your software at any time by logging into your account. Activating this software is easy and only requires five simple steps:
1 – Log into your account by clicking on the Account button in the top menu.
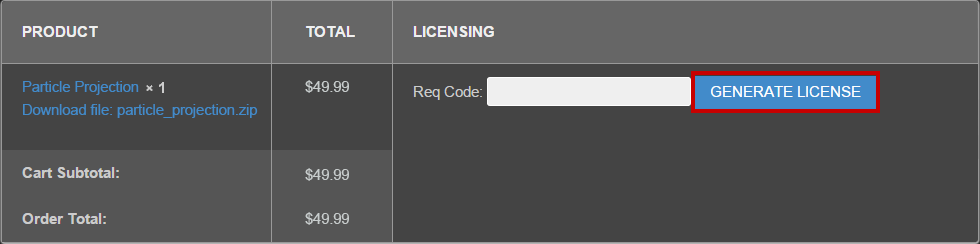
2 – Click on VIEW to display the order details containing the product you wish to activate.
3 – Enter your request code and click GENERATE LICENSE. Please see below for info on how to retrieve your request code.
Your request code can be found by clicking on the help button of the installed software.
4 – A file prompt will ask you to save the license file. You must save this license file in the same folder the plugin resides in. Below is an example for Photoshop CS6.
If you’re using Photoshop CC (eg. version 2013 – 2019 or later), your Photoshop plug-ins are stored in a folder shared between all Photoshop CC versions shown below.
5 – Relaunch Adobe Photoshop, open an image and click on Filter > Richard Rosenman > Filter Name. If the filter is grayed out, it may not support your current image color depth.
In the titlebar, your software should now display REGISTERED. It is now unlocked and ready for use.
This software is compatible with the following OS:
Windows 11 Home 64 bit
Windows 11 Pro 64 bit
Windows 11 Enterprise 64 bit
Windows 11 Education 64 bit
Windows 10 Home 64 bit
Windows 10 Pro 64 bit
Windows 10 Enterprise 64 bit
Windows 10 Education 64 bit
Windows 8 64 bit
Windows 8 Pro 64 bit
Windows 8 Enterprise 64 bit
Windows 7 Home Basic 64 bit
Windows 7 Home Premium 64 bit
Windows 7 Professional 64 bit
Windows 7 Enterprise 64 bit
Windows 7 Ultimate 64 bit
Windows Vista Home Premium 64 bit
Windows Vista Business 64 bit
Windows Vista Enterprise 64 bit
Windows Vista Ultimate 64 bit
Windows XP 64 bit
Windows XP Professional 64 bit
This software is compatible with the following hosts:
Any host capable of running Adobe Photoshop 64 bit compliant plugins
Adobe Photoshop (Version CS5 or higher, including CC) 64 bit
Adobe Photoshop Elements (Version 13 or higher, including CC) 64 bit
Adobe Illustrator (Version CS6 or higher, including CC) 64 bit
Computerinsel Photoline 64 (Version 16 or higher) 64 bit
CorelDRAW (Version X6 or higher) 64 bit
Corel Painter (Version 12.1 or higher) 64 bit
Corel Paint Shop Pro (Version X6 or higher) 64 bit