IK Studio is a powerful character rigging plugin for After Effects that generates a joint angle using inverse kinematics. It’s a sophisticated IK solver designed for the facilitation of complex character animation and, unlike all other existing After Effects IK scripts, it’s a blazing fast native plugin. IK Studio has been designed to be flexible and easy-to-use for both beginners and professionals, making it an excellent choice for a must-have After Effects IK plugin.
IK Studio GUI
Inverse kinematics (IK) is a sophisticated mathematical process that calculates the required joint angles to achieve a specified end position of a limb or appendage. This method significantly accelerates the animation workflow compared to traditional forward kinematics (FK), which determines the position of an end effector based on predetermined joint angles. In forward kinematics, animators must manually select and manipulate each joint to achieve the desired motion, often leading to a labor-intensive process with numerous adjustments. In contrast, inverse kinematics streamlines this by allowing animators to focus on a single translation of the end effector, automatically computing the necessary joint movements to maintain realistic motion. This not only improves efficiency but also facilitates more natural animation, making inverse kinematics a valuable tool in the animator’s toolkit.
Inverse Kinematics versus Forward Kinematics
IK Studio has been specifically designed for animating character limbs such as arms and legs, but it can also be used for various other purposes such as finger articulation, robotic arm control, and more. Unlike all script-based IK solutions that require at least three layers for each limb (start point, end point and spline), IK Studio only requires one layer per limb, thereby greatly simplifying rigging and keeping your composition stack clean, tidy and compact. Simply constrain parent and child points to any animated element and watch IK Studio perform effortlessly. Rigging characters in After Effects has never been easier.
IK Studio is especially powerful when it comes to walk cycles. Walk cycles are some of the toughest and most complex aspects of character animation due to the complex interplay of anatomy, motion, and balance. Each limb must move in a natural, coordinated manner while maintaining the character’s overall weight and posture. IK Studio simplifies this process by allowing animators to define the end position of a limb and automatically calculate the necessary joint movements to achieve that position. This reduces the manual tweaking required and helps ensure that movements remain fluid and realistic, enabling animators to focus more on creative expression rather than technical constraints. With IK Studio, walk cycles are a breeze to create without limitations except your imagination.
IK Studio turns complex walk cycles into a breeze. Characters designed by Freekpik.
IK Studio features all the innovative capabilities one would expect to find in a powerful IK solver. The limbs’ characteristics are fully adjustable and fundamental capabilities such as curvature, direction, limb thickness and limb length are readily available. Curvature controls the degree of arc applied to the spline permitting fun and exciting rubber-hose style animation while direction supports keyframing so as to allow a limb to change direction without having to create an entirely new character set.
IK Studio supports fundamental capabilities such as curvature and direction
IK Studio limbs can be adjusted in size so as to create characters of all styles. This is especially important since human proportions vary wildly from animals and insects. The length of any limb can be scaled independently so as to have upper and lower limbs of varying sizes and lengths, similar to quadrupeds. Moreover, any of these parameters can be fully animated to achieve special effects such as shrinking or growing character limbs.
IK Studio provides full adjustment of limb thickness and length
IK Studio can be linked together using multiple chains to create unique and interesting characters
IK Studio’s feature-rich capabilities provide a wide range of essential character limb properties such as sleeves, cuffs and seams, which can be used to simulate all kinds of apparel including t-shirts, sweaters, shorts, pants, capris, gloves, socks, hems, bracelets and more. All limb properties can inherit the main limb color or use their own.
IK Studio supports essential character limb properties
IK Studio’s powerful stroking features are specifically designed for characters. Full stroking renders a stroke around the entire spline while side stroking leaves the start and end open, allowing it to seamlessly integrate with a character’s shoulder or waist. Sides and top or sides and bottom accommodate the ability to seamlessly integrate one end while leaving the other intact. Freely adjust the stroke color and thickness, or combine it with After Effect’s Layer Style Stroke features for unique results. All stroking capabilities will automatically conform to all other settings including spline round or butt capping, curvature, sleeves and more.
IK Studio features powerful stroking capabilities
IK Studio supports the ability to bind any layer to the parent point, the child point, or anywhere along the main spline. This allows the ability to design and attach any custom accessory such as shoulder pads, tattoos, knee pads, armor, jewelry, watches, bracelets, and more. Any layer, even those supporting animation, can be bound to any given point along the spline. Additionally, the bound layer can automatically scale and rotate to match the spline’s scale and rotation, as well as conform itself to the spline’s curvature and direction. Binding allows for customized character rigs, independent of any style.
Bindings allow for any type of character limb to be designed
IK Studio features rotational constraints for advanced character animation. Much like an arm or leg cannot bend beyond 180 degrees, rotational constraints limit similar movements. Simply specify a minimum and maximum rotational range for either the parent limb or the child limb and watch IK Studio do the rest. If the parent or child limb are moved beyond the permissible ranges, IK Studio will restrict the bend accordingly.
IK Studio features rotational constraints for both parent and child limbs
IK Studio supports both 8 bits / channel and 16 bits / channel color modes for professional workflows.
IK Studio is 100% multi-threaded capable of using an unlimited number of cores for ultimate speed.
IK Studio is 100% Multi-Frame Rendering (MFR) capable for significant speed gains.
Workflow
IK Studio solves the IK when the user translates the upper and lower segment points. These segments are referred to as the Parent Limb and the Child Limb. The parent limb can be thought of as an upper arm or upper leg, while the child limb can be thought of as a lower arm or lower leg. Like most IK systems, IK Studio requires some initial set-up called rigging when used within a character. Rigging is the process of creating a digital skeleton that allows animators to control the movement of characters. Like most IK systems in After Effects, nulls are often used for the skeleton as the manipulators so it is recommended to link the parent limb to a parent null, and the child limb to a child null.
To link a parent limb or child limb, find the Parent Position or Child Position parameter and drag it’s property pick whip to the null’s position. This is a standard procedure for linking most items in After Effects.
Linking a parent or child point to a null
It is important to understand the difference between property linking and layer linking since they produce different results. In the image above, IK Studio’s Parent Position pick wick is called a property pick whip. The pick whip located on the far right side of the layer name is a called a parent pick whip. If you link a parent point or child point’s property pick whip to a null’s position property, and then link that null’s parent pick whip to a parent null, the point will immediately jump to the top-left corner of the screen. This is normal behavior within After Effects because the point has inherited the parent layer’s local position. We need to convert the layer’s local coordinates to world coordinates and this can be done using the toWorld expression below:
I = thisComp.layer("Null 1");
I.toWorld(I.anchorPoint);
There are many different ways to animate within IK Studio, making it an extremely versatile animation tool tailored to each animator’s own personal taste. Some methods will have advantages or disadvantages over others. Let’s look at three different ways to set up the linking of a hand to an arm, for example.
The child limb position property pick whip can be linked to a null, and a hand’s parent pick whip can also be linked to the null. This allows the animator to move the null and both the child limb and hand will follow. Rotating the null will rotate the hand along the null anchor point.
The child limb position property pick whip can be linked to a null, and a hand’s position property pick whip can also be linked to the null. This allows the animator to move the null and both the child limb and hand will follow. Rotating the hand will rotate the hand along the hand anchor point.
The child limb position property pick whip can be linked to a null, and a hand layer can be specified as a Child Binding Layer. This allows the animator to move the null and both the child limb and hand will follow. The hand will auto-rotate if that parameter is enabled. Adjusting the Rotation Offset parameter will rotate the hand along the layer’s anchor point.
Although everyone has their own preference in character rigging, the proposed linking hierarchy shown below works well for IK Studio and has been used for almost all examples in this page.
IK Studio’s Sleeve, Cuff and Seam features allow almost any type of limb to be created. By playing with these parameters and combining them together in clever ways, unique character limbs can be developed.
IK Studio does not support motion blur natively. To use motion blur, simply apply the CC Force Motion Blur effect to the layer. Alternately, the motion blur effect can be added to an adjustment layer above the IK Studio effect. Make sure to first set its Native Motion Blur parameter to On or you may experience a system crash.
Main Parameters
These parameters affect IK Studio’s main spline in regards to color, curvature and direction. as well as provide useful visualization tools.
Render Spline: Enables the rendering of the main spline. There may be instances where a stylized character without arms but with hands is required, in which case this can be disabled. The IK solver will still maintain a correct position for the hand even without the arm rendering.
Parent Position: Specifies the position of the parent limb. This is usually the parameter to link to a Null’s position property for animation.
Child Position: Specifies the position of the child limb. This is usually the parameter to link to a Null’s position property for animation.
Fill Color: Specifies the main spline color.
Curvature: Specifies the degree of curvature in percentage. Curvature allows for rubber hose style animation originally styled in the 1920’s. All features will conform themselves to curvature and work correctly.
Direction: Specifies the bend direction, in the range of -1.0 to 1.0. This is an animatable slider and not a toggle so that a character limb can change direction smoothly, without popping from one direction to another.
IK Studio supports fundamental capabilities such as curvature and direction
Rotation Ranges: Displays the rotation range gizmo. See below for more info on rotation constraints.
IK Axis: Displays the IK axis gizmo.
Gizmo Color: Specifies the gizmo color.
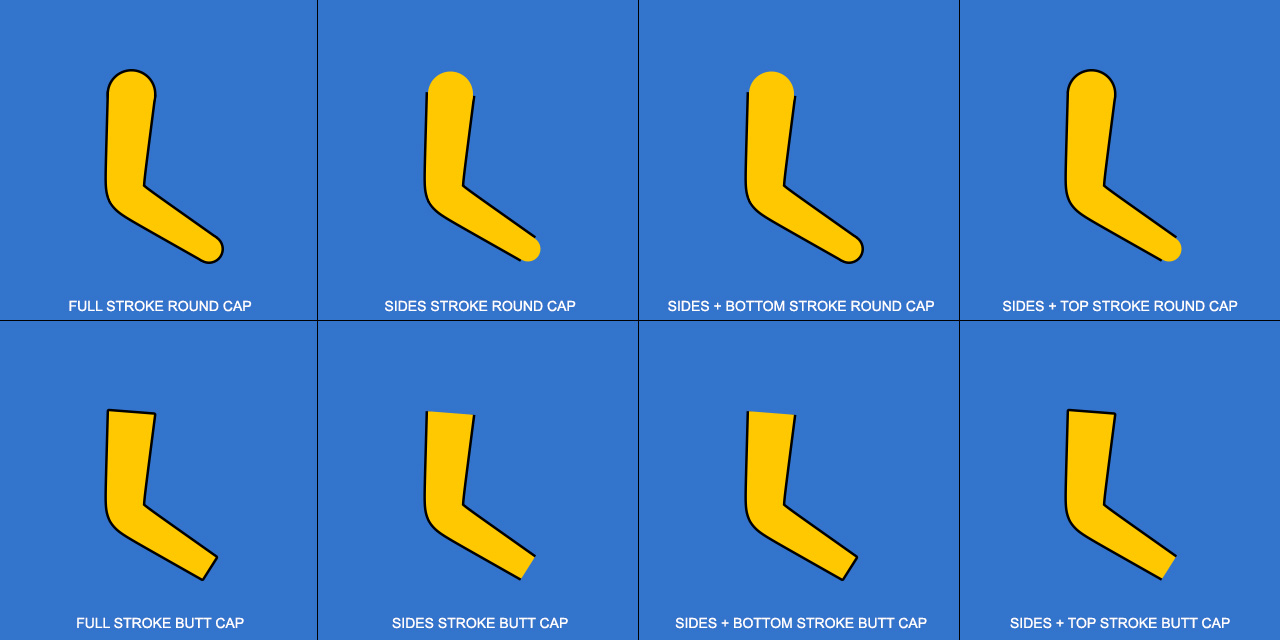
These parameters control IK Studio’s powerful stroking features. Although stroking can be accomplished through the use of After Effects’ layer styles, IK Studio’s built-in stroking features allow for complex effects not otherwise possible. For example, the stroke can be rendered on the sides only, taking into account limb connections where stroking isn’t desired. Stroking can also be excluded from the parent or the child limb extremities so that it doesn’t interfere with a linked or bound layer. Stroking automatically conforms itself perfectly with curvature, as well as sleeve and cuff features (see below for more info).
Stroke
IK Studio stroke examples
Stroke: Specifies how to render the stroke. Disabled renders no stroke. Full renders a stroke around the entire spline. Sides renders a stroke along the sides of the spline only so as to leave limb connections open. Sides + Bottom renders a stroke along the sides and bottom, avoiding interference with linked or bound layers. Sides + Top renders a stroke along the sides and to, avoiding interference with linked or bound layers. The stroke settings also conform themselves to line cap selections, as shown below, even if it’s a combination of round and butt cap. Finally, the stroke settings are also respected when used with sleeve and cuff features.
Stroke Color: Specifies the stroke color.
Stroke Corners: Specifies whether to keep stroke corners sharp or rounded. This is especially useful when using sleeves.
IK Studio stroke corners
Stroke Thickness: Specifies the stroke thickness in pixel units. This has a limit of 10.0 to avoid glitches.
Sleeve
These parameters control IK Studio’s sleeve functions. Using these features, together or in combination with one another, allows for the creation of all types of apparel. The short sleeve can be used to create t-shirts or shorts while the long sleeve can be used to create sweaters or pants. The length adjustment allows for khaki shorts and Capri pants. The inner sleeve features can be used to create hems or under shirts while the sleeve seam can be used to create pant seams, enforcing front or side perspective. The start of the sleeve at the parent point will automatically conform to either a round or butt cap, depending on what has been set. When enabled, the sleeve functions get drawn as separate passes over the main spline so if the thickness is the same, you may see hints of the underlying spline.
IK Studio sleeve examples
Sleeve: Enables the rendering of the sleeve.
Sleeve Fill Color: Specifies the sleeve color. Use Fill Color will used the main spline color while Custom allows a different color to be specified.
Sleeve Custom Color: When Sleeve Fill Color is set to Custom, this color swatch becomes enabled and allows the user to specify a custom sleeve color.
Sleeve Thickness: Controls the sleeve thickness compared to the spline thickness. This has a limit of 10.0 to avoid glitches.
Sleeve Length: Controls the sleeve length. This has a limit of 15.0 to avoid glitches.
Sleeve Seam
The sleeve seam feature renders a line down the middle of the sleeve. This is useful for simulating pant seams from the side, or pleats from the front. As such, the seam feature is especially useful for suggesting perspective. The seam is fully adjustable and its thickness and color can be modified. It will inherit the parent limb’s line cap setting.
Sleeve Seam: Enables the rendering of the sleeve seam.
Sleeve Seam Color: Specifies the sleeve seam color. Use Stroke Color will used the main spline color while Custom allows a different color to be specified.
Sleeve Seam Custom Color: When Sleeve Seam Color is set to Custom, this color swatch becomes enabled and allows the user to specify a custom sleeve seam color.
Sleeve Seam Thickness: Specifies the sleeve seam thickness. Use Stroke Thickness will used the stroke thickness while Custom allows a different thickness to be specified.
Sleeve Seam Custom Thickness: When Sleeve Seam Thickness is set to Custom, this slider becomes enabled and allows the user to specify a custom sleeve seam thickness.
Inner Sleeve
The inner sleeve feature renders a secondary sleeve beneath the main one. This is useful for simulating a shirt beneath a sweater, a dress shirt beneath a jacket or a sleeve cuff, among many other examples. The inner sleeve is fully adjustable and its thickness, length and color can be modified.
Inner Sleeve: Enables the rendering of the inner sleeve.
Inner Sleeve Color: Specifies the inner sleeve color. Use Fill Color will used the main spline color while Custom allows a different color to be specified.
Inner Sleeve Custom Color: When Inner Sleeve Color is set to Custom, this color swatch becomes enabled and allows the user to specify a custom inner sleeve color.
Inner Sleeve Thickness: Controls the inner sleeve thickness. The thickness will never exceed the thickness of the sleeve. This has a limit of 10.0 to avoid glitches.
Inner Sleeve Length: Controls the inner sleeve length. This has a limit of 15.0 to avoid glitches.
Left: Shorts created with sleeve, shorts shadow with inner sleeve, socks with cuff. Characters designed by Freepik.
Cuff
The cuff feature creates a cuff starting at the child point with the ability to control the length towards the middle joint. It can be used to simulate a glove, a sock, or a bracelet to name a few examples. The start of the cuff at the child point will automatically conform to either a round or butt cap, depending on what has been set. When enabled, the cuff function gets drawn as a separate pass over the main spline so if the thickness is the same, you may see hints of the underlying spline. It will inherit the child limb’s line cap setting.
Cuff: Enables the rendering of the cuff.
Cuff Fill Color: Specifies the cuff color. Use Fill Color will used the main spline color while Custom allows a different color to be specified.
Cuff Custom Color: When Cuff Fill Color is set to Custom, this color swatch becomes enabled and allows the user to specify a custom cuff color.
Cuff Thickness: Controls the cuff thickness. This has a limit of 10.0 to avoid glitches.
Cuff Length: Controls the cuff length. This has a limit of 15.0 to avoid glitches.
Arbitrary Binding
IK Studio supports the ability to bind any layer to the parent point, the child point, or anywhere along the main spline. This provides the ability to custom-design any style of upper and lower limbs, or attach any custom accessory such as shoulder pads, tattoos, knee pads, armor, jewelry, watches, bracelets, and more. Any layer, even those supporting animation, can be bound to any given point along the spline. Additionally, the bound layer can automatically scale and rotate to match the spline’s scale and rotation, as well as conform itself to the spline’s curvature and direction. When using a layer as an arbitrary binding, make sure to first set it’s position to the center of your composition for correct alignment.
Bindings allow for any type of character limb to be designed
Arbitrary Binding Layer: Specifies which layer to use.
Composite: Specifies whether to composite the layer in front or behind the spline.
Anchor X: Adjusts the layer’s horizontal anchor-point.
Anchor Y: Adjusts the layer’s vertical anchor-point.
Position: Specifies the layer position along the spline in percentage.
Rotation Offset: Adjusts the rotation of the layer.
Scale Offset: Adjusts the scale of the layer.
Auto Rotate: Toggles whether or not the layer should follow the bend angle of the spline.
Auto Scale: Toggles whether or not the layer should follow the scale along the spline.
Parent / Child Limb
These parameters control all aspects of the parent / child limbs, including Parent / Child Binding features. Although both share the same parameters, the key difference is that the parent limb can pull the child limb, whereas the child limb cannot pull the parent limb. Note that most of these parameters can be animated which can result in fun and exciting animation.
Parent / Child Binding
Like Arbitrary Binding, Parent / Child Binding allows any layer to be attached to the parent or child limb. This allows the ability to design and attach any custom limb or accessory such as shoulder pads, tattoos, knee pads, armor, jewelry, watches, bracelets, and more. More importantly, it allows for the creation and attachment of fully custom-designed limbs, thereby not limiting the style to simple splines. Any layer, even those supporting animation, can be bound to the parent or child limb. Additionally, the bound layer can automatically scale and rotate to match the parent or child limb’s scale and rotation, as well as conform itself to the spline’s curvature and direction. When using a layer for binding, make sure to first set it’s position to the center of your composition for correct alignment. In addition to the same parameters found in the Arbitrary Binding section, Parent / Child Binding also provide X and Y anchor-point adjustment which allows the layer to be offset from the parent or child point.
Parent / Child Binding Layer: Specifies which layer to use.
Composite: Specifies whether to composite the layer in front or behind the spline.
Anchor X: Adjusts the layer’s horizontal anchor-point.
Anchor Y: Adjusts the layer’s vertical anchor-point.
Rotation Offset: Adjusts the rotation of the layer.
Scale Offset: Adjusts the scale of the layer.
Auto Rotate: Toggles whether or not the layer should follow the bend angle of the spline.
Auto Scale: Toggles whether or not the layer should follow the scale along the spline.
Parent / Child Limb Parameters
Parent / Child Line Cap: Specifies whether the end of the parent or child limb should be round or capped. When set to butt cap, the stroke corners can be rounded using rounded stroke corners in the stroke group.
Parent / Child Thickness: Specifies the thickness of the parent or child limb. The spline thickness will interpolate between the parent and the child thickness. This is in pixel units and has a limit of 100.0 to avoid glitches.
Parent / Child Length: Specifies the length of the parent / child limb.
IK Studio provides full adjustment of limb thickness and length
Parent / Child Stretchiness: Specifies the maximum length the parent / child limb can stretch to. For example, if the child stretchiness is set to 200 and the child length to 100, the child limb will stretch up to 200 if the child point is pulled beyond the 100 limit. This features is especially useful for stylized squash and stretch style character animation.
IK Studio supports limb stretchiness for exciting squash & stretch style animation
IK Studio’s rotational ranges permit the limiting of the degree of rotation for both the parent and / or child limb. This is a unique feature that can greatly assist in various types of animation where a joint should not bend beyond a particular degree. Examples of this are knee joints, thigh joints, finger joints, toe joints, etc. Rotational ranges can be assigned for just one limb or both. It is important to understand that the IK solver may produce correct but unexpected results depending on the user’s start and end point positions due to the IK algorithm. To minimize this, keep the start and end points relatively close to where the rotational limits should be.
Parent / Child Min Rotation: Specifies the minimum rotation range permitted.
Parent / Child Max Rotation: Specifies the maximum rotation angle range permitted.
Parent / Child Rotation Reset: Resets the minimum and maximum rotation ranges to default values.
IK Studio features rotational constraints for both parent and child limbs
Changelog
v1.0 – First release.
v1.1 – Added axis X and Y offset for arbitrary binding.
v1.1 – Fixed missing request code & description in After Effects v26+.
This section features video generated with the IK Studio plugin for After Effects.
Let’s go through a quick start tutorial and set up a character for a walk cycle using IK Studio.
1 – Design your character and bring it into After Effects. The character should be layered depending on the animation you’ll need, or the intricacy of the animation. For the example above, we’ll keep it simple so we will want the torso, neck & head as one layer, a hand layer, and a foot layer. Since we’ll be using IK Studio for the arms and legs, we don’t need to design those layers.
2 – Create a null and call it “Waist Null”.
3 – Attach the torso to the waist null using the parent pick whip, not the property pick whip. In other words, attach the torso layer to the null.
4 – Create a null and call it “Left Foot Null”.
5 – Create a new layer for IK Studio. Call it “Left Leg”.
6 – Add the IK Studio effect to the layer from the top menu under Effect -> Richard Rosenman -> IK Studio. You will see the default limb rendered.
7 – In the timeline window, navigate to the IK Studio effect, open it, and using the property pick whip link the “Parent Position” position property to the “Waist Null” position property. This will create an expression called “thisComp.layer(“Waist Null”).transform.position” so that if you now move the waist null, the parent point will follow. The image below shows how to link using the property pick whip if “Waist Null” was titled “Null 1”. We’ve now linked the leg thigh to the waist.
Linking a parent or child point to a null
8 – Now let’s repeat the same step for the left foot. In the timeline window, navigate to the IK Studio effect, open it, and using the property pick whip link the “Child Position” position property to the “Left Foot Null” position property. This will create an expression called “thisComp.layer(“Left Foot Null”).transform.position” so that if you now move the left foot null, the child point will follow. We’ve now linked the ankle to the foot.
9 – Link the left foot layer to the left foot null. You can do this with either the parent pick whip or the property pick whip. If you use the parent pick whip, rotating the null will also rotate the foot. If you use the property pick whip, you can rotate the foot independently of the null. The choice depends on your animation preference.
10 – Repeat steps 4 to 8 for the right leg.
We’ve now set up the left and the right legs. You can move the waist null and you’ll see the feet remain firmly planted with IK Studio solving the inverse kinematics. You can make adjustments to your legs such as length, size, color, etc. You can now repeat these steps for the arms.
There are endless ways to rig your character and this is only one example. If the character was front-facing, you’d create a waist null and left and right thigh nulls so that you could space out the legs. In this case, you’d attach the thigh nulls to the waist null using the parent pick whip, factoring in the expression adjustment noted below.
In the event that you link a parent point or child point’s property pick whip to a null’s position property, and then link that null’s parent pick whip to a parent null, the point will immediately jump to the top-left corner of the screen. This is normal behavior within After Effects because the point has inherited the parent layer’s position. In this case, the expression needs to be adjusted. Please review the documentation tab under Workflow for more info.
Installing this software is easy and only requires three simple steps:
1 – Download the software by clicking on the Download Demo button located above on the software page. This will prompt you to save a .zip file on your computer.
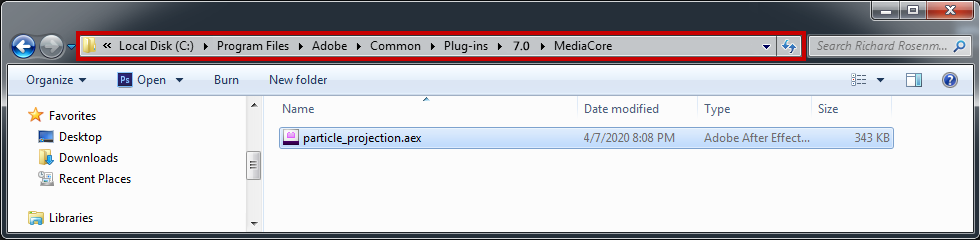
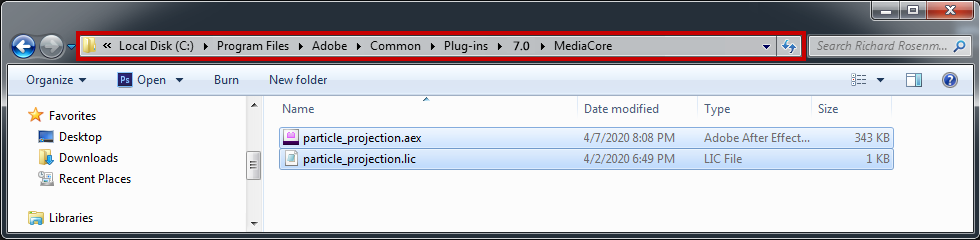
2 – Extract the contents from the .zip file and place the .aex file into your host’s plugin folder. For all Adobe After Effects versions CS6 and higher, this folder is the MediaCore folder. Place the .aex file into the location shown below. You can make a sub-folder to keep your plugins organized.
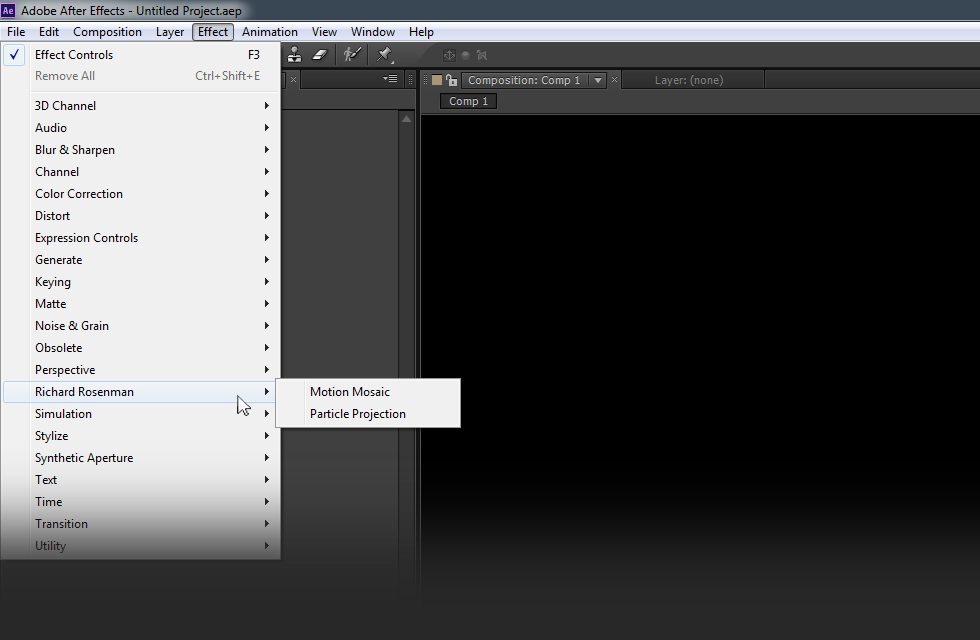
3 – Launch Adobe After Effects, create a new composition, add a new solid, and click on Effect > Richard Rosenman > Effect Name.
If you have purchased a commercial license, please review the activation section.
If you have purchased a commercial license, you must activate your software. You can manually activate your software at any time by logging into your account. Activating this software is easy and only requires five simple steps:
1 – Log into your account by clicking on the Account button in the top menu.
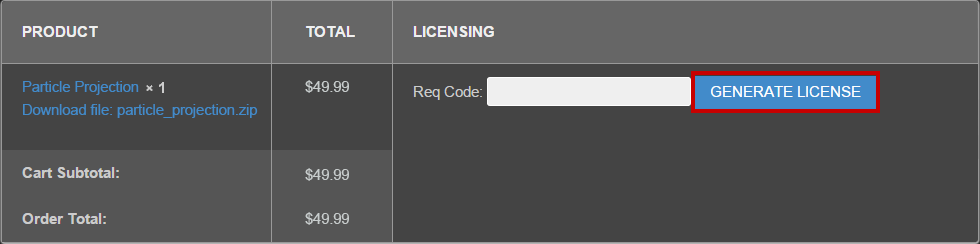
2 – Click on VIEW to display the order details containing the product you wish to activate.
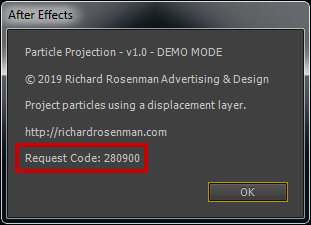
3 – Enter your request code and click GENERATE LICENSE. Please see below for info on how to retrieve your request code.
Your request code can be found by right-clicking on the plugin name in the effect window and selecting About.
4 – A file prompt will ask you to save the license file. You must save this license file in the same folder the plugin resides in.
Place the .lic file into the location shown below. You can make a sub-folder to keep your plugins organized.
5 – Relaunch Adobe After Effects, create a new composition, add a new solid, and click on Effect > Richard Rosenman > Effect Name.
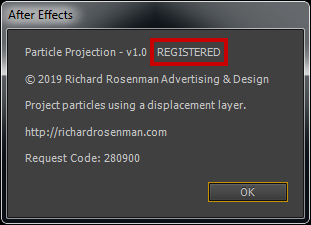
If you on click the About button located at the top of the plugin interface once again, your software should now display REGISTERED. If it is registered but you still see a red x, simply clear your cache. It is now unlocked and ready for use.
This software is compatible with the following Windows OS:
Windows 11 Home 64 bit
Windows 11 Pro 64 bit
Windows 11 Enterprise 64 bit
Windows 11 Education 64 bit
Windows 10 Home 64 bit
Windows 10 Pro 64 bit
Windows 10 Enterprise 64 bit
Windows 10 Education 64 bit
Windows 8 64 bit
Windows 8 Pro 64 bit
Windows 8 Enterprise 64 bit
Windows 7 Home Basic 64 bit
Windows 7 Home Premium 64 bit
Windows 7 Professional 64 bit
Windows 7 Enterprise 64 bit
Windows 7 Ultimate 64 bit
This software is compatible with the following hosts:
Adobe After Effects (Version CS6 or higher, including CC) 64 bit