Path Scatter is the ultimate sprite animation engine. It’s a unique After Effects plugin that will scatter and animate layers along a path dynamically. Choose how many layers you want, assign them to as many paths as you want, and animate them with a single slider, producing unique, organic procedural animation that would otherwise be impossible to achieve manually.
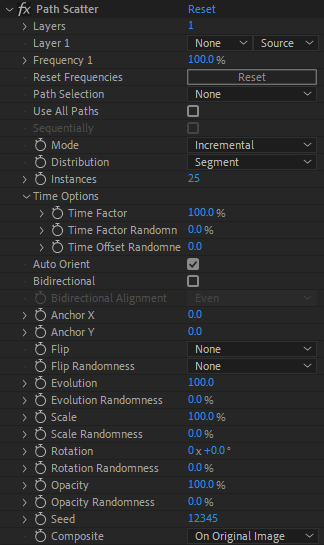
Path Scatter GUI
Next-Level Path-Targeted Animation
Designed specifically for motion designers and visual effects artists, Path Scatter revolutionizes how artists animate sprites along paths. Whether you’re creating organic particle effects, intricate motion graphics, or complex repeating patterns, Path Scatter provides unparalleled control over path-based layer distribution. At its core, Path Scatter takes AE layers and intricately duplicates them along any selected path or mask within your composition, while carrying through their respective animation.
Path Scatter can create incredibly detailed and unique procedural animation, with little setup time. Create various growing flower animations and assign them to paths, then watch them grow effortlessly along the splines with the adjustment of a single slider. Randomize and offset their timings for more organic results. Then take it even further by randomizing their direction, scale, rotation and opacity.
Whether you are looking to build lush, organic environments, populate a highway with moving vehicles, or generate abstract, flowing HUD elements, Path Scatter provides an unparalleled level of control. The plugin seamlessly combines multi-layer sampling, deep randomization, and intricate path-following logic into a single, highly optimized tool.
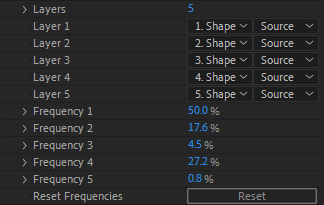
Most After Effects plugins only allow you to specify one layer to be used. Path Scatter allows up to five unique layers to be used concurrently. In addition, you can adjust frequencies to precisely specify how often each layer should appear in relation to others.
Path Scatter Frequencies
Multi-Layer Sprite Generation
One of the most robust features of this software is its versatile layer management system. You can select and distribute up to five unique visual layers simultaneously. To ensure your design looks exactly as intended, a frequency distribution system is included that allows you to control the exact percentage of appearance for each selected layer. For example, if you’re designing a winding forest vine, you can set standard green leaves to appear frequently, while adding rare glowing flowers to the same path by assigning them a much lower frequency percentage.
Extensive Path Scattering Options
When it comes to geometry, you have total freedom over how your sprites interact with the paths. You can target a single specific path or use every single path on your layer – no matter how many. If you choose to use multiple paths, you can animate instances sequentially or concurrently. Users can generate a massive number of individual instances, giving you the creative flexibility to produce detailed swarms, dense particle streams, or intricate arrays. Path Scatter also offers both Incremental and Constant calculation modes so you can animated your layer increasingly across paths, or all together at the same time. Instances can be distributed by segment or by path so that you can have multiple layers randomized across a segment, or per path.
Creating organic, natural-looking animations is effortless thanks to a massive suite of transformation and randomization controls. Every parameter can be fine-tuned to perfection. You can offset the X and Y anchor points, or flip the sprites along the X, Y, or both axes. To further break up uniformity, you can inject customizable randomness into the scale, rotation, and opacity of your instances. You can even flip randomness across the X, Y or XY axis.
Truly Organic Procedural Animation
Motion is where Path Scatter truly shines. By adjusting the Evolution parameters, you can seamlessly drive the animation of your scattered instances forward or backward along the paths. Evolution randomness ensures that items don’t just march in perfect lockstep. The Auto Orient feature guarantees that your sprites organically align to the exact curvature of the path as they travel. You can even enable bidirectional movement, forcing alternating instances to appear in opposite directions, which is perfect for simulating opposing lanes of highway traffic. Advanced time controls allow you to shift the internal animation timings of the sprites themselves. By adding time offset randomness, a scattered flock of animated birds will flap their wings independently rather than in unnatural unison.
Path Scatter allows you to composite your final masterpiece directly over your original image or cleanly onto a transparent background.
Path Scatter supports both 8 bits / channel and 16 bits / channel color modes for professional workflows.
Path Scatter is 100% multi-threaded capable of using an unlimited number of cores for ultimate speed.
Path Scatter is 100% Multi-Frame Rendering (MFR) capable for significant speed gains.
Workflow
Path Scatter couldn’t be any easier to use. Here’s a simply step-by-step outline to get you started:
1. Create a new composition.2. Create a new solid.
3. Create a new path on the solid. Path Scatter works on masks.
4. Import your animated layer or create a layer and place it in your composition.
5. Add the Path Scatter Effect to your solid and specify the path and layer.
6. Animated your effect using the Evolution slider.
Path Scatter uses masks as its path. If your path is currently a shape, you can easily convert it into a mask using Create Mask From Shape located in the Layer menu.If your mask has animation, this will also carry through into your animation.
Path Scatter uses any type of layer for a layer. It can be an imported graphic, image, animation, or After Effects composition. However, the magic of Path Scatter is it’s ability to use the layer’s animation on a sub-frame level. As such, layers animated within After Effects will produce the smoothest animation since they carry sub-frame information.
Path Scatter can feature up to 1,000,000 instances. However, the more instances there are, the larger the toll on performance because Path Scatter performs complex positional, rotational and transparent operations for every single layer instance.
Once you’ve got your effect set up, animation is as easy as animating the Evolution slider, from 0% onwards. You can add easing to the start and end keyframes to control acceleration.
Path Scatter does not support motion blur natively. To use motion blur, simply apply the CC Force Motion Blur effect to the layer. Alternately, the motion blur effect can be added to an adjustment layer above the Path Scatter effect.
Here is the official documentation page for Path Scatter, breaking down each parameter in the order they appear within the After Effects effect control window.
Layers & Frequency
This group of parameters dictates the source material for your scatter. Instead of relying on a single image, Path Scatter allows you to build complex arrays using multiple After Effects layers, controlling exactly how often each one appears.
Layers: Determines the total number of unique input layers (from 1 to a maximum of 5) that will be used to generate your scattered sprites.
Layer (1-5): Dropdown menus where you select the specific After Effects composition layers to be sampled and scattered. Creative Use-Case: If you are building a swarm of insects, you could set Layer 1 to a flying bee, Layer 2 to a flying wasp, and Layer 3 to a flying mosquito.
Frequency (1-5): Float sliders that set the probability (as a percentage) of each assigned layer being generated. As you adjust one slider, the others dynamically update to maintain a 100% total. Creative Use-Case: For a realistic forest floor, you might set dry brown leaves to an 85% frequency, green leaves to 10%, and a rare glowing magical rune to just 5%.
Reset Frequencies: A utility button that instantly recalculates and balances all active frequency sliders so that every layer has an equal, even probability of appearing.
Path Selection & Distribution
These controls define the structural geometry your sprites will adhere to and how they are spaced along those lines.
Path Selection: A dropdown menu allowing you to pick a specific mask or path drawn on the current layer to act as the track for your scatter.
Use All Paths: A checkbox that overrides the single Path Selection, instantly broadcasting your instances across every mask present on the layer.
Sequentially: When “Use All Paths” is active, checking this box forces the instances to evaluate multiple paths as one long, continuous journey. They will travel to the end of the first path and immediately seamlessly transition to the beginning of the next.
Mode: A dropdown offering “Incremental” or “Constant” calculation modes. This alters the underlying math for how the plugin evaluates time and path evolution, allowing for different animation behaviors. If we use growing grass across a path as an example, incremental mode would grow the grass from the start of the path across to the end of it, over time. Constant mode would grow the grass across the entire path, all at the same time.
Distribution: Choose between “Segment” or “Path” to determine how the multiple layers are distributed across multiple paths. Segment will distribute layers randomly across paths based on segments, while Path will distribute layers randomly across themselves, so every path will have random layers.
Instances: Sets the total volume of sprites generated along your paths. This can range from 0 to 1,000,000 instances.
Time Options
If your selected input layers contain animation (such as a pre-comped walking character or a flickering flame), this sub-menu allows you to manipulate how that animation plays back across the scattered instances.
Time Factor: A slider that scales the global playback speed of your animated sprites. Use this parameter to speed up or slow down general animation.
Time Factor Randomness: Injects random timing variations into the playback speed so that individual instances animate at slightly different rates.
Time Offset Randomness (frames): Randomly shifts the starting frame of the animation for each sprite. Creative Use-Case: If you scatter 50 animated birds along a path, applying Time Offset Randomness ensures their wings don’t all flap in perfect unison, making the flock look entirely organic.
Orientation & Transformation
This robust set of tools gives you precise control over the alignment, scale, rotation, and opacity of your elements as they travel.
Auto Orient: A checkbox that forces every sprite to calculate the path’s tangent and rotate to continuously face the direction of travel.
Bidirectional: Enabling this doubles your instance count and flips half of the sprites 180 degrees, sending them traveling in the exact opposite direction along the path. Creative Use-Case: If you wanted to create a growing plant with thorns, enabling this feature would create thorns on both sides of the stem.
Bidirectional Alignment: When Bidirectional mode is active, you can choose “Even” or “Odd” to offset the opposing streams. Creative Use-Case: Draw a single path down the center of a road. By turning on Bidirectional and Bidirectional Alignment, you instantly create two perfect, non-colliding lanes of traffic.
Anchor X: Shifts the horizontal anchor point of the sprites relative to the path.
Anchor Y: Shifts the vertical anchor point of the sprites relative to the path.
Flip: A dropdown (None, X, Y, XY) that globally mirrors the instances across the chosen axes.
Flip Randomness: A dropdown (None, X, Y, XY) that randomly applies mirroring to only a portion of the instances. Creative Use-Case: If you are scattering a single image of a cloud, applying X-axis Flip Randomness ensures the sky doesn’t look obviously tiled, as half the clouds will be mirrored horizontally.
Evolution: The primary driver for motion. Animating this slider pushes the instances forward or backward along the length of the path.
Evolution Randomness: Breaks up mathematically perfect spacing by clumping instances together or pushing them apart randomly.
Scale: Controls the master global size of the generated instances.
Rotation: Controls the master global rotation of the instances.
Rotation Randomness: Injects random angular offsets to the sprites.
Opacity: Controls the master global transparency of the scattered elements.
Opacity Randomness: Randomizes the alpha channel so some sprites appear faded or further in the background.
Global Settings
Utility controls for rendering and randomization logic.
Seed: Drives the core random number generator. Scrubbing this slider (from 0 to 32768) generates a completely new, unique distribution layout without changing any of your other parameters.
Composite: A dropdown allowing you to render the final scatter effect “On Original Image” (composited directly over the layer the effect is applied to) or “On Transparent” (rendering just the sprites with a transparent background for independent blending and stacking).
Changelog
v1.0 – First release.
Installing this software is easy and only requires three simple steps:
1 – Download the software by clicking on the Download Demo button located above on the software page. This will prompt you to save a .zip file on your computer.
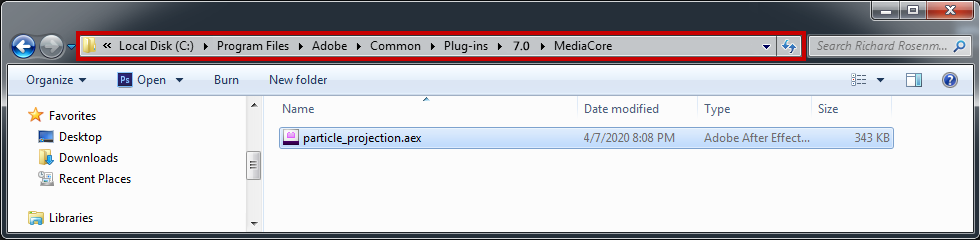
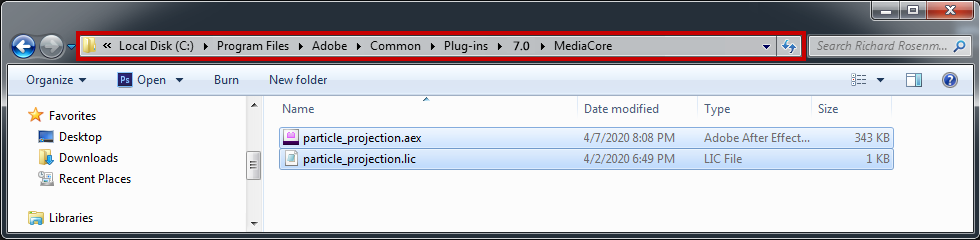
2 – Extract the contents from the .zip file and place the .aex file into your host’s plugin folder. For all Adobe After Effects versions CS6 and higher, this folder is the MediaCore folder. Place the .aex file into the location shown below. You can make a sub-folder to keep your plugins organized.
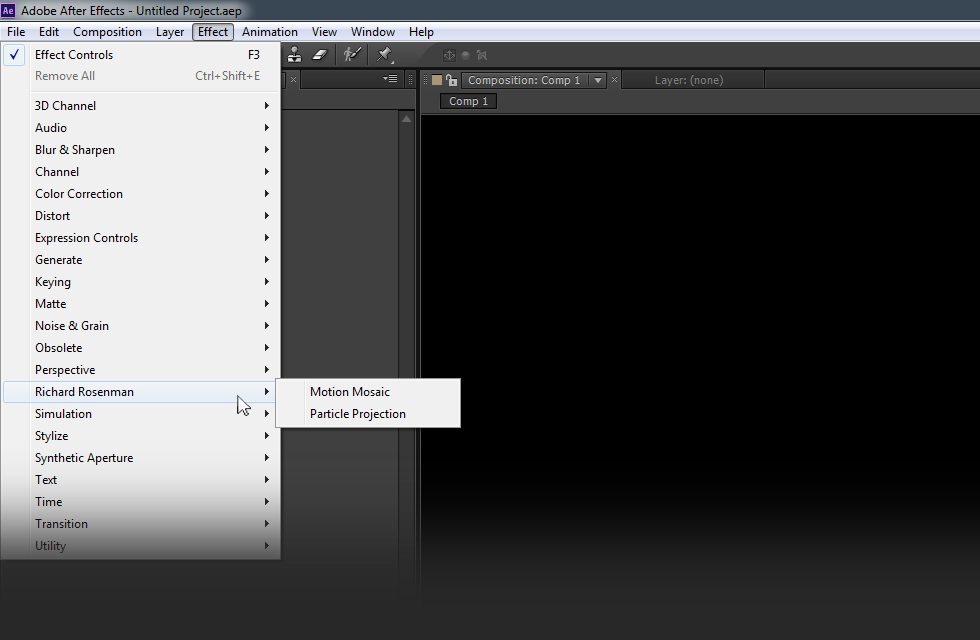
3 – Launch Adobe After Effects, create a new composition, add a new solid, and click on Effect > Richard Rosenman > Effect Name.
If you have purchased a commercial license, please review the activation section.
If you have purchased a commercial license, you must activate your software. You can manually activate your software at any time by logging into your account. Activating this software is easy and only requires five simple steps:
1 – Log into your account by clicking on the Account button in the top menu.
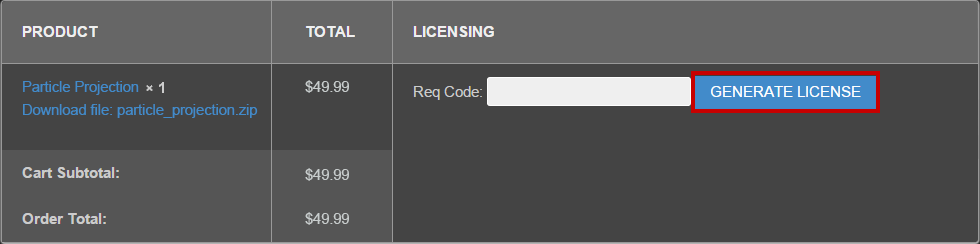
2 – Click on VIEW to display the order details containing the product you wish to activate.
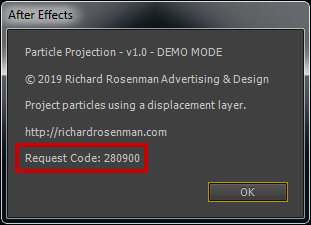
3 – Enter your request code and click GENERATE LICENSE. Please see below for info on how to retrieve your request code.
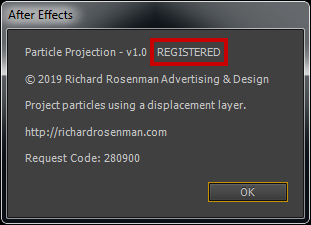
Your request code can be found by right-clicking on the plugin name in the effect window and selecting About.
4 – A file prompt will ask you to save the license file. You must save this license file in the same folder the plugin resides in.
Place the .lic file into the location shown below. You can make a sub-folder to keep your plugins organized.
5 – Relaunch Adobe After Effects, create a new composition, add a new solid, and click on Effect > Richard Rosenman > Effect Name.
If you on click the About button located at the top of the plugin interface once again, your software should now display REGISTERED. If it is registered but you still see a red x, simply clear your cache. It is now unlocked and ready for use.
This software is compatible with the following Windows OS:
Windows 11 Home 64 bit
Windows 11 Pro 64 bit
Windows 11 Enterprise 64 bit
Windows 11 Education 64 bit
Windows 10 Home 64 bit
Windows 10 Pro 64 bit
Windows 10 Enterprise 64 bit
Windows 10 Education 64 bit
Windows 8 64 bit
Windows 8 Pro 64 bit
Windows 8 Enterprise 64 bit
Windows 7 Home Basic 64 bit
Windows 7 Home Premium 64 bit
Windows 7 Professional 64 bit
Windows 7 Enterprise 64 bit
Windows 7 Ultimate 64 bit
This software is compatible with the following hosts:
Adobe After Effects (Version CS6 or higher, including CC) 64 bit