Rope Sim is a powerful rope simulation plugin for After Effects capable of complex physics-driven rope simulations. Until now, animating realistic cables, strings, and ropes has been a tedious process of manual keyframing, rigid puppet pins, and frustrating visual compromises. Rope Sim breaks those limitations by introducing a high-performance, physically-correct simulation environment directly into your 2D and 2.5D compositions. Harnessing the raw computational power of GPU acceleration through advanced OpenCL and CUDA processing, this plugin delivers improved simulation performance, allowing you to focus on your creative vision rather than fighting the math.
Rope Sim GUI
The Ultimate Physics-Driven Rope Engine for After Effects
All examples on this page shown with segments enabled for clarity
For motion designers and animators, Rope Sim acts as a gateway to organic, secondary motion. Instead of painstakingly plotting out bezier paths frame-by-frame to fake overlapping action, you simply define your anchor points, dial in your desired rope length, and let the robust physics engine take over. You have absolute control over the physical properties of your dynamics. By tweaking deep parameters like elasticity, damping, and gravity, you can simulate anything from a heavy, sluggish industrial chain to a highly elastic, snappy bungee cord. The engine even features advanced self-collision calculations, ensuring that your ropes behave exactly as they would in the real world, elegantly folding and piling up on themselves without ever breaking the illusion of volume.
Real-World Collision Physics With After Effects Masks
Use After Effects masks as colliders – of any shape and animation.
Visual effects artists will unlock an unprecedented level of environmental interactivity through Rope Sim’s brilliant mask-based collision and wind systems. You can effortlessly integrate your simulated ropes into live-action plates or complex motion graphics by utilizing standard After Effects masks as rigid colliders. Combine this with the plugin’s robust wind and turbulence generator, and you can instantly breathe life into a scene, whether you are creating the chaotic, high-frequency whipping of a downed power line in a hurricane or the gentle, rhythmic sway of a hanging string light in a soft evening breeze.
Rope Sim is ideal for simulating character features such as hair or tails. Instead of spending hours animating a character’s pony tail, simply hook-up the start point to the character and watch the engine simulate the hair with accurate secondary motion in no time.
Animatable Attachment Points
Keyframe any attachment point, detaching or re-attaching at any time.
Rope Sim features start and end attachment points at its core. Animate the attachment of any of the points throughout the timeline for truly unique results such as a dangling power line between two poles, which detaches on one end, causing the cable to swing down. Detaching both ends allows for a free-falling rope which can bounce, wrap, stick or slide off any mask collider in the scene.
Rope Tearing Based On Tension
Pull the points apart, use a collider, or even drop the rope for tension stress to tear it apart.
At its core, Rope Sim features a powerful, keyframable attachment system. Anchor points can track to moving elements, but their true magic lies in animating their attached state. By detaching a point, a rigid element instantly becomes a dynamic physical object.
Imagine detaching one end of a taut power line: the engine instantly calculates the release of tension, causing the cable to swing downward, driven entirely by simulated weight, gravity and momentum – no manual path animation required.
Detaching both ends sends the rope into complete free-fall, allowing it to dynamically bounce, wrap, or slide against any mask collider in your scene. This transforms days of agonizing vertex manipulation into a breathtaking, emergent simulation.
Fully Editable Properties & Aesthetics
Adjust rope thickness, tapering, color and composite mode.
From a visual and stylistic standpoint, Rope Sim pushes far beyond simple, uniform strokes by offering seamless, independent control over start and end thickness tapering. This granular control allows artists to effortlessly transform basic lines into highly stylized organic elements – such as creeping tentacles or overgrown vines, giving them a natural volume that beautifully enhances the physical illusion. Beyond organic aesthetics, Rope Sim includes a diagnostic visualization mode that displays the underlying physics nodes and individual rope segments.
Apply stickiness and only allow the rope to ‘unstick’ at a specific threshold.
Rope Sim is not just a utility; it is an entirely new creative workflow that bridges the gap between complex 3D physics software and the intuitive2D layer-based workspace of After Effects. By eliminating the complexity of traditional path animation and replacing it with highly art-directable, physically accurate simulations, Rope Sim empowers artists to bring a breathtaking level of dynamic, breathing realism to their projects in record time.
Rope Sim supports both 8 bits / channel and 16 bits / channel color modes for professional workflows.
Rope Sim is GPU accelerated for ultimate speed.
Rope Sim is 100% Multi-Frame Rendering (MFR) capable for significant speed gains.
Workflow
Rope Sim couldn’t be any easier to use. Here’s a simple step-by-step outline to get you started:
1. Create a new composition.2. Create a new solid.
3. Add the Rope Sim Effect to your solid.
4. Add a mask to your solid if you wish to use colliders, set the mask mode to "None", and specify the mask in the collision options.
5. Preview the animation.
Rope Sim uses masks for colliders. If your path is currently a shape, you can easily convert it into a mask using Create Mask From Shape located in the Layer menu. If your mask has animation, this will also carry through into your animation.
Rope Sim is a physics simulator. As such, it must recalculate the entire sim each time the frame is changed. While it features outstanding performance, it will begin to slow down the longer the animation is. Adding colliders will also slow down performance as it must perform collision checks.
Getting a good simulation is a combination of the right number of segments and substeps. For example, tearing will have different stress points depending on these factors. Colliders will behave differently – sometimes more accurately, other times less so. Forces will also have different impacts based on these factos.
If a simulation is changed midway through a cached sim, you may need to clear the After Effects cache to produce a new, clean result as After Effects may still have part of the older simulation stored in cache.
Rope Sim does not support motion blur natively. To use motion blur, simply add an adjustment layer and apply the Pixel Motion Blur effect to the layer.
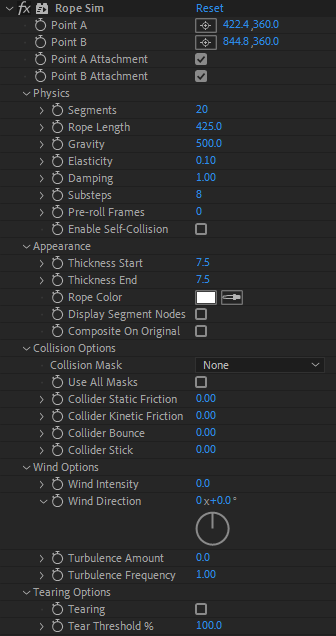
Main Parameters
This category contains the fundamental parameters you’ll be using most of the time – chain point positions and attachments. These are among the most powerful parameters within the plugin. They allow you to control the general behavior of the rope and dictate whether it should be hanging, dangling, or even both. Both the start and end points can be keyframed at any time so that the rope can be moved, stretched, swung, spun, or collided with masks. More importantly, any point can be detached or re-attached using keyframing at any time. For example, the second point can be detached, so that the rope falls and swings, followed the first point detachment, causing the rope to fall. Finally, the points can even be re-attached mid-way through the timeline which allows the rope to have fallen, and then picked up again.
Keyframe the attachment point and simulate instant, beautiful secondary motion.
Point A: This determines the primary X and Y coordinate for the start of the rope in your composition space. You can keyframe this position to attach the rope to a moving object, like a swinging crane arm or a character’s hand.
Point B: This determines the secondary X and Y coordinate for the end of the rope.
Point A Attachment: This determines whether the rope is physically pinned to Point A. Unchecking this box, especially when keyframed, releases the rope from this specific point, allowing it to detach and swing downwards based on gravity and momentum.
Point B Attachment: This dictates whether the rope is pinned to Point B. If both Point A and Point B attachments are disabled simultaneously, the entire rope will enter a free-fall state and plummet through the composition. Adding collider masks below can produce unique results as the rope can bounce, stick, or slide with it.
Physics
This core category houses the fundamental properties that dictate how the rope behaves in its environment. By adjusting these settings, you can define the material feel of the simulation, transforming a light string into a heavy chain. The number of segments and the substeps are probably the single two most important parameters in this section and they work together hand-in-hand to produce different results. A high number isn’t always desirable and a lower number of rope segments, for example, can create a smoother rope, albeit less accurate.
Adjust rope elasticity (left) or modify damping (right) to simulate different materials.
Segments: This controls the underlying resolution of the rope simulation by dividing the total length into smaller, rigid links. A lower segment count creates a stiff, blocky chain, while a higher segment count yields a highly flexible, smooth cable, though it requires slightly more processing power to calculate. The segment count also affects forces and collision accuracy.
Rope Length: This dictates the total resting length of the simulated cable, independent of the actual distance between Point A and Point B. For example, if your anchor points are 500 pixels apart on screen but your rope length is set to 1000, the rope will naturally sag heavily in the middle, creating a deep, realistic U-shape.
Gravity: This sets the directional force pulling the rope downwards. A higher value simulates a heavier, denser material, while negative values can be used to reverse gravity entirely, making the rope float upwards like an underwater kelp stalk or a helium balloon string.
Elasticity: This defines how stretchy the material is when put under tension. A value near zero simulates a rigid steel cable that refuses to stretch, whereas a higher value creates a bouncy, rubber-band effect when the rope is pulled taut.
Damping: This applies simulated air resistance or friction to the rope’s movement, causing it to lose energy over time. High damping is excellent for simulating ropes submerged in viscous fluids like water or oil, as it forces the swinging rope to settle into its resting position much faster instead of swinging endlessly. A damping value of 0 would mean the rope would never come to a complete standstill.
Substeps: This critical parameter determines how many times the physics engine calculates collisions and forces between every rendered frame. If your rope is passing right through your collision masks or jittering wildly under high tension, increasing the substeps will drastically improve the accuracy and stability of the simulation by giving the engine more time to correct physics errors.
Pre-roll Frames: This forces the simulation to calculate physics for a set number of frames before the timeline actually begins. This is particularly useful if you want your rope to start in a fully settled, resting state rather than falling awkwardly into place exactly at frame zero of your animation.
Enable Self-Collision: This prevents the rope from clipping through its own geometry. When enabled, the rope will realistically fold, stack, and coil upon itself when dropping onto a surface, rather than phasing through its own segments.
This category controls the visual rendering of the rope once the physics simulation is complete. It dictates how the underlying math is drawn onto your After Effects composition. Using the options in this group, the rope can be tapered so that it can represent a tail, hair or a tentacle.
Simulate secondary action such as clothing elements like the neck tie shown below.
Thickness Start: This sets the width, in pixels, of the rope at Point A.
Thickness End: This sets the width of the rope at Point B. By using different values for the start and end thickness, you can easily create organically tapering shapes like vines, tentacles, or a rat’s tail.
Rope Color: This determines the solid color used to render the rope segments.
Display Segment Nodes: This renders distinct circular indicators at each physics segment joint along the rope. It is primarily used as a technical diagnostic tool to see exactly how the physics engine is calculating the rope’s curve.
Composite On Original: This blends the rendered rope directly over the original source image of the layer. If disabled, the plugin will render the rope on a perfectly transparent background, ignoring whatever pixels were originally on the layer.
Collision Options
This group allows your simulated rope to physically interact with the environment defined by your After Effects masks. It bridges the gap between the simulated rope and the rest of your composition. Colliders allow for physically-correct rope interactions with various shapes – even custom drawn ones. Since the shapes are vector-based, accurate collisions are calculated since Rope Sim computes correct angles on impact. You are not limited to just one shape – you can have as many as you want so that it’s a breeze creating full interactive environments for your simulations.
Collision Mask: This dropdown allows you to select a specific path drawn on your layer to act as a physical barrier. The rope will dynamically bounce off or rest upon the contours of this mask.
Use All Masks: This overrides the single mask selection and forces the physics engine to treat every single mask path on the layer as an active physical collider.
Collider Static Friction: This determines how much horizontal force is required to get a resting rope to start moving across a collider’s surface. A high value means the rope will grip the surface tightly and resist being dragged by gravity or wind.
Low collider kinetic friction (left), high collider kinetic friction (right)
Collider Kinetic Friction: This dictates how much sliding resistance is applied while the rope is actively moving along a collider. Increasing this value makes the collider surface feel rough like sandpaper, causing the rope to drag and slow down as it slides.
Low collider bounce (left), high collider bounce (right)
Collider Bounce: This controls the restitution, or springiness, of the collision surface. A high bounce value will cause a dropped rope to ricochet off the mask upon impact, much like a rubber hose hitting a concrete floor.
Collider stickiness with low threshold level.
Collider Stick: This defines an interactive threshold that temporarily pins the rope to the collider until a specific amount of tension forces it to pull away. This is incredibly useful for simulating sticky organic materials like spiderwebs or slime threads that adhere to a surface until forcibly yanked off by a moving anchor point.
Wind Options
This category provides an external, directional force field that pushes the rope globally, perfect for simulating weather or chaotic environmental turbulence. Keyframing the wind parameters will produce physically-accurate results since the rope will react accordingly. Just like real-world wind effects, Rope Sim provides turbulence for varying wind intensities as well as wind frequency for control over the scale.
Upward wind with colliders (left), sideward wind with colliders (right).
Wind Intensity: This sets the base strength of the wind pushing against the rope.
Wind Direction: This angle parameter determines the global direction the wind is blowing towards. By combining high intensity with specific angles, you can simulate a strong cross-breeze, an updraft lifting the rope, or a downdraft pushing it flat against a surface.
Wind low turbulence frequency (left), wind high turbulence frequency (right).
Turbulence Amount: This adds randomized, chaotic force to the baseline wind intensity. Instead of a steady, constant push, the rope will flutter and whip unpredictably, perfectly mimicking the chaotic behavior of a loose cable in a heavy storm.
Turbulence Frequency: This controls the speed and tightness of the turbulent waves acting on the rope. A lower frequency creates broad, slow swaying motions, while a high frequency causes rapid, tight vibrations along the entire length of the cable.
Tearing Options
This advanced mechanical group allows the rope to dynamically snap or break when the simulation forces exceed its structural limits. Tearing is an extremely powerful feature in Rope Sim. By specifying a threshold, you can control how much stress the rope can take before breaking. This allows you to simulate different threads such as fine wool or tough silk. Moreover, since tearing is dependent on segment stress, the rope can break using any number of means – by pulling it taut, by pushing a collider through it, or by dropping it. The tearing point will be completely different in every scenario, but always physically-accurate. Sometimes the rope will snap in the middle, while other times it will snap at one of the attachments points. If you display the segment points, you can specifically see where the tearing occurs.
Tearing by separating points and producing tension stress.
Tearing with collider producing tension stress.
Tearing with collider due to gravity impact tension stress.
Tearing: This checkbox activates the tearing system. When disabled, the rope is indestructible regardless of how much force, wind, or tension is applied to it.
Tear Threshold %: This sets the exact breaking point of the rope based on how much it stretches beyond its resting length. For example, setting this to 50% means the rope will physically snap in half if the physics engine forces any segment of the rope to stretch to 1.5 times its original resting size.
Changelog
v1.0 – First release.
Installing this software is easy and only requires three simple steps:
1 – Download the software by clicking on the Download Demo button located above on the software page. This will prompt you to save a .zip file on your computer.
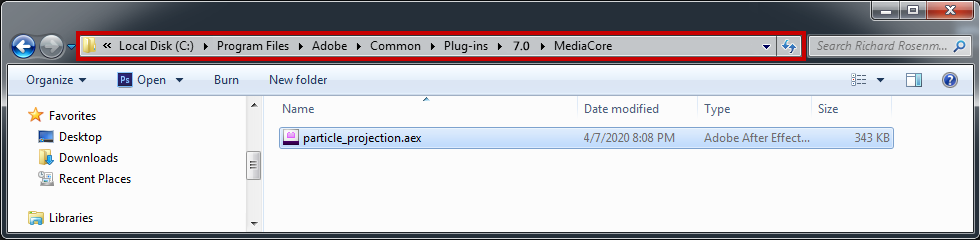
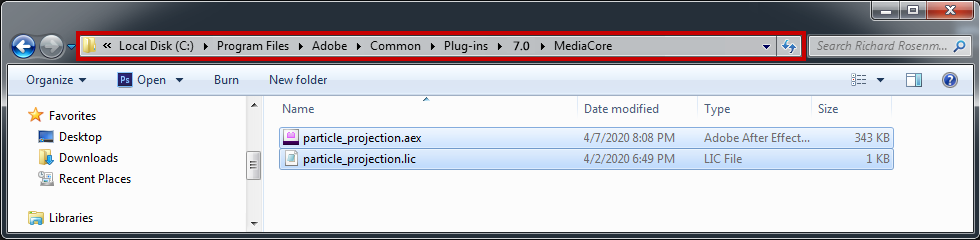
2 – Extract the contents from the .zip file and place the .aex file into your host’s plugin folder. For all Adobe After Effects versions CS6 and higher, this folder is the MediaCore folder. Place the .aex file into the location shown below. You can make a sub-folder to keep your plugins organized.
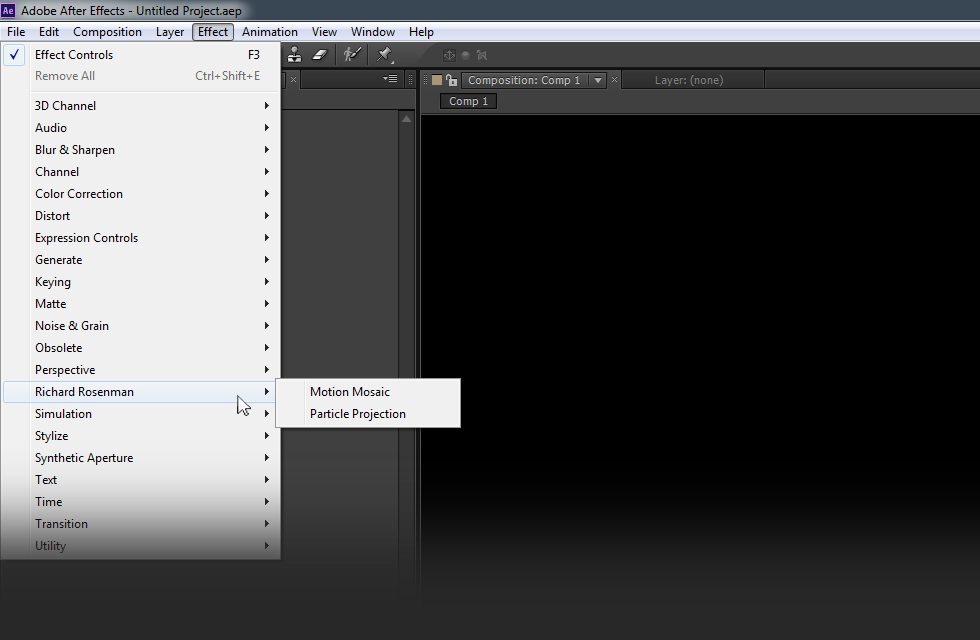
3 – Launch Adobe After Effects, create a new composition, add a new solid, and click on Effect > Richard Rosenman > Effect Name.
If you have purchased a commercial license, please review the activation section.
If you have purchased a commercial license, you must activate your software. You can manually activate your software at any time by logging into your account. Activating this software is easy and only requires five simple steps:
1 – Log into your account by clicking on the Account button in the top menu.
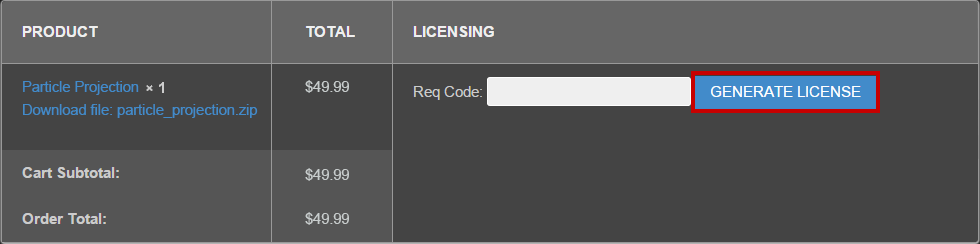
2 – Click on VIEW to display the order details containing the product you wish to activate.
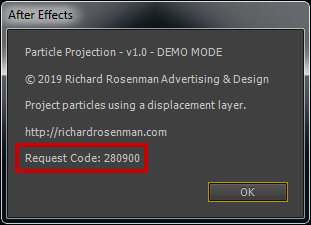
3 – Enter your request code and click GENERATE LICENSE. Please see below for info on how to retrieve your request code.
Your request code can be found by right-clicking on the plugin name in the effect window and selecting About.
4 – A file prompt will ask you to save the license file. You must save this license file in the same folder the plugin resides in.
Place the .lic file into the location shown below. You can make a sub-folder to keep your plugins organized.
5 – Relaunch Adobe After Effects, create a new composition, add a new solid, and click on Effect > Richard Rosenman > Effect Name.
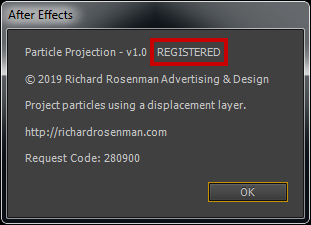
If you on click the About button located at the top of the plugin interface once again, your software should now display REGISTERED. If it is registered but you still see a red x, simply clear your cache. It is now unlocked and ready for use.
This software is compatible with the following Windows OS:
Windows 11 Home 64 bit
Windows 11 Pro 64 bit
Windows 11 Enterprise 64 bit
Windows 11 Education 64 bit
Windows 10 Home 64 bit
Windows 10 Pro 64 bit
Windows 10 Enterprise 64 bit
Windows 10 Education 64 bit
Windows 8 64 bit
Windows 8 Pro 64 bit
Windows 8 Enterprise 64 bit
Windows 7 Home Basic 64 bit
Windows 7 Home Premium 64 bit
Windows 7 Professional 64 bit
Windows 7 Enterprise 64 bit
Windows 7 Ultimate 64 bit
This software is compatible with the following hosts:
Adobe After Effects (Version CS6 or higher, including CC) 64 bit