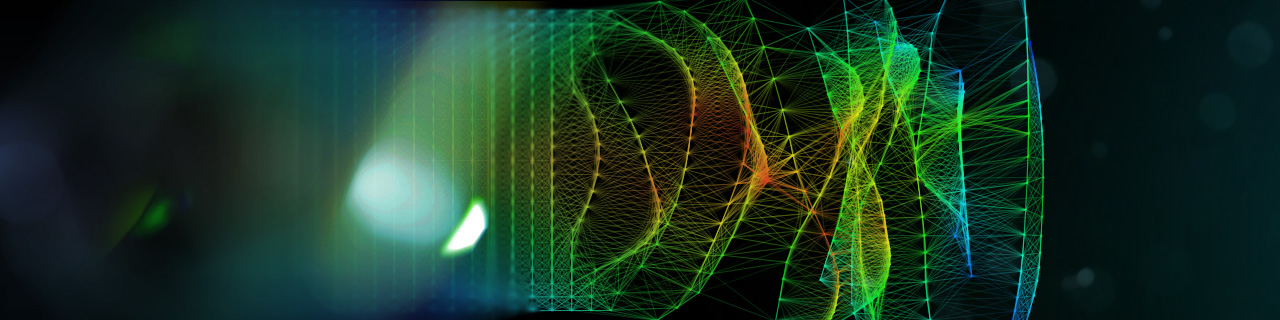
Lattice is an incredibly powerful particle based procedural lattice structure generator for Adobe Photoshop (or compatible host). It is a novel tool for designers, illustrators and digital artists for the creation of generative design. When combined with traditional commercial design, Lattice adds technical sophistication.
Lattice GUI
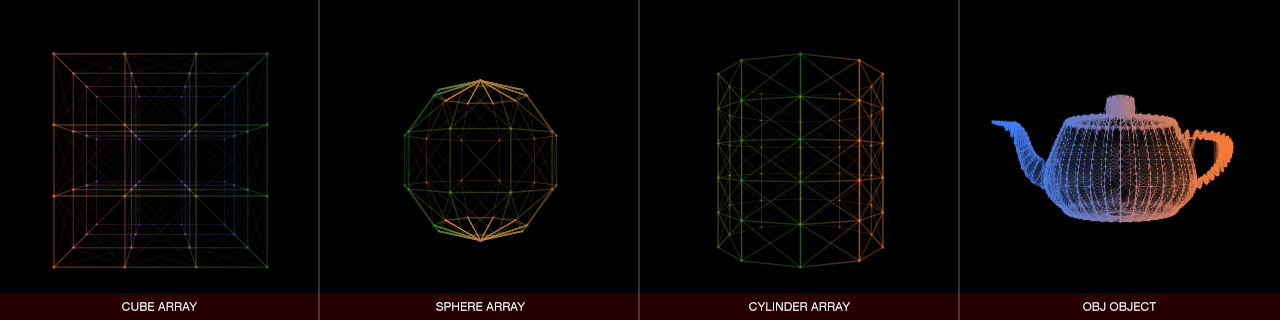
Lattice’s core function is to interconnect particles with lines and points. Particles are initially generated in the form of a 3D cube, sphere or cylinder and are then manipulated by you through the use of effectors. When two particles are within a specified distance of each other, they are connected. This simplicity of ordered chaos is what makes generated content from Lattice so visually captivating.
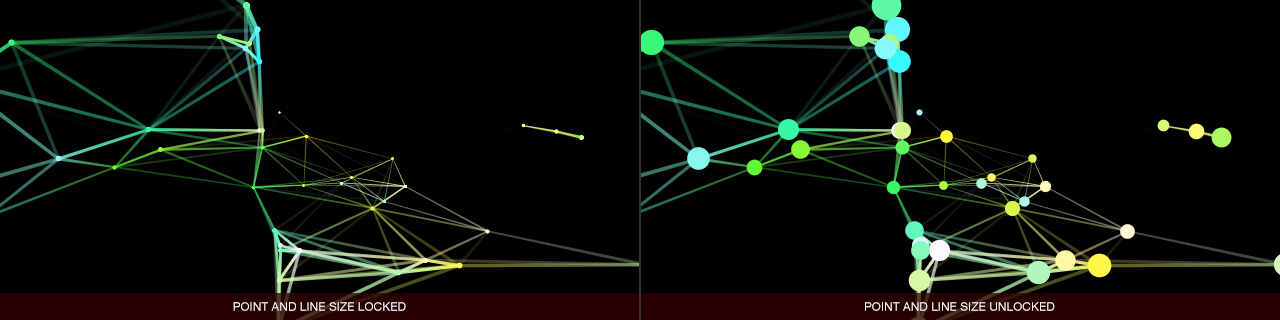
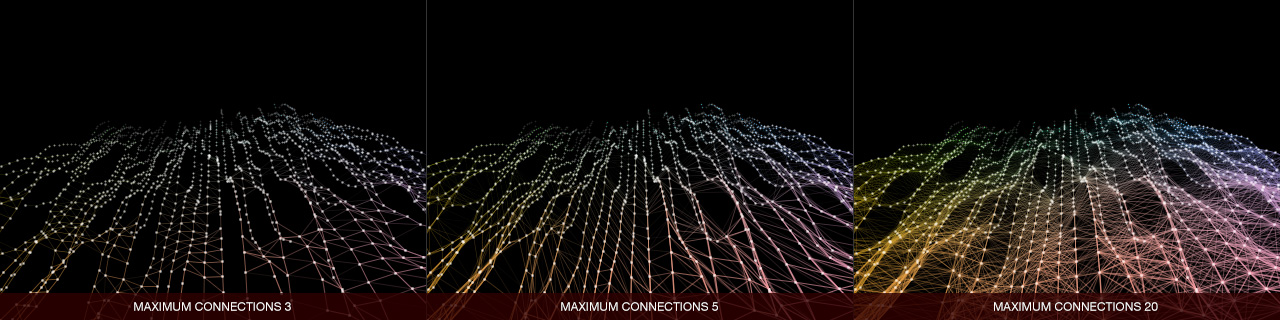
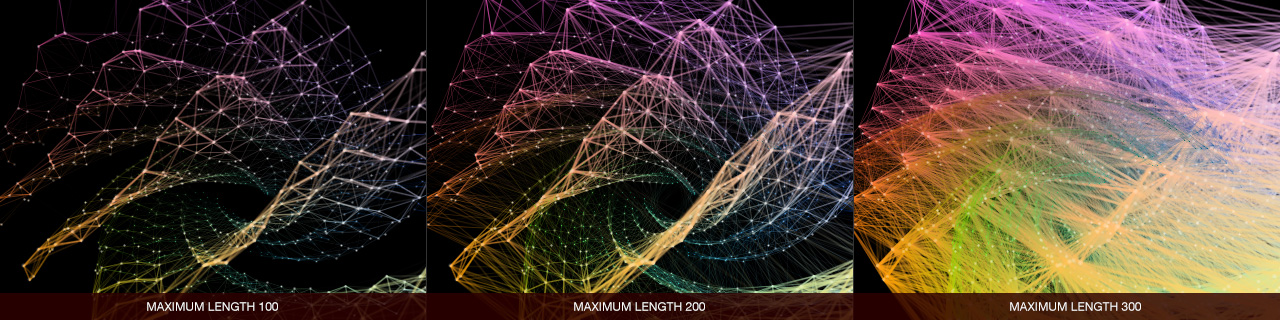
Lattice provides a vast array of options to get your structure looking perfect. Line and point sizes can be locked with respects to one another, or fully independent. Line and point transparency can be affected by depth while line transparency can also be affected by length. Specify the minimum and maximum particle distance required for a connection as well as the maximum number of connections allowed.
Lattice produces stunning imagery to enhance your design work.
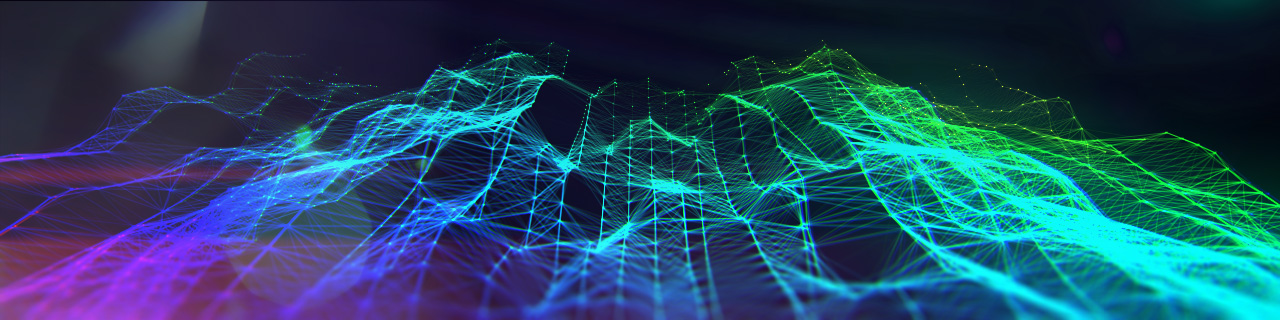
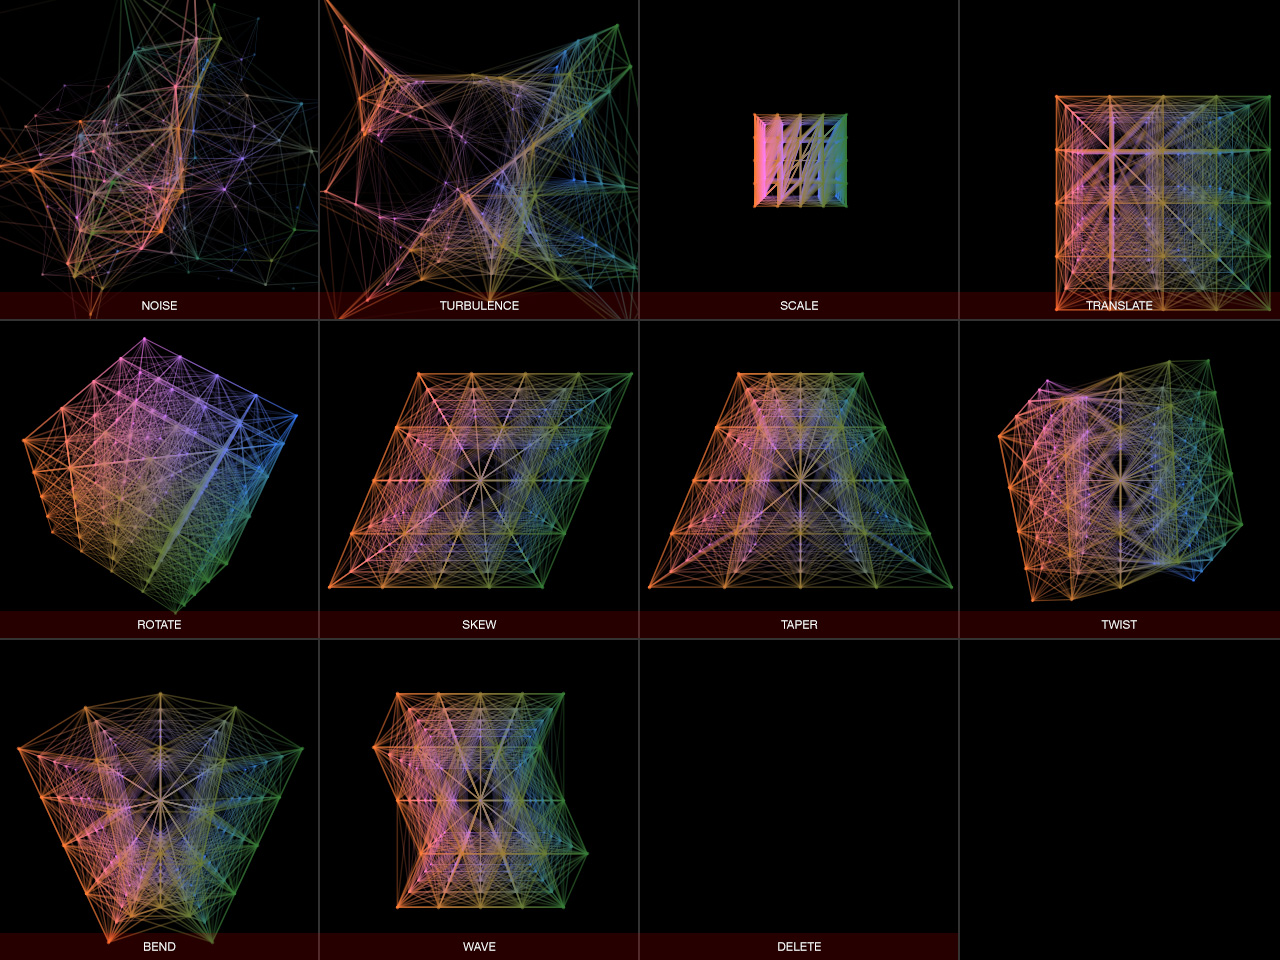
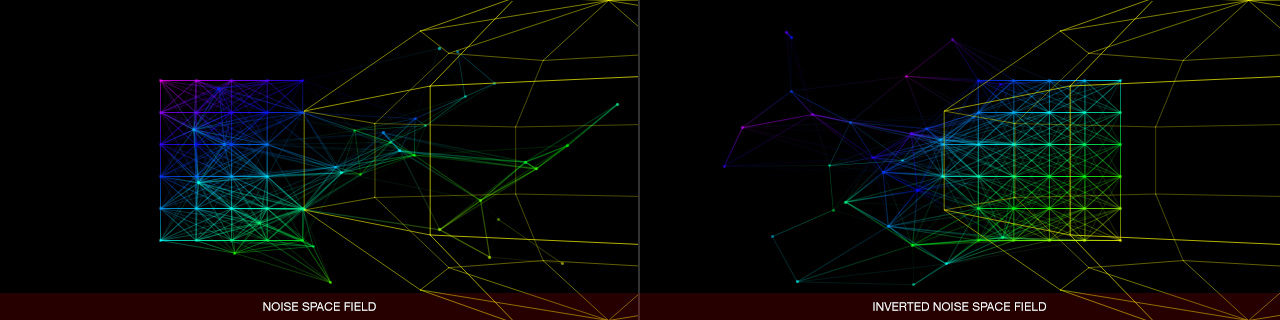
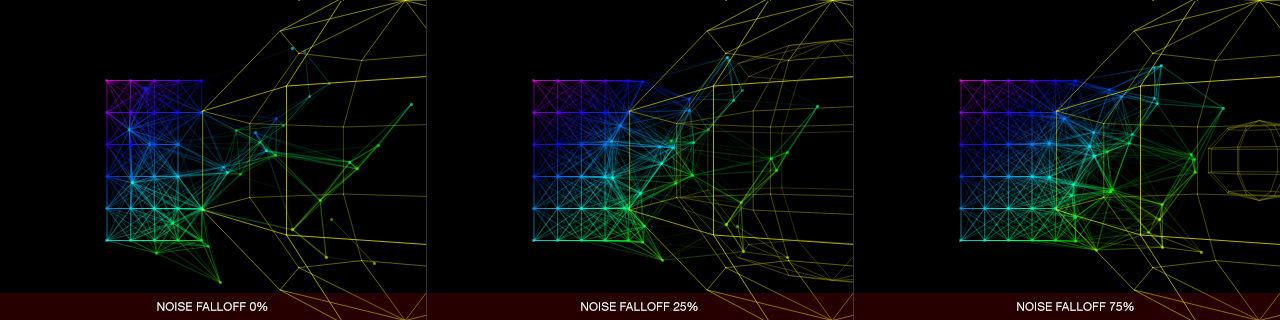
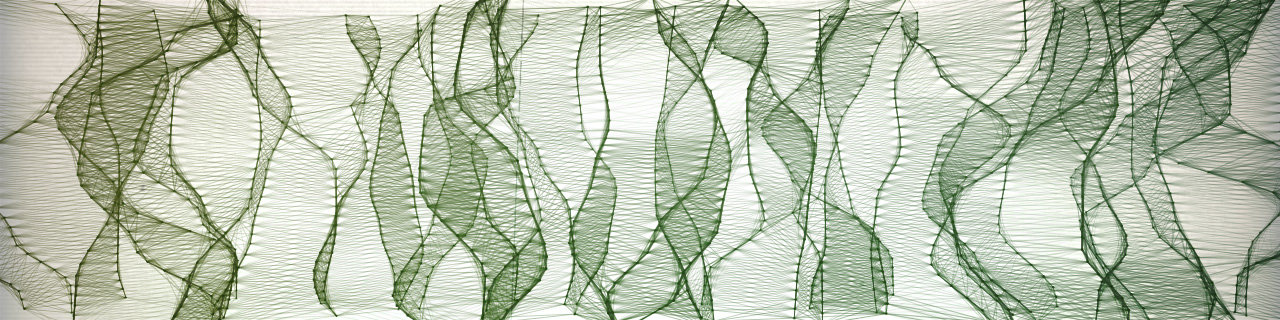
Lattice’s effectors, the heart of the plugin, can produce all sorts of dynamic effects such as noise, turbulence, scales, translations, rotations, skews, tapers, twists, bends, waves and deletes. By combining multiple effectors together you can produce truly stunning structures of unlimited variations. Additionally, each effector has its own affective space fields so that you can modify only specific parts of the particle array. A falloff control allows you to softly feather the effect while other features such as field inversion and field axis allow endless fine-tuning of your effect.
Noise and turbulence effectors provide their own seed values so you can have an infinite number of generative effects. Delete allows you to remove particles from specific areas thus resulting in highly-customized structures.
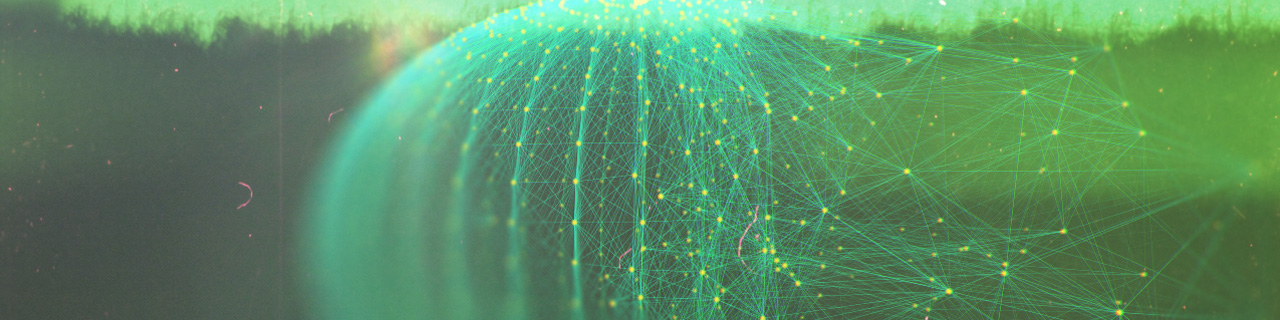
Lattice’s beauty is in the simplicity of its generative self.
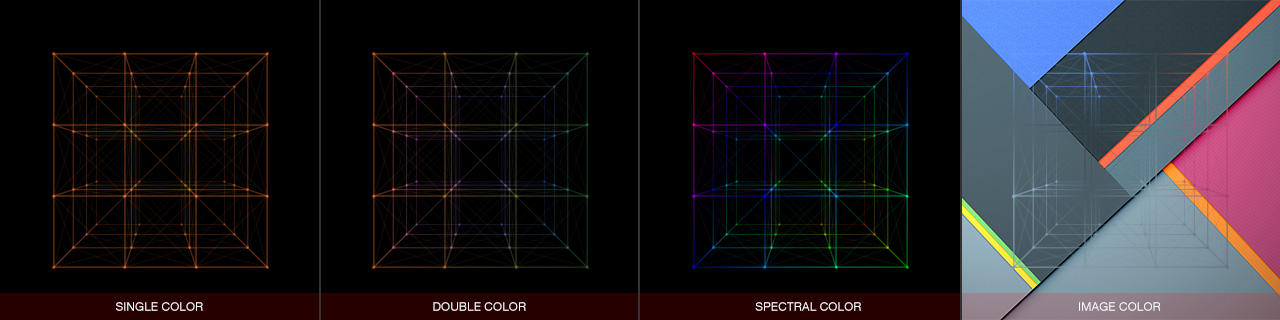
Lattice doesn’t stop there. Packed with a seriously powerful coloring engine, each particle can inherit it’s own unique color based on axis or position. Coloring can be dictated by a single color, a mix of two colors in any number of three dimensions, a distribution of color spectrum in any number of dimensions and even image colors derived from a source image thereby facilitating integration into existing images. Both line and point colors can be individually overridden for a custom color and line intensity can be derived from line length resulting in gorgeous shading.
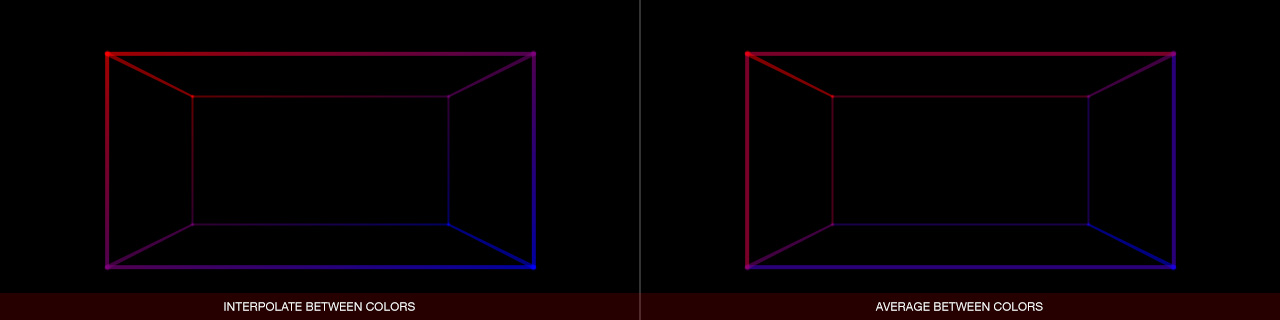
Interconnecting particles can have colors blended between the two resulting in gradients or averaged for more graphic results.
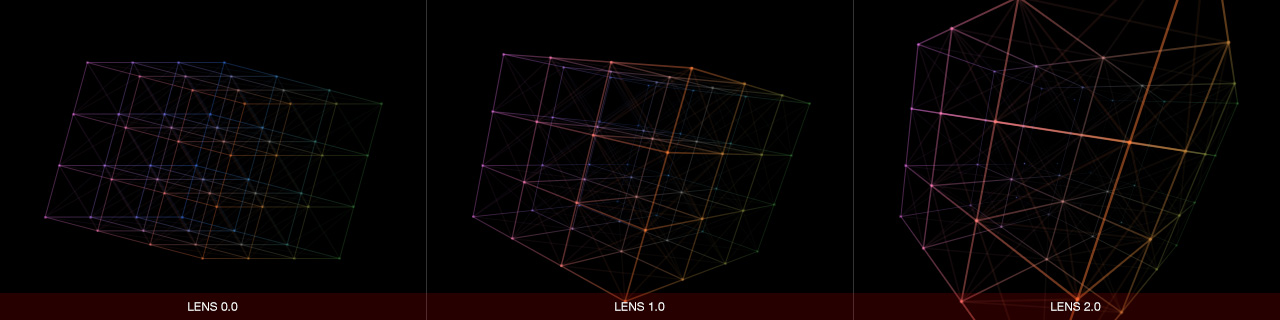
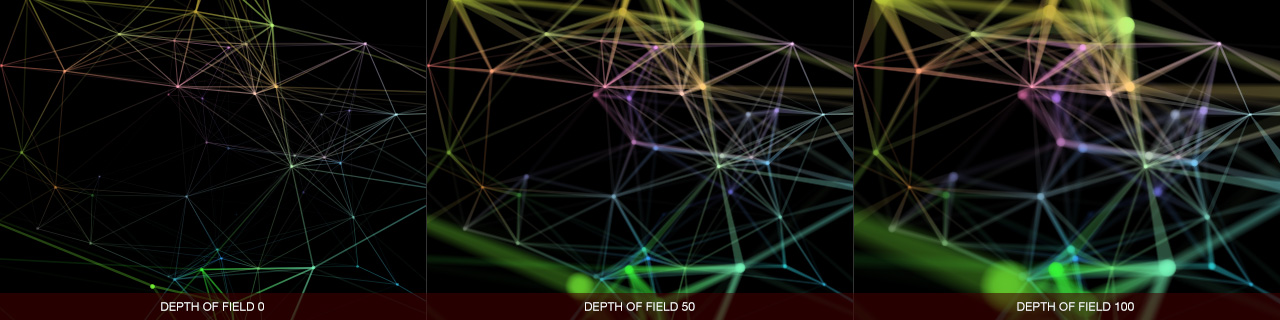
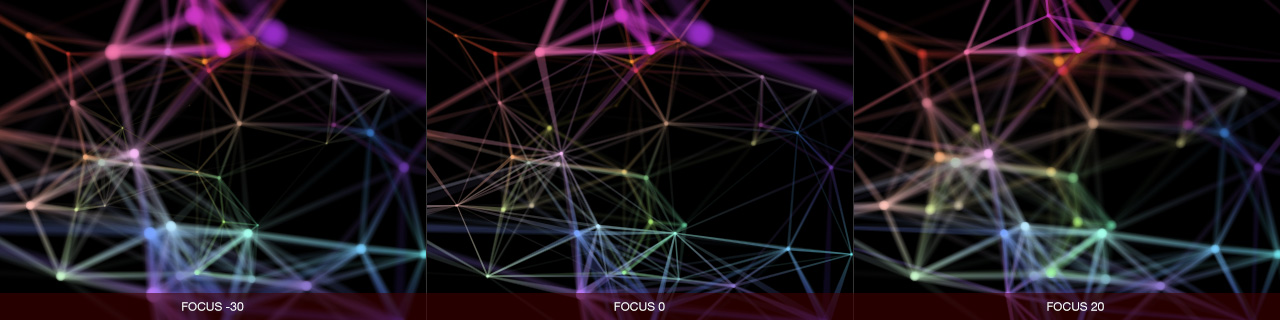
Lattice also features simulated depth of field! Easily bring particles in or out of focus within a viewing plane. Adjust the lens for an increased or decreased field of view and exaggerated perspective.
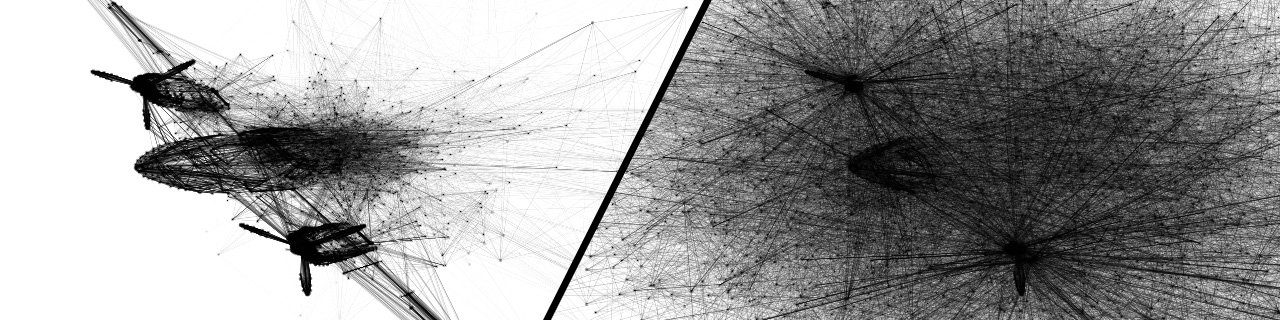
Lattice can easily generate high-density or low-density structures.
Lattice also boasts the capability to import OBJ models! This means you can create your own custom 3D model in your software of choice and import it into Lattice. Once inside, you can rotate, scale, and translate your model, and use effectors to manipulate it just as you would any built-in Lattice particle array. Working with custom 3D models inside Lattice provides limitless creative possibilities.
Remember that by using effector space fields, you can customize any specific parts of your OBJ model, complete with falloff feathering.
Lattice can import OBJ models created with your software of choice.
Lattice provides a large, simplified and user-friendly interface with all the necessary features you’d expect. A live status bar displays statistical info such as the object type, active number of points and lines, how many effectors are currently in use and the frames per second (FPS) for performance measures. Any object can be saved or retrieved at the click of a button.
Download Lattice now and try the demo. Lattice adds a level of sophistication to your work making it a must-have plugin in the arsenal of any artist and designer.
Lattice is 100% multi-threaded capable of using an unlimited number of cores for ultimate speed.
Lattice supports both 8 bits / channel and 16 bits / channel color modes for professional workflows.
Workflow
Lattice operates by interconnecting points from an array of particles that are manipulated using various predefined components. These components are called effectors and the list of these effectors is called the stack. The stack defines the structure in it’s entirety and due to its workflow, provides non-destructive adjustment. The stack is the most important part of the Lattice GUI and having a clear understanding of it’s operation will ensure you get the most out of the software.
Every effector dropped into the stack holds its own unique set of parameters based on the type of effector that it is. For instance, a turbulence or wave effector will use the scale parameter while a noise effector won’t. Other effectors modify the X, Y and Z effect sliders. For instance, a scale effector will reset the ranges from 0-200, while a translate effector will reset the ranges from -200-200. A delete effector will only use the radius and X, Y, Z position controls. Each effector can be meticulously adjusted using these parameters to reach the desired look intended.
Workflow Tips
Lattice performs some lengthy calculations. As a result, it’s important to know what features affect performance and how. At all times, Lattice will display the current FPS which is a good gauge for performance levels. Lattice’s was built upon simplicity and the nicest aesthetic results often come from working with low density objects.
The single greatest performance hit comes from the number of lines which is defined by the number of connecting particles. The status bar will actively display how many points and lines are being drawn. If you accidentally set too many particles, you can cancel the current processing by pressing escape.
Depth of Field may cause a performance hit because it requires increasing the size of lines and points.
Line size (thickness) may also cause a performance hit if the lines are too thick.
Zoom level for the preview windows can significantly affect performance. A smaller preview window will result is much faster performance.
Effectors are not saved per invocation. If you apply or cancel the filter, your effectors will be lost. As a result, it is recommended you save your work before exiting the filter.
OBJ objects are not saved per invocation. If you apply or cancel the filter, your loaded OBJ object will be loast. As a result, it is recommended you save your work before exiting the filter and reload the OBJ object.
Object Parameters
Object Type: Specifies what object type to use for the initial particle array. Options include Cube Array, Sphere Array, Cylinder Array or OBJ model. Switching from one object to another will destroy the current object. However, active effectors will remain in memory. This means you can switch from a cube array to a sphere array while maintaining all your predefined effectors.
Lattice allows OBJ object import. Once imported, you can apply any effectors as you would on a cube, sphere or cylinder array. Keep in mind some OBJ objects can be very dense and therefore may affect performance.
Load OBJ: When OBJ model is selected from the object type dropdown, this button toggles the file loader. Loading an OBJ object will display the number of loaded points being loaded.
Grid X, Y, Z: Specifies the number of particles in the X, Y and Z axis respectively for the Cube Array, Sphere Array or Cylinder Array. When OBJ model is selected, these sliders are inactive.
X, Y, Z Pos: Transforms the particles in the X, Y and Z axis respectively.
X, Y, Z Scale: Scales the particles in the X, Y and Z axis respectively.
Rot X, Y, Z: Rotates the particles in the X, Y and Z axis respectively. You can interactively rotate the object by clicking and dragging in the preview window.
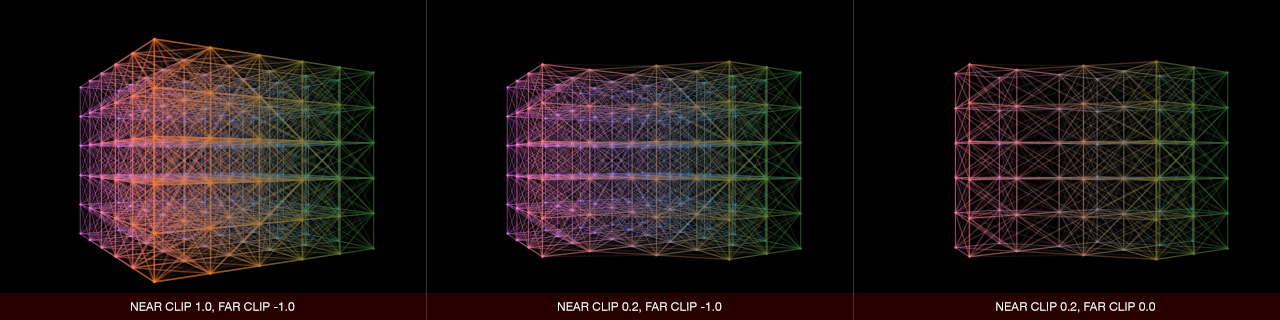
Near Clip: Specifies the near clipping plane. Any particles beyond the near clipping range will not be drawn.
Far Clip: Specifies the far clipping plane. Any particles beyond the far clipping range will not be drawn.
Lens: Specifies the field of view. An increased lens will exaggerate perspective.
DOF: Specifies the amount of depth of field. Lattice’s simulated depth of field allows you to defocus particles that fall outside a given depth.
Focus: Specifies the focus plane for depth of field. Particles outside this plane will defocus.
Render Points: Toggles point rendering.
Point Color Override: Specifies whether to use the inherited point color or a custom point color.
Point Color Override Swatch: Specifies the custom point color.
Size: Specifies the point size. If Lock Point and Line Size is enabled, this will also affect line size.
Intensity: Specifies the point intensity.
Lock Point and Line Size: Locks point and line size. Adjusting point size will respectively set line size and vice-versa.
Perspective Opacity: Specifies point and line transparency based on depth. The further back particles are, the more transparent they will become.
Render Lines: Toggles line rendering.
Line Color Override: Specifies whether to use the inherited point color or a custom line color.
Line Color Override Swatch: Specifies the custom line color.
Line Length Opacity: Specifies line transparency based on length. The longer lines are, the more transparent they will become.
Line Color Interpolation Mode: Specifies whether to blend or average colors between two points.
Size: Specifies the line thickness. If Lock Point and Line Size is enabled, this will also affect point size.
Intensity: Specifies the line intensity.
Max Connections: Specifies the maximum number of connections allowed per particle if two particles are within minimum and maximum distance of each other. More connections will result in more lines drawn.
Minimum Length: Specifies the minimum length required to make a connection. Two particles must be greater than this distance to make a connection.
Maximum Length: Specifies the maximum length required to make a connection. Two particles must be less than this distance to make a connection.
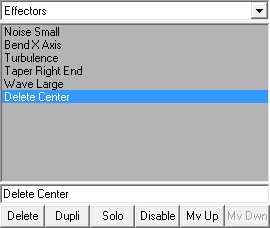
Stack Parameters
Each effector provides its own set of parameters. Some effectors use certain controllers while others don’t. The image below describes the function of every effector. Remember that truly unique results occur when effectors are combined and affecting only specific parts of the object using space fields.
Effectors: Specifies which effector to add to the stack. Lattice currently supports 11 predefined effectors. Each carries it’s own set of adjustable parameters. These effectors include noise, turbulence, scales, translations, rotations, skews, tapers, twists, bends, waves and deletes.
Stack: The stack lists the effectors that make up the lattice. Clicking on an effector will update the GUI and display its specific parameters. Adjusting a parameter will update the lattice in the preview window.
Name: Display the name of the currently-selected effector. Any effector can be renamed to something more descriptive for ease of use.
Stack Operators
The stack operators are used to move and manage effectors within the stack. This is helpful from an organizational standpoint so as to keep sets of effectors together. It is important to remember that effectors are not saved in memory once the filter is applied or cancelled. As a result, it is important to save your lattice for future retrieval.
Delete: Deletes the currently-selected effector. Deletions cannot be undone.
Duplicate: Creates a copy of the currently-selected effector (with the currently-specified parameters) and places it at the bottom of the stack.
Solo: Isolates and displays the currently-selected effector only. This is useful for working with a specific effector and displaying it without the rest of the lattice for clarity.
Move Up: Moves the currently-selected effector one position up in the stack. This change in effector order can affect the lattice structure.
Move Down: Moves the currently-selected effector one position down in the stack. This change in effector order can affect the lattice structure.
Effector Parameters
Display Space Field: Every effector has a space field. This is a spherical area that defines the affective area of the effector. Everything within (or outside of depending on settings) this field, will have the effect of the effector. This button toggles the display of the space field.
Space Field Color: Specifies the space field color. If working on a light background, you may want to specify a darker space field color so as to see it more clearly.
Invert Space Field: Toggling this button will affect all particles outside of the space field as opposed to inside.
Object Axis / Field Axis: Specifies the effector axis. If set to object, the particles will scale (for instance) to the axis located in the center of the object. If set to field, the particles will scale (for instance) to the axis located in the center of the effector. Switching between these two can produce very interesting results.
Seed: Specifies the random seed for generating random values. Some effectors such as noise and turbulence require random values. For other effects, this slider will not have any effect.
Radius: Specifies the radius of the space field. Everything within this field will be affected by the effector.
Falloff: Specifies the falloff radius of the effector. A falloff reduces the effect of the effector between the radius and the falloff, thereby creating a smoother transition between the affected and unaffected particles.
Scale: Specifies the scale for turbulence and wave effectors. For other effects, this slider will not have any effect.
X, Y, Z Effect: Specifies the intensity of the effect for each axis.
Field X, Y, Z: Specifies the location of the space field in relation to the object.
Interface Parameters
Status Bar: Displays relevant information about the current lattice including object type, point count, line count, effector count and FPS (frames per second).
Zoom: Specifies the preview window zoom level. Working with a small preview windows can significantly improve performance.
Color Mode: Specifies the coloring mode for the particles. Options include:
Single Color: Uses the first color swatch for all point and line colors.
Double Color: Blends between the first and second color swatch for all point and line colors.
Spectral Color: Uses spectral coloring for all point and line colors.
Image Color: Uses colors from the current image for all point and line colors. This is useful for integrating lattice structures into existing images by ensuring the same palette is used.
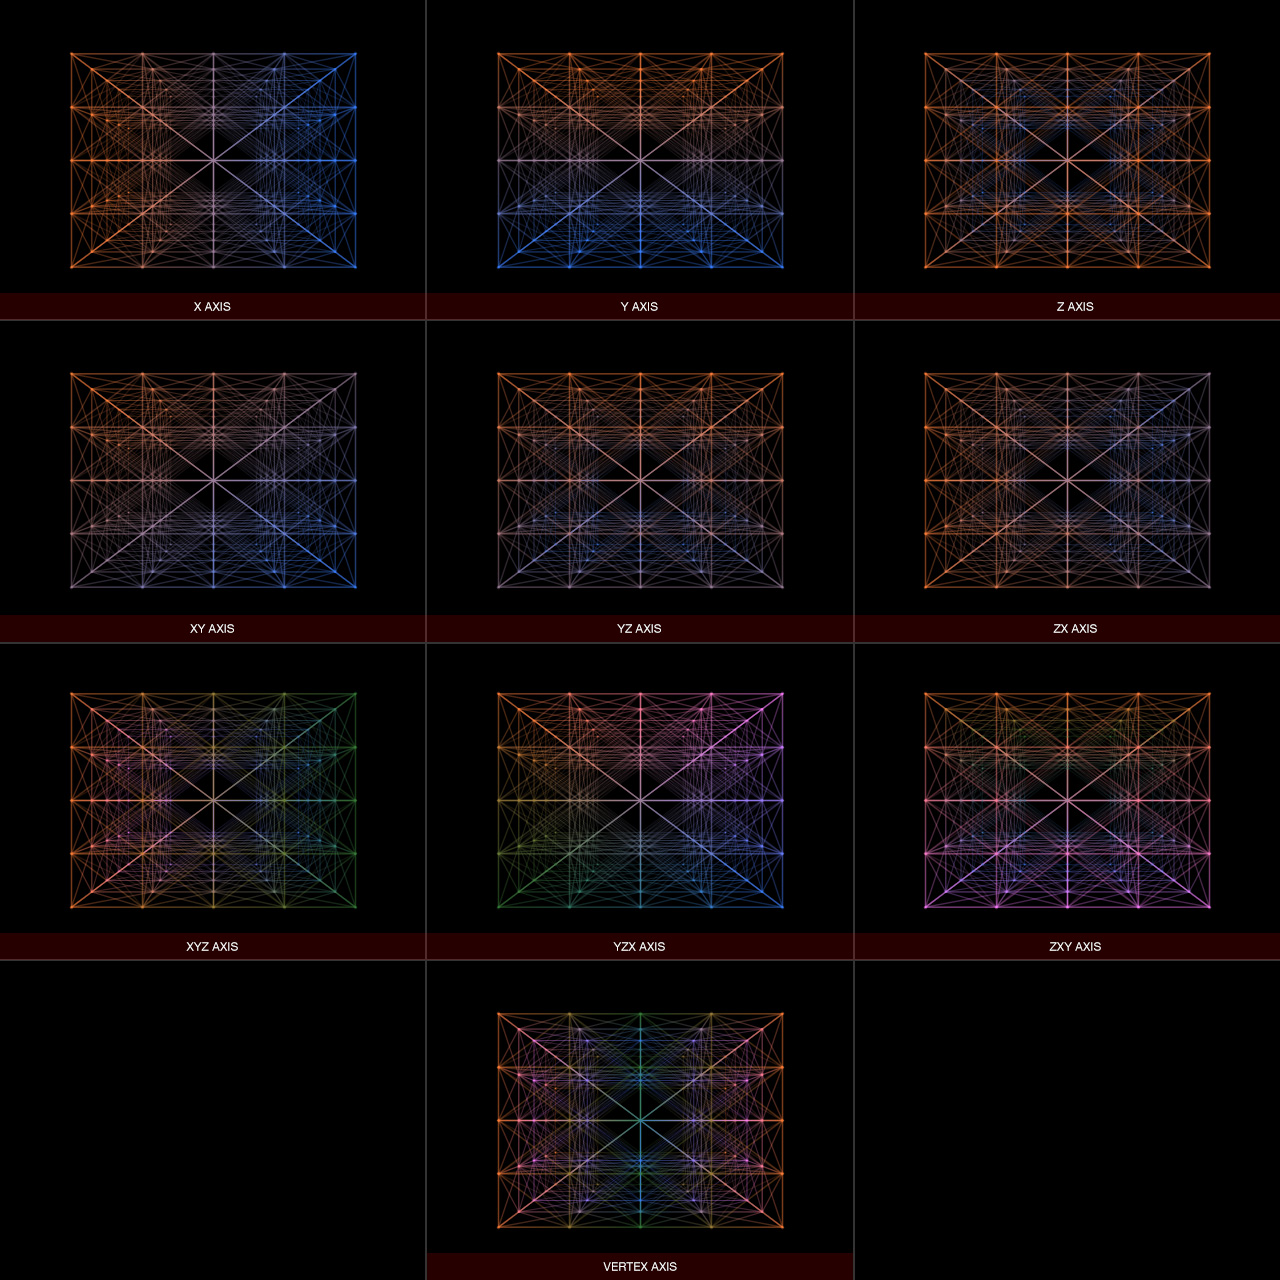
Color Axis: Specifies the coloring axis through which to assign color. Options include:
Axis controls will work only on double color and spectral color. Loading an OBJ object will distribute a linear blend between the two color swatches if double color is selected or a linear blend between the spectrum if spectral color is selected.
Color Swatch A: Specifies the first color swatch.
Color Swatch B: Specifies the second color swatch.
Swap: Swaps color A with color B.
Perspective Projection: Toggles the use of perspective projection. Disabling this will yield orthographic projection.
Blending Mode: Specifies the blending mode. Normal blend will composite the lattice normally while Additive Blend will composite the lattice additively. This is the same as using Photoshop’s Linear Dodge mode.
Saturation: Specifies the saturation level when using spectral coloring mode. This control will become enabled when spectral color is selected.
Seed: Specifies (and changes) the global random seed for all effectors that depend on random values, such as noise or turbulence. This global seed will affect all effectors. Changing an effector’s seed value in the Effector Paramenters section will only affect the currently-selected effector.
Reseed: Randomly resets the global seed value.
Changelog
v1.0 – First release.
v1.1 – Fixed incorrect logo display when using larger fonts or DPI.
v1.1 – Centered interface to screen on first launch.
Special Thanks
Mike James.
Installing this software is easy and only requires three simple steps:
1 – Download the software by clicking on the Download Demo button located above on the software page. This will prompt you to save a .zip file on your computer.
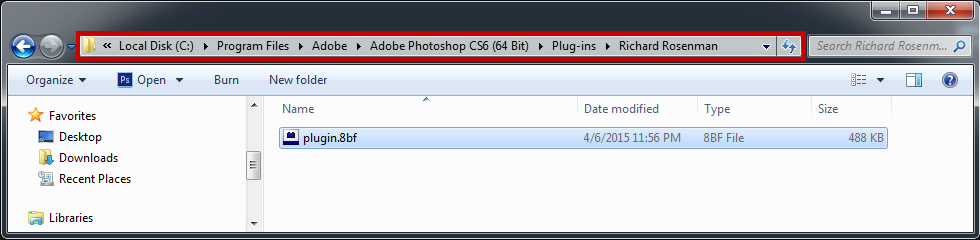
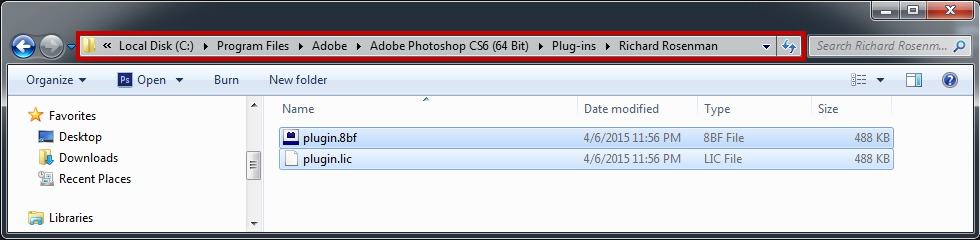
2 – Extract the contents from the .zip file and place the .8bf file into your host’s plugin folder. For instance, to install for Adobe Photoshop CS6, place the .8bf file into the location shown below. You can make a sub-folder to keep your plugins organized, such as the one below. Please make sure 64 bit plugins such as these are placed in the corresponding 64 bit Adobe Photoshop plugin folder.
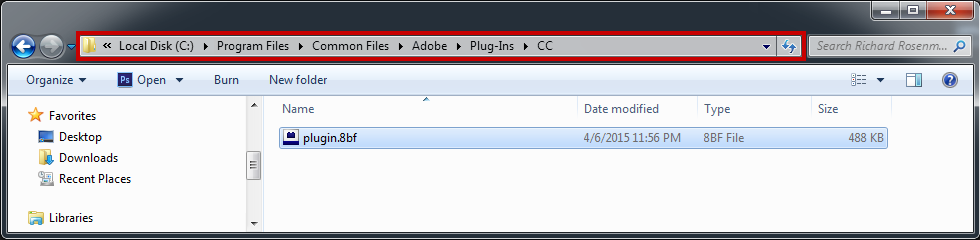
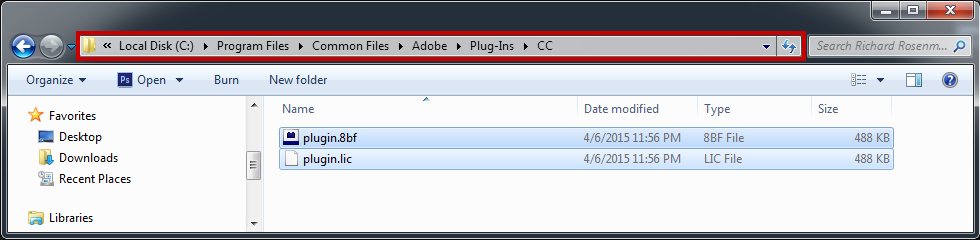
If you’re using Photoshop CC (eg. version 2013 – 2019 or later), your Photoshop plug-ins are stored in a folder shared between all Photoshop CC versions shown below.
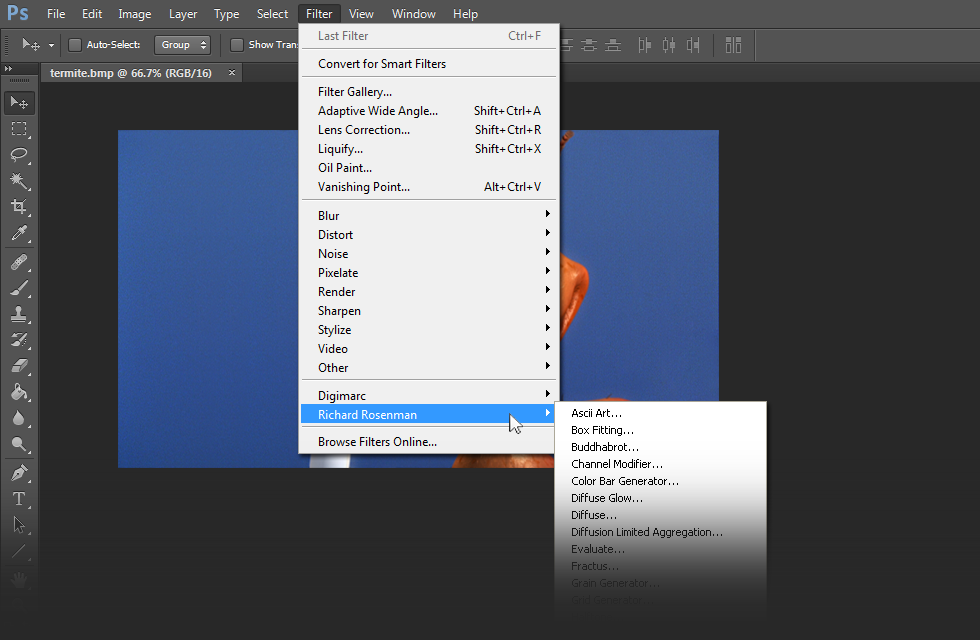
3 – Launch Adobe Photoshop, open an image and click on Filter > Richard Rosenman > Filter Name. If the filter is grayed out, it may not support your current image color depth.
If you have purchased a commercial license, please review the activation section.
If you have purchased a commercial license, you must activate your software. You can manually activate your software at any time by logging into your account. Activating this software is easy and only requires five simple steps:
1 – Log into your account by clicking on the Account button in the top menu.
2 – Click on VIEW to display the order details containing the product you wish to activate.
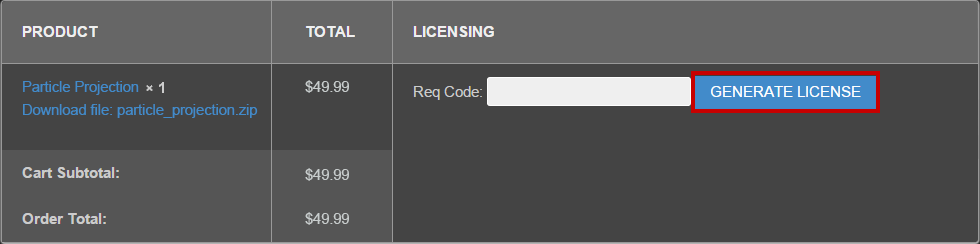
3 – Enter your request code and click GENERATE LICENSE. Please see below for info on how to retrieve your request code.
Your request code can be found by clicking on the help button of the installed software.
4 – A file prompt will ask you to save the license file. You must save this license file in the same folder the plugin resides in. Below is an example for Photoshop CS6.
If you’re using Photoshop CC (eg. version 2013 – 2019 or later), your Photoshop plug-ins are stored in a folder shared between all Photoshop CC versions shown below.
5 – Relaunch Adobe Photoshop, open an image and click on Filter > Richard Rosenman > Filter Name. If the filter is grayed out, it may not support your current image color depth.
In the titlebar, your software should now display REGISTERED. It is now unlocked and ready for use.
This software is compatible with the following OS:
Windows 11 Home 64 bit
Windows 11 Pro 64 bit
Windows 11 Enterprise 64 bit
Windows 11 Education 64 bit
Windows 10 Home 64 bit
Windows 10 Pro 64 bit
Windows 10 Enterprise 64 bit
Windows 10 Education 64 bit
Windows 8 64 bit
Windows 8 Pro 64 bit
Windows 8 Enterprise 64 bit
Windows 7 Home Basic 64 bit
Windows 7 Home Premium 64 bit
Windows 7 Professional 64 bit
Windows 7 Enterprise 64 bit
Windows 7 Ultimate 64 bit
Windows Vista Home Premium 64 bit
Windows Vista Business 64 bit
Windows Vista Enterprise 64 bit
Windows Vista Ultimate 64 bit
Windows XP 64 bit
Windows XP Professional 64 bit
This software is compatible with the following hosts:
Any host capable of running Adobe Photoshop 64 bit compliant plugins
Adobe Photoshop (Version CS5 or higher, including CC) 64 bit
Adobe Photoshop Elements (Version 13 or higher, including CC) 64 bit
Adobe Illustrator (Version CS6 or higher, including CC) 64 bit
Computerinsel Photoline 64 (Version 16 or higher) 64 bit
CorelDRAW (Version X6 or higher) 64 bit
Corel Painter (Version 12.1 or higher) 64 bit
Corel Paint Shop Pro (Version X6 or higher) 64 bit