Motion Mosaic is a complex After Effects plugin that generates a motion mosaic using a displacement and icon layer. The ability to rotate, scale or offset the icon layer’s time by the displacement layer is what produces truly unique results.
Motion Mosaic operates by generating a mosaic of numerous copies of the icon layer and then manipulating them according to the displacement layer’s corresponding pixel luminance value. For instance, the brighter the pixel value, the more rotation or scaling is done to the icon layer. However, the magic to this effect is the ability to randomly offset the icon layer’s animation not only by a random time value but also by the number of units. You can even offset the icon layer’s animation according to the displacement layer so that brighter pixel values display earlier icon animation frames while darker pixel values display later ones. The result is an effect that would otherwise be impossible to create programmatically and unlike anything you’ve seen before.
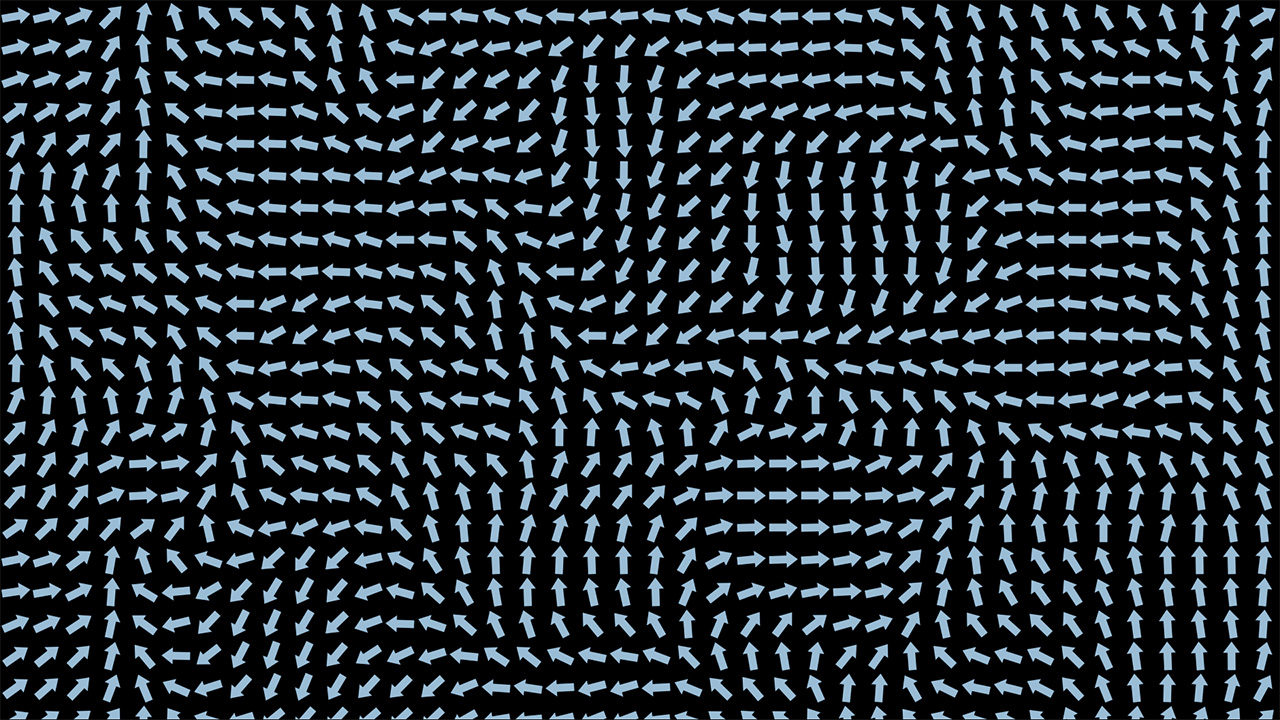
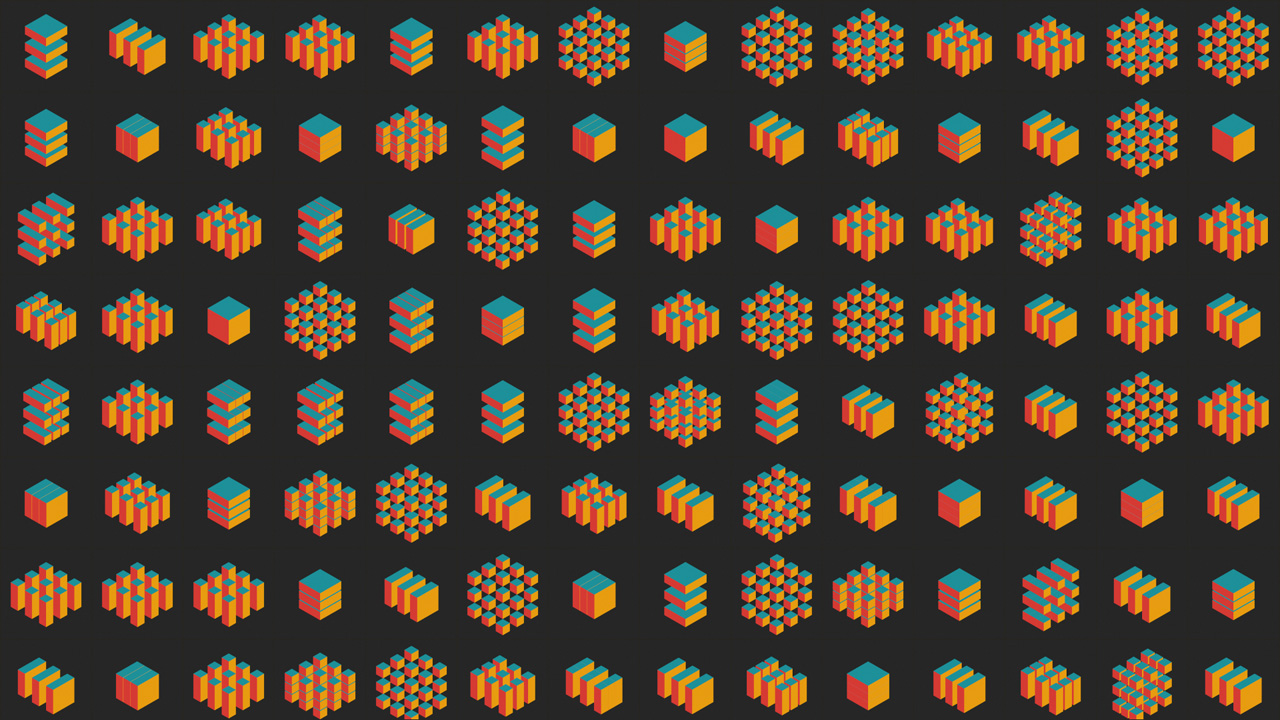
An icon layer can be rotated and / or scaled through a displacement layer
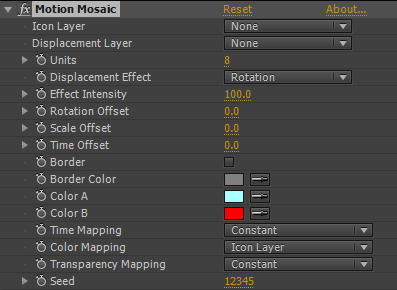
Motion Mosaic offers a set of powerful features for generating truly unique effects. Specify both an icon layer and displacement layer and set the number of units. Toggle between rotation, scale, both or none for the displacement effect. Control the intensity of the effect independent of the displacement layer. Adjust the rotation, scale and time offsets. Toggle a border on and off and specify its color. Set color swatches and use them to map displacement layer values to icon layer coloring. Map the displacement layer values to icon layer time. Map the displacement layer values to icon layer transparency. Adjust the random engine seed value. Since every control is fully animatable and keyframable within After Effects, the possibilities are endless.
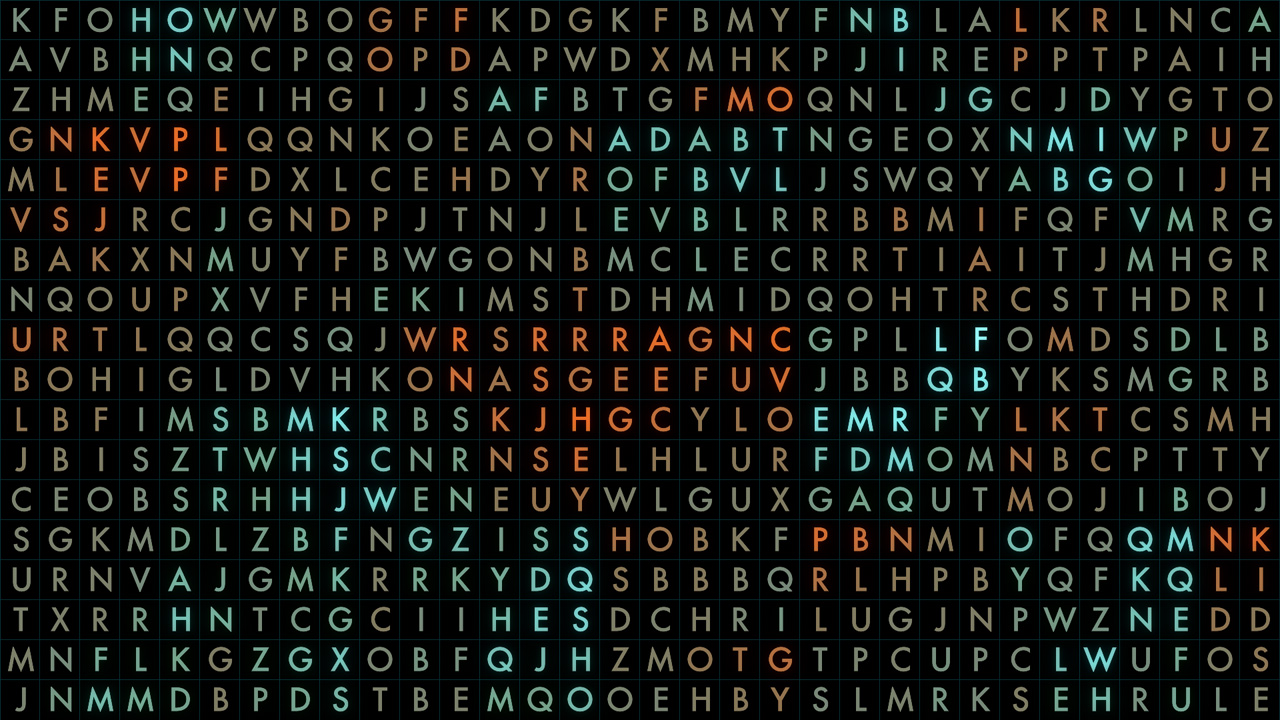
An animated alphabet sequence from A-Z is mapped in time and color according to the displacement layer
Motion Mosaic’s power lies in its dynamic mapping features. For instance, it is possible to affect the icon layer’s rotation, scale, color, transparency and time according to the displacement layer’s value. Brighter displacement layer values will result in certain mosaics rotated more than others, scaled more than others, colored differently than others, shaded more transparent than others or offset in time more than others.
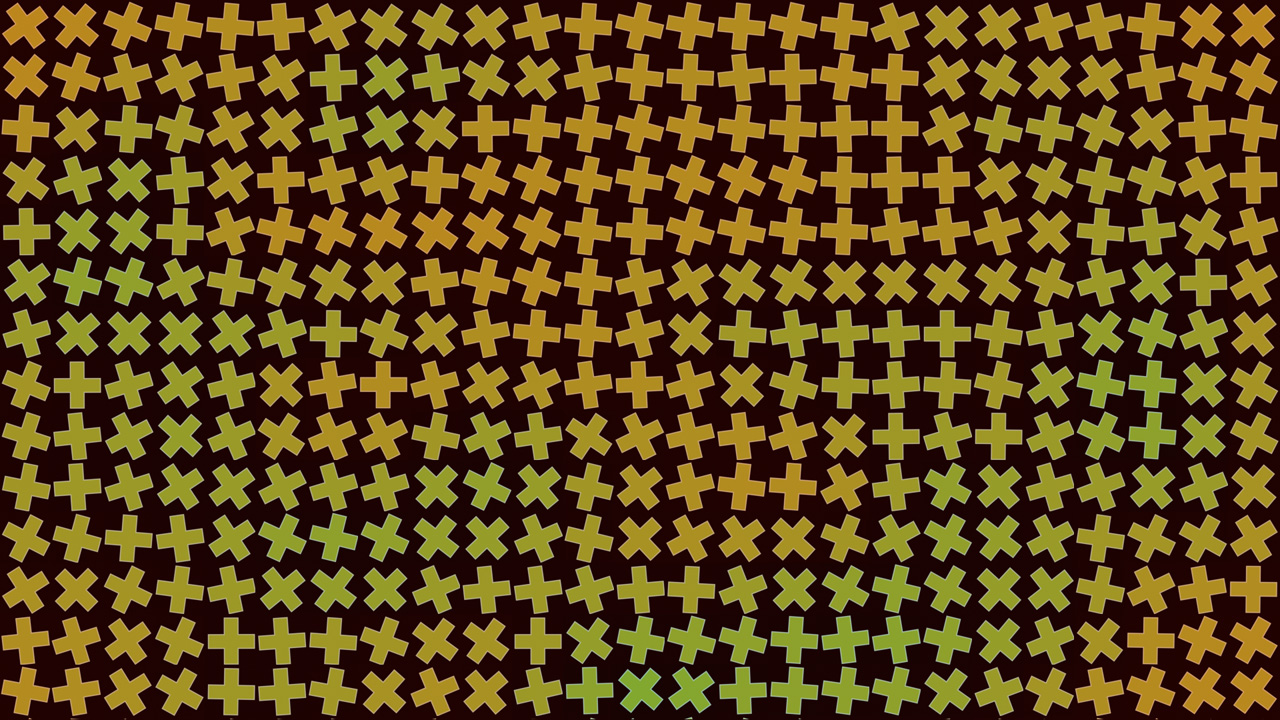
A ripple displacement layer rotates and colors the square icon accordingly
Motion Mosaic produces effects not otherwise possible when using animated icon layers. Map the animation timing to the displacement layer so as to offset timing by constant, horizontal units, vertical units, displacement and inverse displacement.
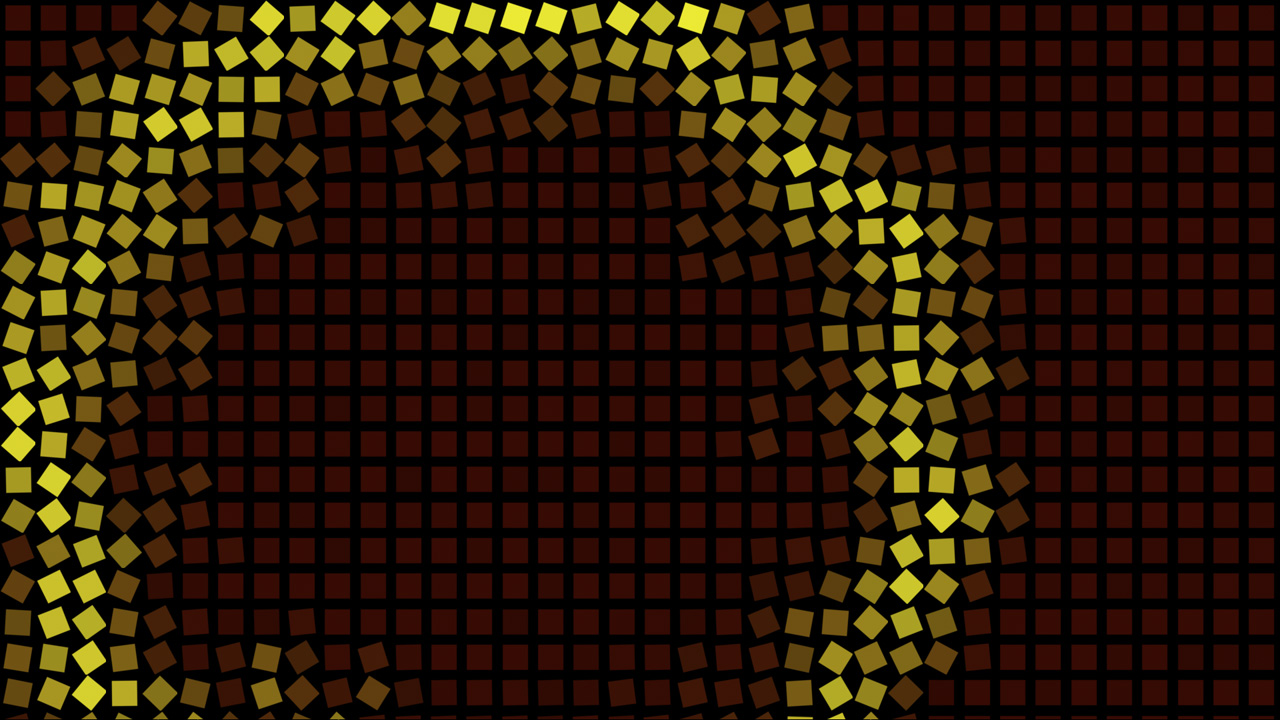
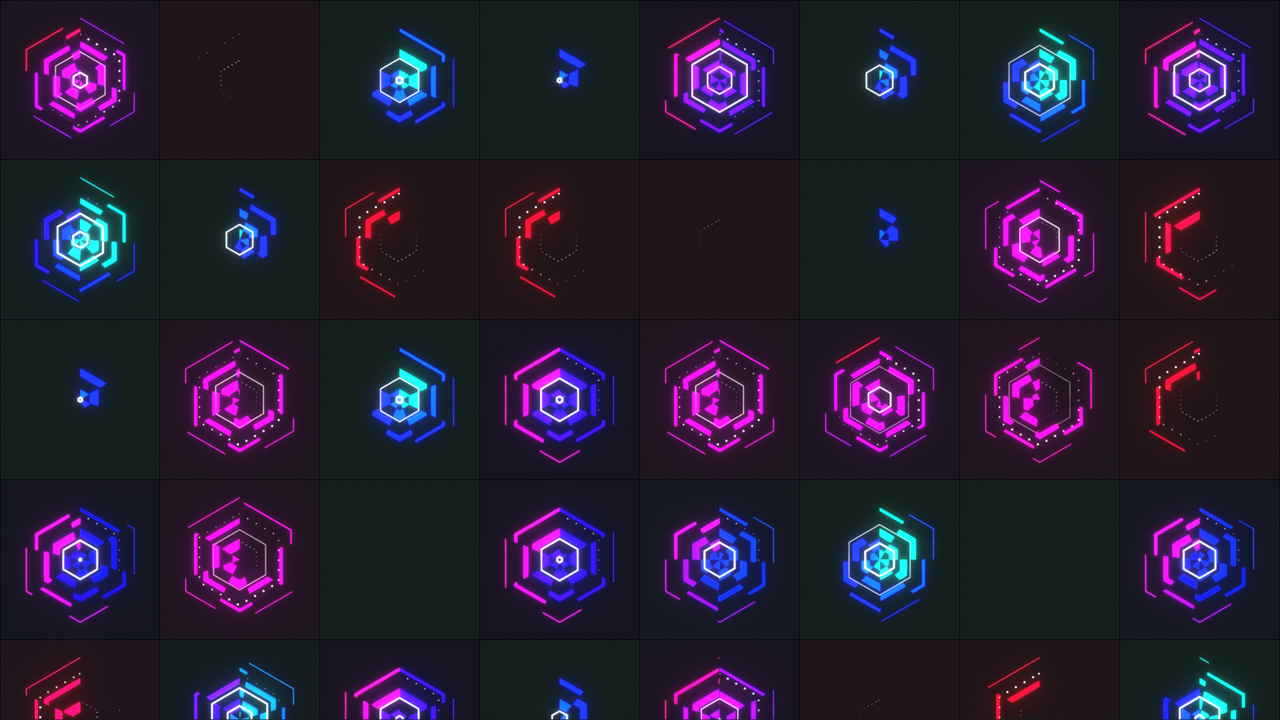
The animation of the hexagon is offset by the displacement layer for each unit
For a complete list of features, check out the documentation tab. Better yet, download the free demo of Motion Mosaic today!
Motion Mosaic supports both 8 bits / channel and 16 bits / channel color modes for professional workflows.
Motion Mosaic is 100% Multi-Frame Rendering (MFR) capable for significant speed gains.
Workflow
Motion Mosaic is capable of working in 8 bits per channel and 16 bits per channel color modes. It is recommended to work in 16 bits per channel color mode so that the displacement map can provide 32,768 levels of luminance as opposed to 256 when working in 8 bits per channel color mode. While Motion Mosaic will also work in 32 bits per channel color mode, it will down-convert 32 bit float values to 16 bits per channel.
Motion Mosaic must be provided a displacement layer to work from. If the displacement layer has any effects applied to it, it must first be pre-composed or the effects will be ignored. This is normal operation within After Effects for any effects that depend on layer input.
Motion Mosaic must be provided an icon layer to work with. The icon layer can be a still image or an animation sequence. Working with animation sequences allows for unique time mapping effects.
Motion Mosaic displaces based on luminance values. As a result, grey-scale displacement layers provide the best output. Motion Mosaic will convert all displacement layers to grey-scale.
Motion Mosaic can have motion blur by applying the CC Force Motion Blur effect set to Native mode.
Motion Mosaic uses bilinear interpolation for fast rotation and scaling but, as with any sampling, aliasing will occur when the differences in scale are large. To reduce the possibility of aliasing, one should try match the icon layer size to the mosaic layer unit size as closely as possible.
An icon layer can be rotated or scaled according to a displacement layer
Controls
Icon Layer: Specifies the icon layer to be used for generating the mosaic. The icon layer can be any resolution and any length. It can be a still image or animation. If animation exists, the time mapping features can produce unique effects. If there are any effects applied to the displacement layer, it must be pre-composed in order for those effects to be taken into consideration.
Displacement Layer: Specifies the displacement layer to be used for mapping. If there are any effects applied to the displacement layer, it must be pre-composed in order for those effects to be taken into consideration.
Units: Specifies the number of horizontal and vertical units for the mosaic. The number of units will always be aligned horizontally.
Displacement Effect: Specifies what type of effect to apply to the mosaic. These effects are dependent on the displacement layer’s luminance values and the effect intensity. Options include:
Rotation: Rotates the icon layer according to the displacement intensity.
Scale: Scales the icon layer according to the displacement intensity.
Both: Rotates and scales the icon layer according to the displacement intensity.
None: Applies no rotation or scale to the icon layer. This is useful when applying time mapping only.
Effect Intensity: Controls the displacement intensity. Although the intensity of the displacement layer directly affects the intensity of projection, this control acts as a multiplier.
Rotation Offset: Adjusts the icon rotation angle.
Scale Offset: Adjusts the icon scale intensity.
Time Offset: Adjusts the icon time offset.
Border: Enables or disables an icon border.
Border Color: Specifies the border color.
Color A: Specifies the primary color for use when displacement or inverse displacement color mapping is selected. This works best for white colored icons.
Color B: Specifies the secondary color for use when displacement or inverse displacement color mapping is selected. This works best for white colored icons.
Time Mapping: Specifies how to map time to the icon layer. Constant disregards the displacement layer and applies a constant time. Displacement maps earlier frames to brighter values and later frames to darker ones. Inverse Displacement maps later frames to brighter values and earlier frames to darker ones. Options include:
Constant: The icon layer’s time mapping is linear.
Horizontal Units: The icon layer’s time mapping is dictated by the number of horizontal units. Each horizontal unit will be mapped to each of the icon layer’s frames.
Vertical Units: The icon layer’s time mapping is dictated by the number of vertical units. Each vertical unit will be mapped to each of the icon layer’s frames.
Displacement: The icon layer’s time mapping is dictated explicitly by the displacement layer. If the icon layer has 100 frames of animation, a white value of the displacement layer will map to frame 0, a black value will map to frame 100 and intermediate values will map accordingly.
Inverse Displacement: The icon layer’s time mapping is dictated explicitly by the inverse displacement layer. If the icon layer has 100 frames of animation, a white value of the displacement layer will map to frame 100, a black value will map to frame 0 and intermediate values will map accordingly.
An icon layer’s animation can be mapped to a displacement layer
Color Mapping: Specifies how to map color to the icon layer. Icon Layer disregards the displacement layer and applies a constant color dictated by the icon layer. Displacement maps Color A to brighter values and Color B to darker ones. Inverse Displacement maps Color B to brighter values and Color A to darker ones. Options include:
Icon Layer: The icons color will remain unaffected.
Displacement: The icons color will be explicitly mapped to Color A and Color B according to the displacement layer. A white value of the displacement layer will map to Color A, a black value will map to Color B and intermediate values will map accordingly.
Inverse Displacement: The icons color will be explicitly mapped to Color A and Color B according to the inverse displacement layer. A white value of the displacement layer will map to Color B, a black value will map to Color A and intermediate values will map accordingly.
Transparency Mapping: Specifies how to map transparency to the icon layer. Constant disregards the displacement layer and applies a constant transparency of 0%. Displacement maps 100% transparency to brighter values and 0% transparency to darker ones. Inverse Displacement maps 0% transparency to brighter values and 100% transparency to darker ones.
Constant: The icons transparency will remain fully opaque.
Displacement: The icons transparency will be explicitly mapped to the displacement layer. A white value of the displacement layer will map to fully opaque, a black value will map to fully transparent and intermediate values will map accordingly.
Inverse Displacement: The icons transparency will be explicitly mapped to the inverse displacement layer. A white value of the displacement layer will map to fully transparent, a black value will map to fully opaque and intermediate values will map accordingly.
Seed: Randomizes any random-dependent values such as Time Offset.
Changelog
v1.0 – First release.
v1.1 – Multi-Frame Rendering (MFR) support.
v1.1 – Removed Color A & B.
v1.1 – Removed Time Mapping By Units.
v1.1 – Improved Scaling & Rotation Sampling.
v1.1 – Added Time Randomness Constraints.
v1.1 – Added Background Color.
v1.1 – Added Icon Layer Animation Support.
v1.1 – Fixed Time Randomness Bug When Greater Than Composition Length.
v1.1 – Increased Max Units to 256.
v1.2 – Fixed Memory Leak.
v1.3 – Fixed missing request code & description in After Effects v26+.
This section features video generated with the Particle Projection plugin for After Effects.
Installing this software is easy and only requires three simple steps:
1 – Download the software by clicking on the Download Demo button located above on the software page. This will prompt you to save a .zip file on your computer.
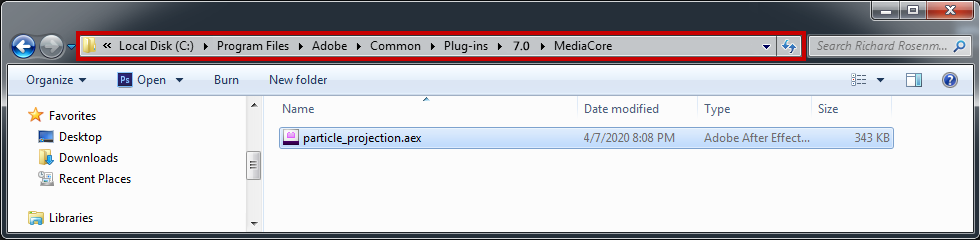
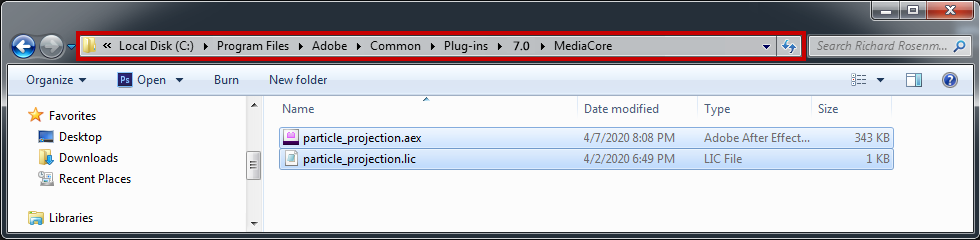
2 – Extract the contents from the .zip file and place the .aex file into your host’s plugin folder. For all Adobe After Effects versions CS6 and higher, this folder is the MediaCore folder. Place the .aex file into the location shown below. You can make a sub-folder to keep your plugins organized.
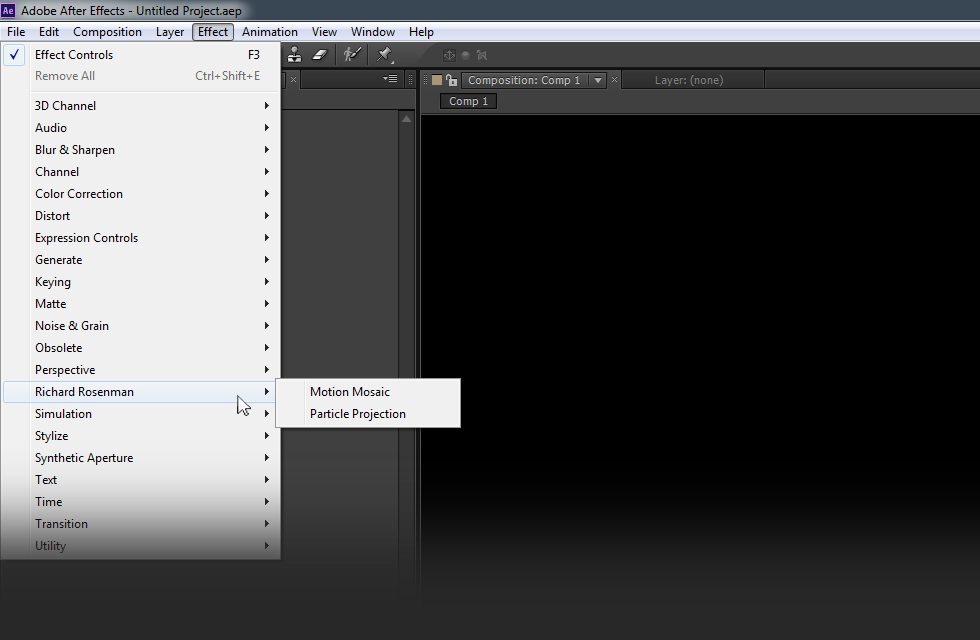
3 – Launch Adobe After Effects, create a new composition, add a new solid, and click on Effect > Richard Rosenman > Effect Name.
If you have purchased a commercial license, please review the activation section.
If you have purchased a commercial license, you must activate your software. You can manually activate your software at any time by logging into your account. Activating this software is easy and only requires five simple steps:
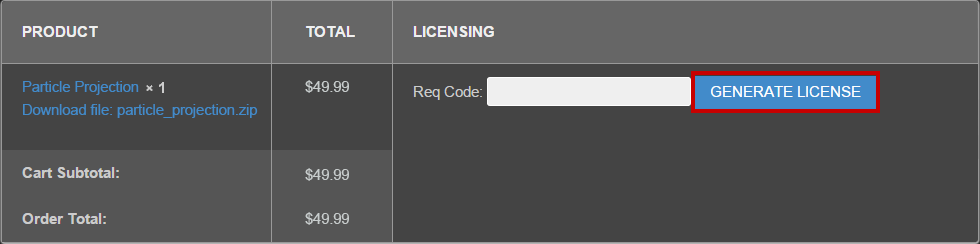
1 – Log into your account by clicking on the Account button in the top menu.
2 – Click on VIEW to display the order details containing the product you wish to activate.
3 – Enter your request code and click GENERATE LICENSE. Please see below for info on how to retrieve your request code.
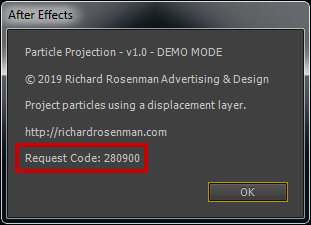
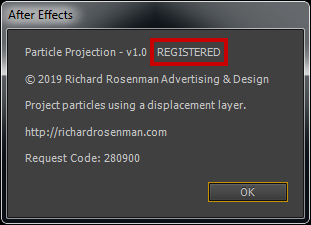
Your request code can be found by right-clicking on the plugin name in the effect window and selecting About.
4 – A file prompt will ask you to save the license file. You must save this license file in the same folder the plugin resides in.
Place the .lic file into the location shown below. You can make a sub-folder to keep your plugins organized.
5 – Relaunch Adobe After Effects, create a new composition, add a new solid, and click on Effect > Richard Rosenman > Effect Name.
If you on click the About button located at the top of the plugin interface once again, your software should now display REGISTERED. If it is registered but you still see a red x, simply clear your cache. It is now unlocked and ready for use.
This software is compatible with the following Windows OS:
Windows 11 Home 64 bit
Windows 11 Pro 64 bit
Windows 11 Enterprise 64 bit
Windows 11 Education 64 bit
Windows 10 Home 64 bit
Windows 10 Pro 64 bit
Windows 10 Enterprise 64 bit
Windows 10 Education 64 bit
Windows 8 64 bit
Windows 8 Pro 64 bit
Windows 8 Enterprise 64 bit
Windows 7 Home Basic 64 bit
Windows 7 Home Premium 64 bit
Windows 7 Professional 64 bit
Windows 7 Enterprise 64 bit
Windows 7 Ultimate 64 bit
This software is compatible with the following hosts:
Adobe After Effects (Version CS6 or higher, including CC) 64 bit