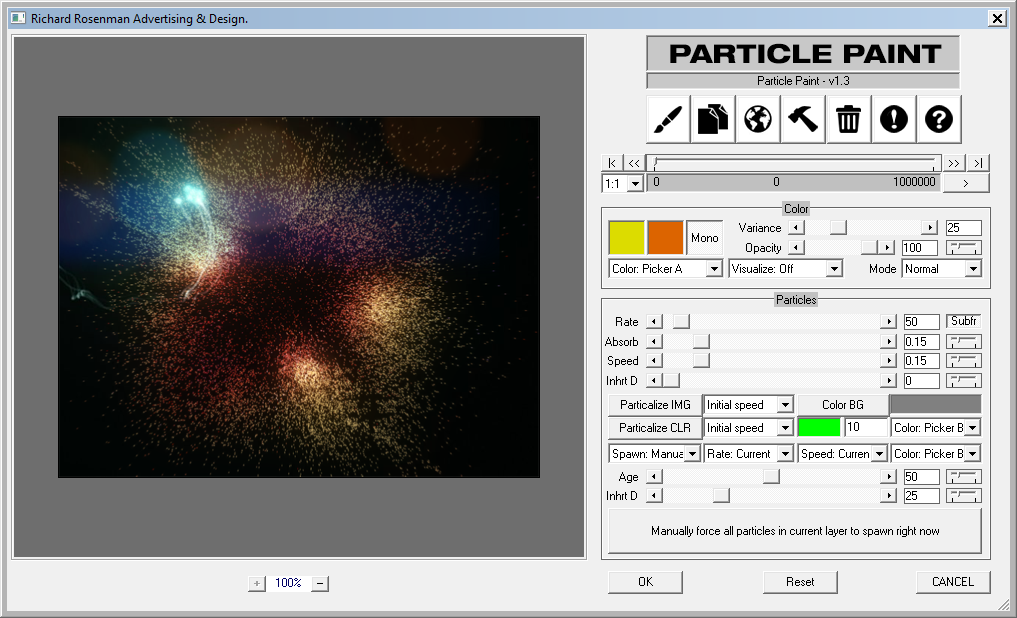
Particle Paint is a unique and novel creative tool with which you can paint using live particles. Since these particles always remain live, the user can continue to modify them and change their attributes indefinitely until they’re ready to bake into an image. This means color can be changed over and over again, as can position, visibility, transparency, etc. Dynamic motion effects can be applied to the particles using physics, forces and filters. Particles can spawn additional particles manually, by age or by speed, each capable of inheriting brush or parent forces.
Particle paint emits particles like any particles simulator does during the course of an evolving timeline. Particles are sprayed using a rate and speed that is affected by forces such as air resistance (paper absorption), brush direction, etc. At any time, the user can rewind the timeline and redo those particles. Alternately, one can select any section within a timeline and make modifications to it.
Making full use of Adobe Photoshop’s integration, Particle Paint can use image information as emitters or colliders. A specific area can be drawn, for instance, and then used to emit particles. Likewise, a specific area can be draw, and when particles collide with it, any number of operations can occur such as bouncing, stopping, dying or spawning.
As with any professional paint software, Particle Paint provides layers to work with. Particles can be overlayed on top of each other, modified within their layer only, or modified across all layers at the same time. Layers provide transparency tools and blending modes for indefinite possibilities.
Particle Paint features inter-particle collision checking so that particles can interact and bounce off each other, or they can blend their colors together. Gravitational forces can be applied, as well as brush forces allowing the user to specify a brush size and interactively apply forces over a particular area of particles.
Because of their indefinite lifespans, particles can be continually modified using the tools section until the user chooses to bake the particles and generate the final image.
Particle Paint is very much an experimental beta application at this time and it suffers from poor performance issues. There may be glitches but for the most part it is a powerful and unique, fully-functional, dynamics-driven painting application. Have fun.
Particle Paint is 100% multi-threaded capable of using an unlimited number of cores for ultimate speed.
Menu System
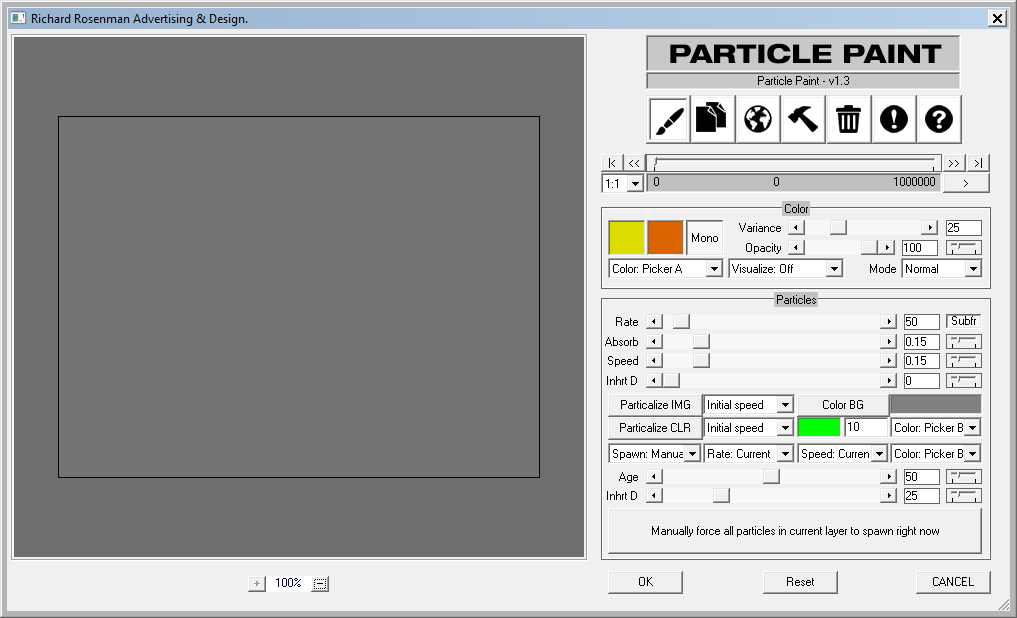
Particle Paint’s graphical user interface (GUI) is structured into groups of controls which belong to logical units. These consist of the main timeline and 7 sub-sections: brushes, layers, world, tools, trash, stats and help. Individual controls or entire control groups may be enabled or disabled, depending on the settings of other controls. The interface can also be resized by dragging the lower right-hand corner tab for a larger workspace.
Timeline
The main timeline displays the total number of particles that have been created in time, in the current layer. It allows you to scrub within the timeline as well as jump to the beginning and end, rewind and fast-forward, or magnify and iterate. As you paint, the timeline is incremented by the rate size so painting with a rate of 1 will increase the timeline by 1, whereas painting with a rate of 100 will increase the timeline by 100. Performance is directly affected by the total number of live particles visible on-screen. However, you can have 500,000 particles and if only 20,000 are visible, performance will be efficient. This is because performance decreases according to the total number of particles that need to be drawn on the canvas.
Scrubbing in the timeline lets you go back and overwrite particles you don’t want, or allows you to draw on a separate layer in time with a previously-drawn layer (more on this in the layers section). The iterate button “>” is very useful for when you do not want to paint new particles but want to allow the current ones to resolve, or be affected by forces or filters. For instance, you can paint in the preview window and then click on iterate to see the particles resolve to a rest. Likewise, you can then go to the world menu, enable gravity (Force Y), and click iterate to see the current particles become affected.
The magnify dropdown is useful to zoom in and out of your timeline. The default timeline shows particles from 0 to 1,000,000 but initially when painting, you may only have 10,000 particles. In this case, you can zoom in for finer adjustments.
|<: This button sets the timeline to the start (0).
<<: This button rewinds the timeline from the current position.
Timeline: This slider allows you to scrub through the currently existing particles in time.
>>: This button fast-forwards the timeline from the current position.
>|: This button sets the timeline to the end (1,000,000).
Magnify: This dropdown specifies the magnification ratio of the timeline.
>: This button will iterate the current particles. This is the same as placing the mouse within the preview window but without generating new particles. This is especially useful for applying forces and/or filters and watching their influence.
Brushes
The brush section allows you to select color, variance, opacity and compositing modes, all of which are individually inherited by the particle when it is created. This means if particles 0-10 are generated in blue and particles 11-20 are generated in red, each will maintain these attributes indefinitely unless manually changed. Everything in the color section is inherited by particles upon birth except for visualization mode settings (explained further below).
You can adjust the rate (amount) of particles, the absorption (friction) of the canvas, the speed (velocity) at which the particles are emitted, and the amount of brush stroke direction they inherit.
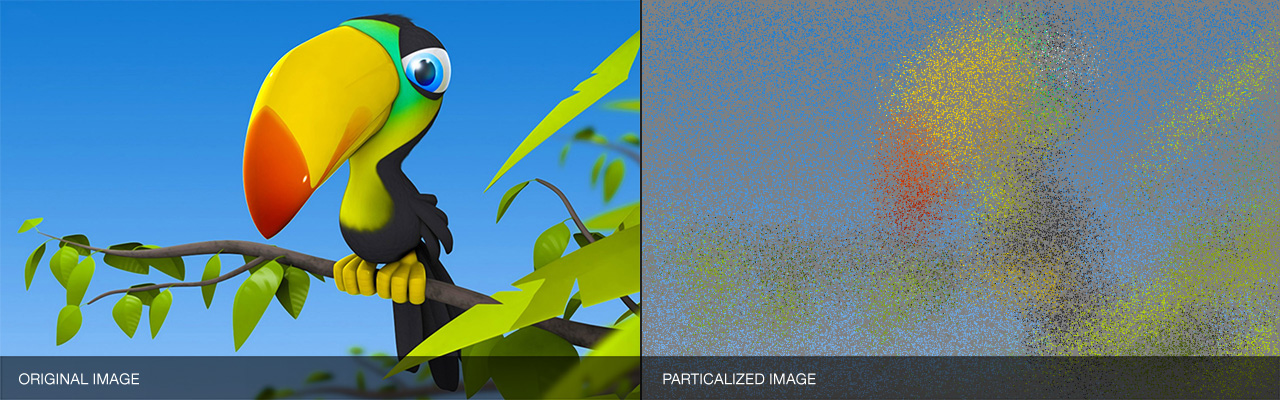
Particalize image allows you to convert your image into live particles for manipulation while particalize color converts any image color specified by your color selector and threshold tolerance into particles.
Spawning allows your particles to each generate a new sub-set of particles manually, or based upon particle speed or age. Additionally, you can control the rate of the spawns created, as well as their speed, color and inherited direction. Currently, each particle has a spawning limit of 1 unless manually forced to re-spawn. Forcing particles to spawn can exponentially increase the particle count to extreme numbers so be careful to set the rate to a nominal amount beforehand.
Visualization mode is a handy tool that allows you to visualize the particles by age or speed. By age, newly-born particles will be represented in red while older particles will be blue. By speed, fast moving particles will be represented by red while slower particles will be represented by blue. Visualization is 100% completely re-calculated every iteration so if particles stop and are then accelerated again using forces, you will see them turn from blue back to red. Likewise, if old particles re-spawn, the spawns will be represented in red as they are newly-born particles.
Color Picker A & B: These pickers allow you to specify paint colors.
Mono: This button will generate monochromatic color variance (depending on the variance slider) as opposed to chromatic color variance.
Variance: This slider will control the amount of color variance (randomness) per particle.
Opacity: This slider will control the amount of opacity (visibility) per particle.
Opacity Randomness: This trackbar controls the amount of opacity (visibility) randomness per particle.
Color Picker Selector (Picker A, Picker B, Picker A & B): This dropdown will specify the color picker to use for color assignment.
Visualization: This dropdown allows you to visualize the particles by age or speed.
Mode: This dropdown specifies the particle’s compositing mode.
Rate: This slider controls the rate (amount) of particles emitted. Particle Paint – Left to right: Subframe emissions on, off, on & off.
Subframe: This button allows particle emission on a sub-frame basis & interpolates emission points based on previous and current brush positions. This is effectively eliminates particle ‘bursts’ and produces smooth, continuous emissions.
Absorption: This slider controls the amount of absorption (friction) the canvas produces. In other words, how quickly the particles stop moving. A value of 0 will allow particles to continue travelling indefinitely.
Absorption Randomness: This trackbar controls the amount of absorption randomness per particle.
Speed: This slider controls the speed (velocity) at which particles are emitted.
Speed Randomness: This trackbar controls the amount of speed randomness per particle.
Inherit Brush Direction: This slider specifies, in percentage, the amount of direction for the particle to inherit from the brush motion (or in the case of spawns, from the parent particle). Higher values will force particles to continue travelling in the direction the mouse was headed in. Inherit direction allows you to ‘toss’ particles as you paint.
Inherit Brush Direction Randomness: This trackbar controls the amount of inherited direction randomness per particle.
Particalize IMG: This button will convert an image into particles. The number of particles will amount to imageWidth x imageHeight. Each particle will be assigned it’s corresponding pixel color.
Particalize IMG Speed (Initial speed, No initial speed): This dropdown specifies whether particles are assigned an initial birth speed specified by the speed slider, or are born still.
Color BG: This button will color the background (the color under the particles) to a specified color. This is useful for particalizing an image or color and displaying the new particles against a solid color instead of the same duplicate image.
Color BG Picker: This picker allows you to specify the background color (the color under the particles).
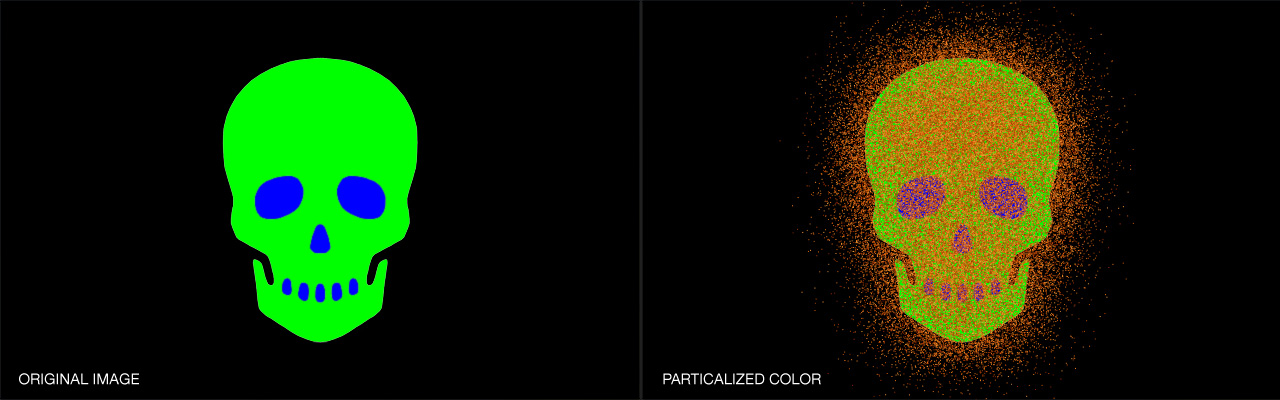
Particalize CLR: This button will convert an image color into particles. The number of particles will amount to the total number of pixels matching the specified color and color threshold.
Particalize CLR Speed (Initial speed, No initial speed): This dropdown specifies whether particles are assigned an initial birth speed specified by the speed slider, or are born still.
Particalize CLR Picker: This picker allows you to specify the particalization color.
Particalize CLR Threshold: This picker allows you to specify the threshold color value. By increasing the threshold, you can increase the search tolerance and select a range of colors.
Particalize CLR Color (Picker A, Picker B, Picker A & B, Image): This dropdown specifies the particalization color with respects to the color pickers and image.
Spawning (Manual, By Age, By Speed): This dropdown specifies whether particles are spawned manually (using the manually force all particles in current layer to spawn right now button), by age (as specified by the age slider) or by speed (as specified by the speed slider).
Spawn Rate (Quarter, Half, Current, Double, Quadruple): This dropdown specifies the spawn rate with respects to the rate slider. A setting of quarter will spawn only a quarter of the spawns specified by the value of the rate slider.
Spawn Speed (Quarter, Half, Current, Double, Quadruple): This dropdown specifies the spawn speed with respects to the speed slider. A setting of quarter will spawn particles at a quarter of the speed specified by the value of the speed slider.
Spawn Color (Picker A, Picker B, Picker A & B): This dropdown specifies the spawn color with respects to the color pickers.
Age / Speed: This slider specifies the age or speed threshold when spawning particles by age or speed. When set to age, any particles older than the value specified will spawn. When set to speed, any particles travelling faster than the value specified will spawn. This slider changes its title according to the spawning by age / speed dropdown.
Inherit Parent Direction: (See inherit brush direction above). This slider specifies, in percentage, the amount of direction for the spawn to inherit from the parent particle. Higher values will force spawns to continue travelling in the direction the parent particle was headed in.
Inherit Direction Randomness: This trackbar controls the amount of inherited direction randomness per spawned particles.
Manually Force All Particles In Current Layer To Spawn Right Now: This button will immediately force all currently live particles to spawn using spawning values. Be careful as this can quickly lead to an excessive amount of particles.
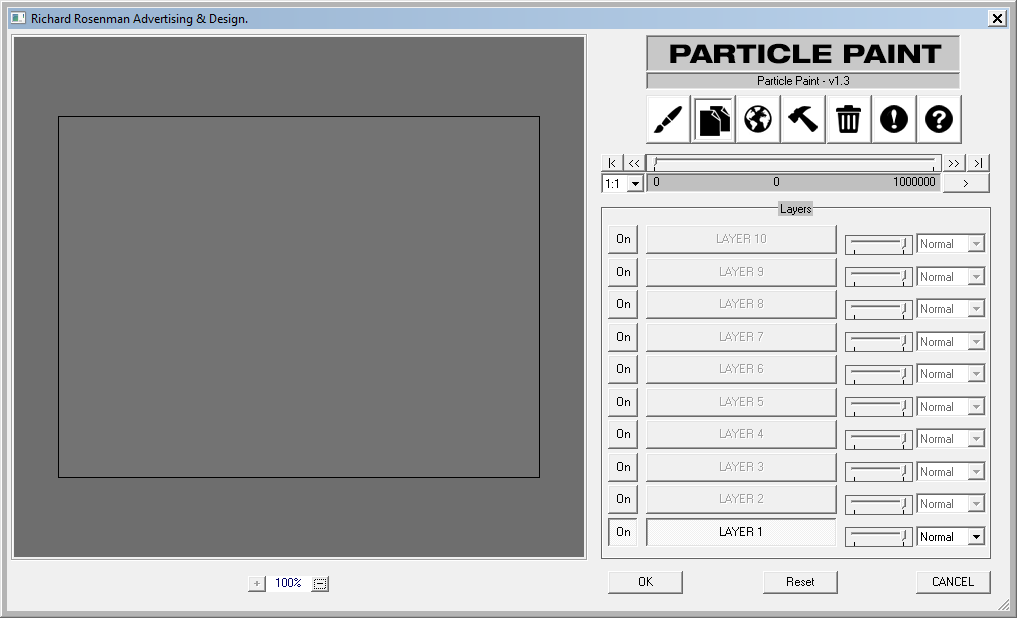
Layers
Particle Paint currently supports up to 10 layers for a non-destructive workflow. Layers work exactly like they do in Adobe Photoshop and you can enable or disable a layer, control opacity or select a compositing mode. You can achieve unique effects when working with layers such as painting on one, then resetting your timeline to 0 and painting on another layer while watching your first layer repaint itself. All effects found in the world section can be applied to single or multiple layers, thus affecting performance in different ways. Finally, keep in mind that the particle timeline displays the total number of particles in the current layer so you may actually have up to 10 times the number of particles shown if you have been painting on all 10 layers over the same timeframe.
ON: This button enables or disables a layer.
Layer 1-10: This button specifies the current (active) layer.
Opacity: This trackbar specifies the opacity (transparency) of the layer.
Mode: This dropdown specifies the layer’s compositing mode.
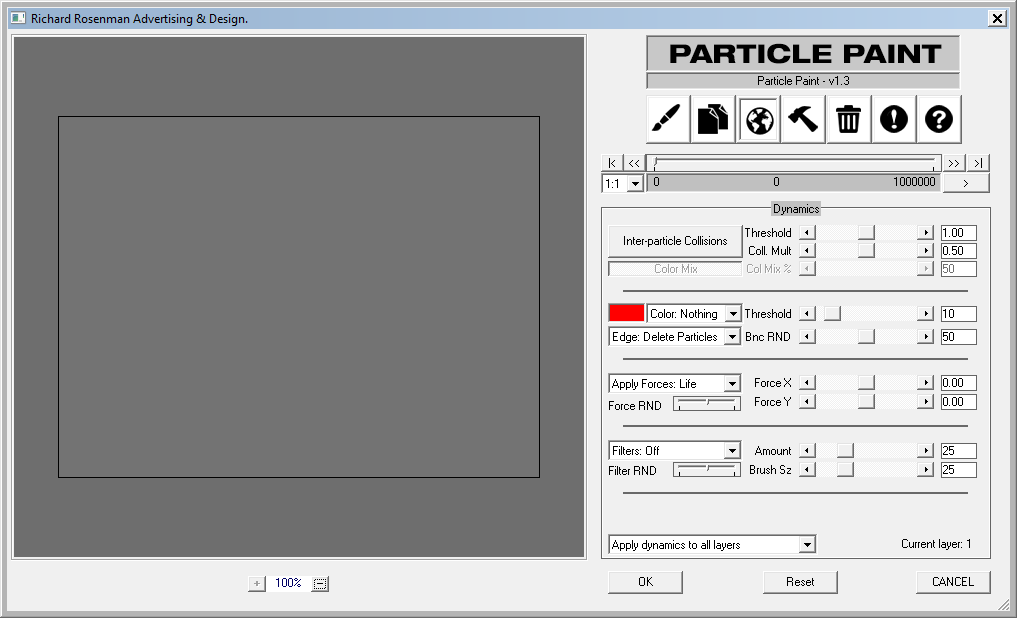
World
The world section allows you to apply special forces, filters and colliders for unique & dynamic effects. Inter-particle collisions enable realistic collision detection between particles, although performance is extremely poor. Using this feature, you can mix colors between colliding particles as well as control how much inertia is transferred between them.
Particle Paint allows you to specify image colors as particle colliders. By specifying a collision color along with a variance threshold, you can create areas that obstruct particles much like masking tape obstructs paint. You can also specify what happens to a particle upon contact with a collision color for interesting effects such as bouncing or spawning, as you can also do for preview window edges.
Forces can be compared to gravity and / or wind and can be applied to particles at birth, life, or both. Finally, filters act as unusual forces that can make your particles behave in unique ways. Filters are applied to particles using the brush and a falloff (Brush Size) so that you can interact with them in real-time. You can generate new particles while applying unique motion filters to them or simply apply the filters to existing particles by interacting with them using the brush.
Inter-Particle Collisions: This button enables particle collisions with one another. Unfortunately, this greatly decreases performance as further optimizations are required. Currently, velocity threshold checking as well as a spatial grid optimization is used to speed up collision detection.
Threshold: This slider limits the particle collision checking to only particles moving faster than the specified speed. This is an optimization feature since particles that have come to a stop (or have significantly slowed down), don’t necessarily require collision detection. Setting this slider to 0 will force collision detection between all particles regardless of speed.
Collision Multiplier: This slider controls how much force is transferred between colliding particles.
Color Mix: This button enables color mixing (color transfer) between colliding particles, according to the Color Mix % values. So if particle A is red, particle B is green and the color mixing percentage is set to 50%, particle A will accept 50% of particle B’s color and vice-versa, resulting in two yellow particles.
Color Mixing Percentage: This slider specifies, in percentage, how the color is mixed between two colliding particles.
Collision Color Picker: This color picker specifies a collision color. A collision color is a painted area on the canvas that Particle Paint can treat as a particle collider. If your working canvas has a loaded image, any pixels containing that color (with a threshold specified by the threshold slider) will act as colliders.
Collision Color (Nothing, Delete, Bounce, Stop, Spawn): This dropdown specifies what happens to a particle if it collides with a collision color. Nothing disregards the collider. Delete hides the particle. Bounce bounces the particle. Stop immediately stops the particle from moving. Spawn assigns the particle to spawn.
Threshold: This slider controls, in percentage, the collision color threshold. If the collision color is set to red (255,0,0), but the threshold is set to 10%, the acceptable collision color will range from (225,0,0) to (280,0,0). Although in this case, the color would be clamped to a maximum of (255,0,0).
Edge (Delete, Bounce, Stop, Spawn): This dropdown specifies what happens to a particle if it collides with the preview window edge. Delete hides the particle. Bounce bounces the particle. Stop immediately stops the particle from moving. Spawn assigns the particle to spawn.
Bounce RND: This slider controls the amount of randomness applied to particle bounces. Apply Forces (Birth, Life, Both): This dropdown specifies whether to apply forces (as dictated by the Force X & Force Y sliders) to particles at birth only, life only, or both.
Forces X: Controls the amount of horizontal force applied, both positive or negative.
Forces Y: Controls the amount of vertical force applied, both positive or negative.
Forces RND: This trackbar controls the amount of randomness applied to forces.
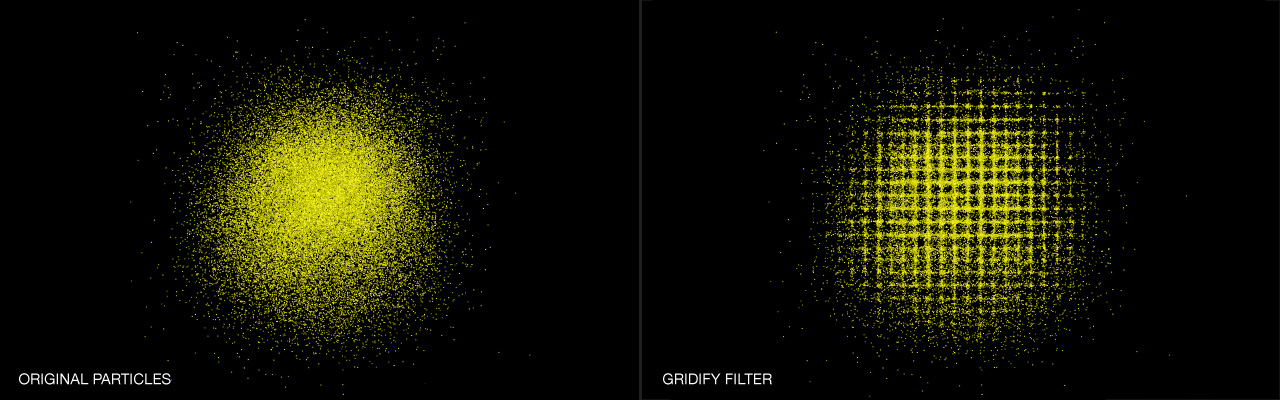
Filters (Off, Noise, Sine Noise, Gridify, Brush: Repel, Brush: Attract): This dropdown specifies which motion filters to apply. Noise applies a general motion noise to the particles. Sine noise applies a motion noise based on sine & cosine functions. Gridify arranges your particles into organized grid formations based on the value of the amount slider. Brush repel and attract allow you to paint using your brush as a magnet that pushes particles away from it, or attracts them to it.
Amount: This slider specifies the amount of motion filters to apply.
Brush Size: This slider specifies the brush size when painting using motion filters.
Filter RND: This slider controls the amount of randomness applied to motion filters.
Layer Application: This dropdown specifies whether to apply all forces & filters to the current layer only, or to all layers. Keep in mind that some effects such as “Inter-particle collisions” significantly slows down performance if applied to all layers as it checks for collisions through all enabled layers.
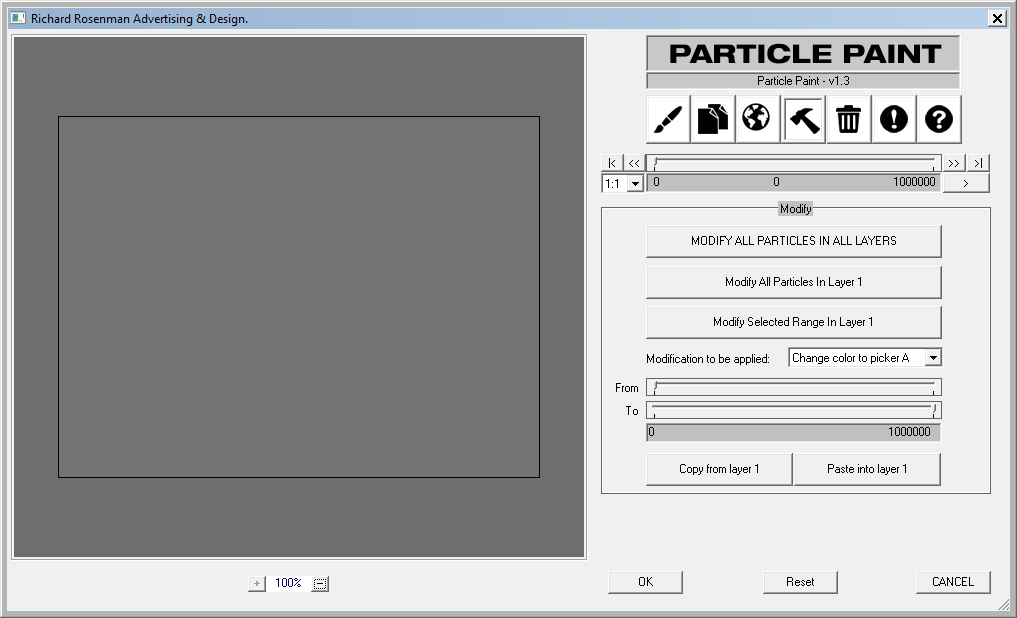
Tools
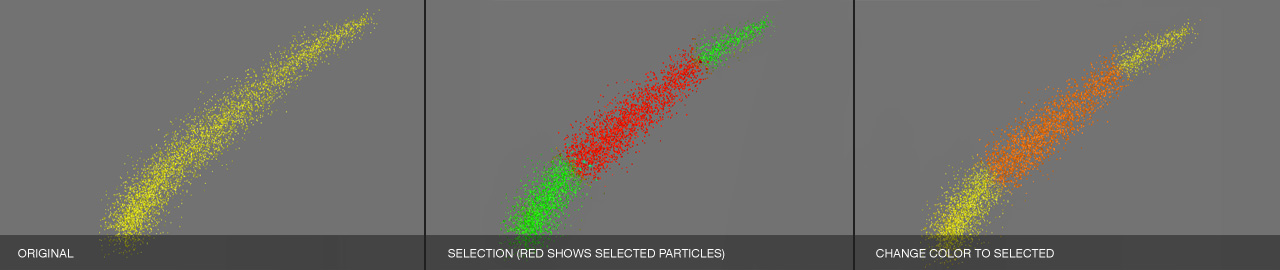
The tools section allows you to modify existing particles in any number of ways. You can change the color, opacity or compositing mode to a range of particles or all particles, in specific layer or all layers. Because particles are always alive, you can make as many modifications to them as you want. A powerful layer copy and paste function allows you to select any range of particles in the current layer and copy them to another.
Modify all particles in all layers: This button will apply the modifications specified to all particles in all layers.
Modify all particles in current layer: This button will apply the modifications specified to all particles in the current layer.
Modify selected range in current layer: This button will apply the modifications specified to the selected range of particles in the current layer.
Modification to be applied (Change Color To Picker A, Change Color To Picker B, Change Color To Picker A & B, Change Opacity To Current, Change Color Mode To Current): This specifies the modification to be performed on the particle(s).
Range Selectors: These trackbars specify the from and to ranges. The trackbars are dependent on the timeline magnify dropdown so setting a magnification level of 1:128, for instance, will provide finer control with the range selectors.
Copy & Paste: These buttons allow you to copy particles from the selected range & layer, to paste into the current timeline in another layer.
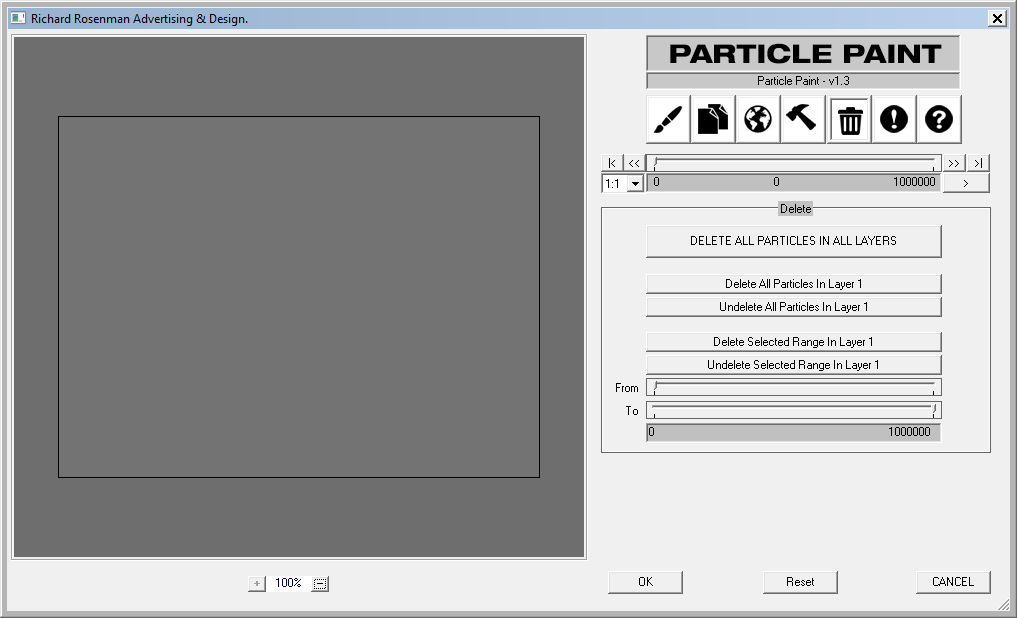
Trash
The trash section works exactly the same way the tools do and allows you to delete or undelete existing particles. You can delete or undelete a range of particles or all particles, in specific layer or all layers. Because particles are always alive, you can make as many modifications to them as you want. It’s important to remember that once a particle is created, you are not actually deleting or undeleting it, rather you are hiding or unhiding it. If you want to permanently delete the particle, scrub backwards in the timeline to before it was created and overwrite it by painting new particles.
Delete all particles in all layers: This button will delete (hide) all particles in all layers.
Delete all particles in current layer: This button will delete (hide) all particles in the current layer.
Undelete all particles in current layer: This button will undelete (unhide) particles in the current layer.
Delete selected range in current layer: This button will delete (hide) the selected range of particles in the current layer.
Undelete selected range in current layer: This button will undelete (unhide) the selected range of particles in the current layer.
Range Selectors: These trackbars specify the from and to ranges. The trackbars are dependent on the timeline magnify dropdown so setting a magnification level of 1:128, for instance, will provide finer control with the range selectors.
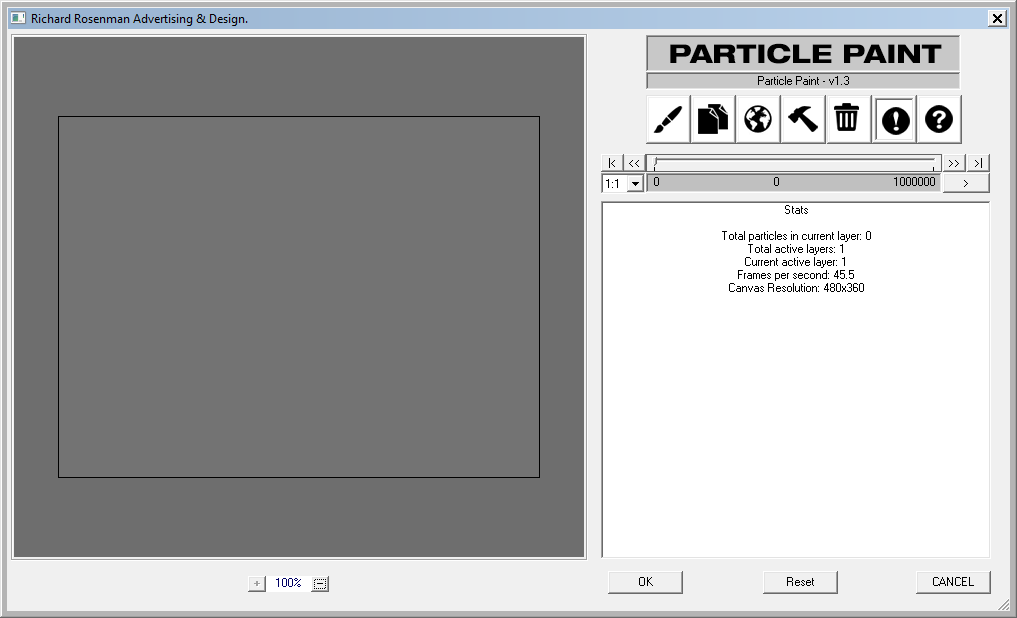
Stats
The stats section displays pertinent information regarding the number of particles created, the number of active layers used, the frames per second for the preview window and the canvas resolution. This section will be expanded in future releases. Painting while on the stats window will provide live feedback.
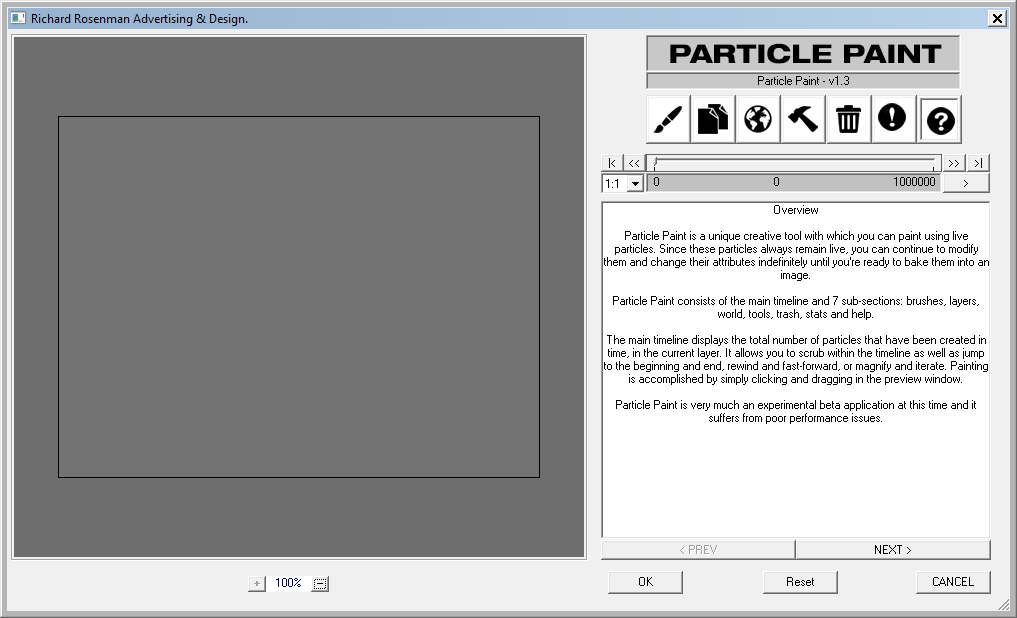
Help
The help section displays helpful information about Particle Paint. This section will be expanded in future releases.
Changelog
v1.0 – First release.
v1.2 – Fixed right-click mouse panning in preview window that produced crash.
v1.2 – Added image particalization.
v1.2 – Added color particalization.
v1.2 – Added background color.
v1.3 – 64 bit release.
v1.4 – Fixed incorrect logo display when using larger fonts or DPI.
v1.4 – Centered interface to screen on first launch.
If you have any feedback regarding Particle Paint, please feel free to let me know. Your feedback shows community interest which, in turn, encourages me to continue development. If you have any suggestions or features you’d like to see in future releases, please let me know. Finally, I encourage you to show me any work produced with Particle Paint as this lets me know what features are more often used and in what capacity.
Installing this software is easy and only requires three simple steps:
1 – Download the software by clicking on the Download Demo button located above on the software page. This will prompt you to save a .zip file on your computer.
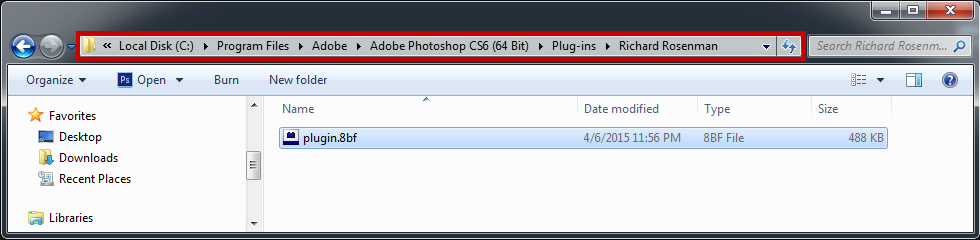
2 – Extract the contents from the .zip file and place the .8bf file into your host’s plugin folder. For instance, to install for Adobe Photoshop CS6, place the .8bf file into the location shown below. You can make a sub-folder to keep your plugins organized, such as the one below. Please make sure 64 bit plugins such as these are placed in the corresponding 64 bit Adobe Photoshop plugin folder.
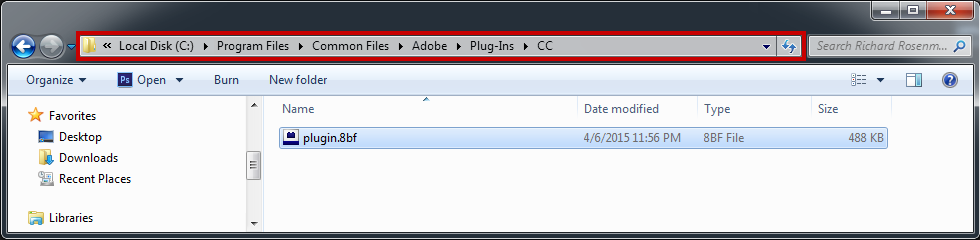
If you’re using Photoshop CC (eg. version 2013 – 2019 or later), your Photoshop plug-ins are stored in a folder shared between all Photoshop CC versions shown below.
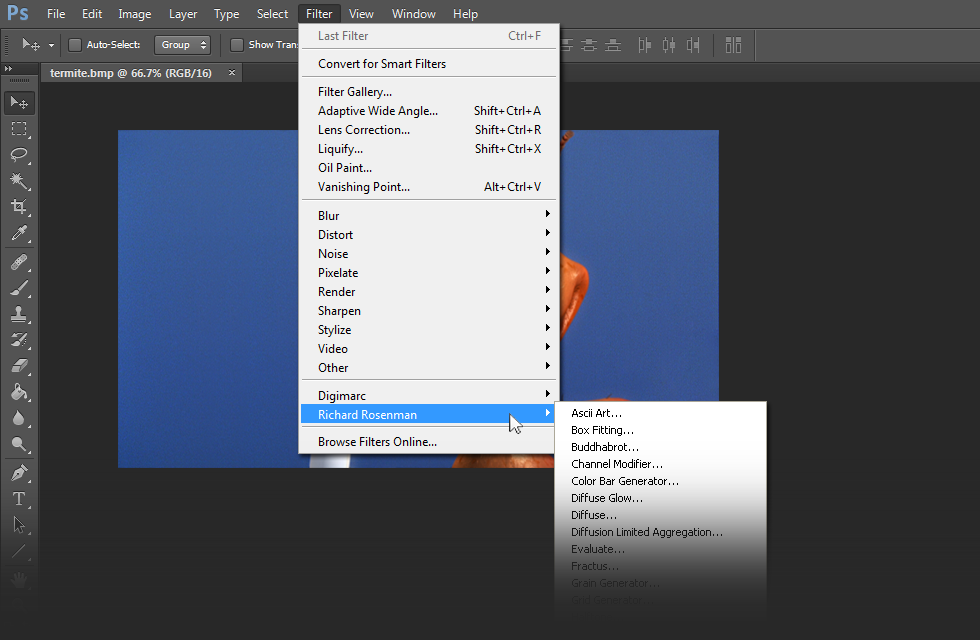
3 – Launch Adobe Photoshop, open an image and click on Filter > Richard Rosenman > Filter Name. If the filter is grayed out, it may not support your current image color depth.
If you have purchased a commercial license, please review the activation section.
This software is compatible with the following OS:
Windows 11 Home 64 bit
Windows 11 Pro 64 bit
Windows 11 Enterprise 64 bit
Windows 11 Education 64 bit
Windows 10 Home 64 bit
Windows 10 Pro 64 bit
Windows 10 Enterprise 64 bit
Windows 10 Education 64 bit
Windows 8 64 bit
Windows 8 Pro 64 bit
Windows 8 Enterprise 64 bit
Windows 7 Home Basic 64 bit
Windows 7 Home Premium 64 bit
Windows 7 Professional 64 bit
Windows 7 Enterprise 64 bit
Windows 7 Ultimate 64 bit
Windows Vista Home Premium 64 bit
Windows Vista Business 64 bit
Windows Vista Enterprise 64 bit
Windows Vista Ultimate 64 bit
Windows XP 64 bit
Windows XP Professional 64 bit
This software is compatible with the following hosts:
Any host capable of running Adobe Photoshop 64 bit compliant plugins
Adobe Photoshop (Version CS5 or higher, including CC) 64 bit
Adobe Photoshop Elements (Version 13 or higher, including CC) 64 bit
Adobe Illustrator (Version CS6 or higher, including CC) 64 bit
Computerinsel Photoline 64 (Version 16 or higher) 64 bit
CorelDRAW (Version X6 or higher) 64 bit
Corel Painter (Version 12.1 or higher) 64 bit
Corel Paint Shop Pro (Version X6 or higher) 64 bit